Crispy Skillet Chicken Thighs
- Time: Active 15 minutes, Passive 25 minutes, Total 40 minutes
- Flavor/Texture Hook: Shatter crisp skin with silky, herb infused meat
- Perfect for: High end weeknight dinners or meal prep
- Mastering These Skillet Chicken Thighs
- Why This Rendering Method Works
- Essential Components for Crispy Skin
- The Best Pans for Searing
- Step by Step Searing Guide
- Troubleshooting Your Skillet Chicken Thighs
- Flavor Variations to Try Next
- Storing and Reheating Your Leftovers
- Plating for a Restaurant Look
- Critical High in Sodium
- Recipe FAQs
- 📝 Recipe Card
Mastering These Skillet Chicken Thighs
The first time I tried making Skillet Chicken Thighs, my kitchen looked like a disaster zone. I thought the secret was a screaming hot pan and a lot of oil. All I got was a smoke alarm screaming at me and skin that looked burnt but felt like wet cardboard.
It was frustrating because I knew that bistro style crunch was possible; I just hadn't "cracked the code" yet.
I spent weeks acting like a flavor detective, testing different temperatures and pan types. I realized that the "aggressive sizzle" we’re often told to look for is actually the enemy of a truly crispy thigh. You don't want to shock the skin; you want to coax the fat out of it.
Now, this is my go to re creation of those high end restaurant mains. It's satisfyingly simple once you understand the physics of the render. We’re going to treat this chicken with the respect it deserves, using a cold start method that sounds counterintuitive but produces a skin texture that genuinely shatters when your fork hits it.
Why This Rendering Method Works
The Physics of the Render: Starting chicken in a cold skillet allows the subcutaneous fat to liquefy and escape slowly before the skin proteins set. This prevents the fat from being trapped, which is what usually causes that unctuous, rubbery texture in lesser recipes.
| Thickness | Internal Temp | Rest Time | Visual Cue |
|---|---|---|---|
| 2.5 cm | 74°C | 5 minutes | Juices run clear |
| 3.5 cm | 74°C | 7 minutes | Bone feels loose |
| 4.5 cm | 74°C | 10 minutes | Skin is mahogany gold |
Starting the meat in a cold pan might feel wrong, but as the metal heats up, you'll hear a gentle hiss that slowly builds. This gradual increase is the secret to a uniform golden crust that stays crispy long after it leaves the heat.
Essential Components for Crispy Skin
The alchemy of this dish lies in the interaction between the salt and the skin’s moisture levels. I’ve found that using 15g of Kosher salt is non negotiable for 8 bone in, skin on chicken thighs (about 1.5 kg).
The salt doesn't just season; it draws out surface moisture through osmosis, allowing for a quicker and more effective sear.
| Ingredient | Science Role | Pro Secret |
|---|---|---|
| Kosher Salt | Moisture Extractor | Apply 30 mins early to dry the skin surface |
| Smoked Paprika | Maillard Catalyst | The sugars in paprika accelerate browning and depth |
| Smashed Garlic | Aromatic Infusion | Smashed (not minced) cloves flavor the oil without burning |
For the best results, you'll want to use a high smoke point oil like 15ml of avocado oil or ghee. These fats can handle the heat transition without breaking down or tasting bitter. If you’re looking for a side dish to balance these rich flavors, this technique is quite different from the one used in our Chicken Broccoli Rice recipe, where moisture retention is the primary goal.
For the Chicken Prep
The base of our flavor profile starts with 5g of cracked black pepper, 5g of smoked paprika, 3g of garlic powder, and 2g of dried oregano. You need to pat those thighs bone dry with paper towels before the spices even touch them. If the skin is damp, you’re steaming, not searing.
For the Finishing Aromatics
Once the chicken is flipped, we introduce 30g of unsalted butter, 4 smashed garlic cloves, and 3 sprigs of fresh rosemary or thyme. This is where the magic happens the butter foams and carries the herbal oils into every crevice of the meat.
| Original Ingredient | Substitute | Why It Works |
|---|---|---|
| Smoked Paprika (5g) | Chipotle Powder (3g) | Adds a similar smokiness but with significantly more heat |
| Avocado Oil (15ml) | Ghee (15ml) | High smoke point and adds a rich, nutty depth |
| Rosemary (3 sprigs) | Sage (6 leaves) | Same woody aromatic profile; works well with poultry |
While I love the depth of rosemary, don't be afraid to experiment with what’s in your garden. Just avoid soft herbs like parsley or cilantro at this stage, as they’ll just turn into bitter black flecks in the hot fat.
The Best Pans for Searing
To truly master Skillet Chicken Thighs, the vessel is as important as the technique. You need something with high thermal mass the ability to hold onto heat even when cold meat is added.
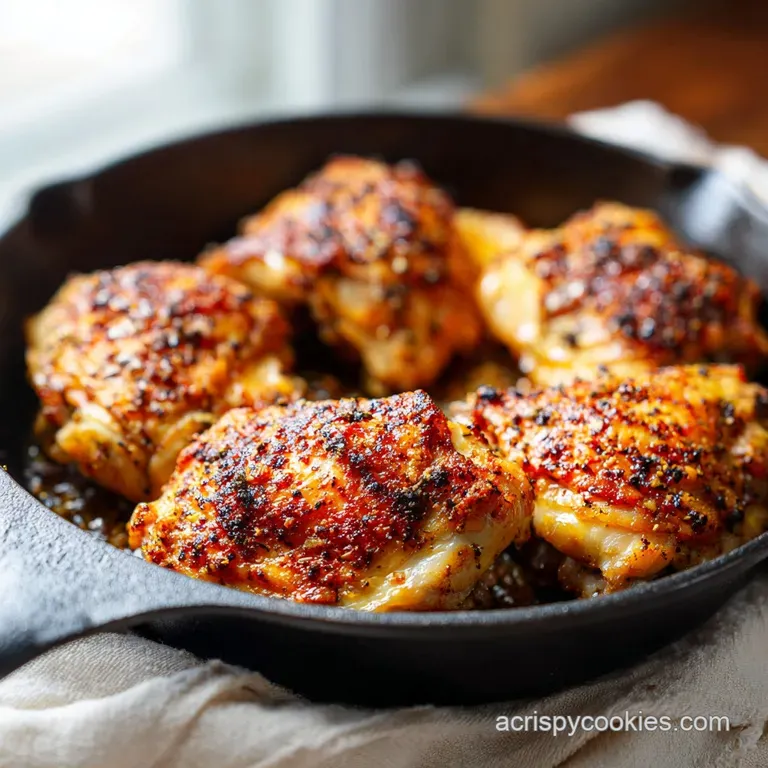
A cast iron skillet is the gold standard here, as it provides an even, radiating heat that mimics a professional kitchen’s flat top.
If you don't have cast iron, a heavy bottomed stainless steel pan is your next best bet. Avoid non stick pans for this specific recipe; they can't handle the dry heat required to render the fat properly, and you’ll never get that deep, mahogany crust.
The pan should be large enough to hold all 8 thighs without them overlapping, which prevents steam from getting trapped between the pieces.
step-by-step Searing Guide

- Dry the chicken. Use paper towels to remove every trace of moisture from 1.5 kg of chicken thighs. Note: This is the most important step for crunch.
- Season the skin. Rub 15g salt, 5g pepper, 5g paprika, 3g garlic powder, and 2g oregano into the skin and underside.
- Start cold. Place 15ml oil in a cold skillet, then lay the chicken skin side down.
- Apply medium heat. Turn the stove to medium and wait for the fat to start rendering. until you hear a steady, gentle crackle.
- Press the meat. Use a weight or another heavy pan to ensure the skin has full contact with the skillet surface.
- Render patiently. Cook for 15 minutes without moving the chicken until the skin is deep golden and rigid.
- Flip and baste. Turn the chicken over and add 30g butter, 4 smashed garlic cloves, and 3 sprigs of rosemary.
- Finish the cook. Suture the meat with the herb butter for 10 minutes until the aroma of toasted garlic fills the room.
- Check the temp. Use a meat thermometer to ensure the internal temperature has reached 74°C.
- Rest the meat. Move the chicken to a board for 5 minutes until the juices settle and the skin hardens.
Troubleshooting Your Skillet Chicken Thighs
One of the biggest hurdles I faced when learning this was "The Soggy Skin Trap." You think it's done because it's brown, but the moment you take it out, it goes soft. This usually happens because the heat was too high, searing the outside before the fat underneath had a chance to fully render out.
Why Your Skin is Rubber
If your skin isn't shattering, you likely didn't cook it skin side down long enough on a moderate heat. If you see the skin browning too fast, don't be afraid to nudge the heat down. We want a slow melt, not a fast burn.
| Problem | Root Cause | Solution |
|---|---|---|
| Skin sticks to pan | Pan wasn't clean or moved too early | Let it cook until it naturally releases from the metal |
| Too much smoke | Heat is too high or oil reached flash point | Lower the flame and use a high smoke point oil |
| Meat is dry | Overcooked past 74°C | Use a probe thermometer to pull at exactly 74°C |
Similar to the precision required in our Ground Chicken Meatballs recipe, monitoring the internal temperature is the only way to ensure the meat stays silky while the exterior stays crisp.
Common Mistakes Checklist
- ✓ Never crowd the pan; leave at least 2cm between thighs to avoid steaming.
- ✓ Don't use a lid; trapping the steam will ruin the skin's texture immediately.
- ✓ Always start with a cold pan if you want the absolute best fat rendering.
- ✓ Resist the urge to flip early; the chicken will "tell" you it's ready by releasing from the pan.
- ✓ Let the meat rest; cutting too soon causes the juices to purge, softening the crust from the inside.
Flavor Variations to Try Next
Once you've mastered the basic technique, you can start playing with the profile. If you're feeding a crowd, you can easily double this recipe. For scaling up, work in batches rather than cramming 16 thighs into one pan.
Use 1.5x the salt and spices for a double batch, as the flavors intensify significantly in the rendered fat.
- Skillet Chicken Thighs and Potatoes: After removing the chicken to rest, toss halved baby potatoes into the rendered fat. Roast them in the same skillet at 200°C until crispy.
- Skillet Chicken Thighs with Gravy: Whisk 15g of flour into the pan drippings, add 250ml of chicken stock, and simmer until velvety.
- Mediterranean Twist: Swap the smoked paprika for lemon zest and extra oregano. Finish with a handful of kalamata olives and feta cheese.
If you enjoy the flavor profile of this chicken, it pairs exceptionally well with a side of toasted orzo, much like the textures found in a French Onion Chicken recipe.
Storing and Reheating Your Leftovers
Leftover chicken will stay fresh in the fridge for up to 4 days if stored in an airtight container. However, be aware that the fridge is the enemy of crispy skin; the moisture will inevitably soften that crust you worked so hard on.
To freeze, wrap individual thighs in foil and store in a freezer bag for up to 3 months.
To reheat, avoid the microwave at all costs it will turn the skin into rubber. Instead, place the thighs on a wire rack over a baking sheet and heat in a 190°C oven for 10 minutes. This allows the hot air to circulate and re crisp the skin while gently warming the meat.
For a zero waste tip, don't you dare throw away those bones! Toss the leftover carcasses into a pot with some veggie scraps and water to make a rich, homemade stock. The smoky paprika and rosemary notes from the original cook will give the stock an incredible depth.
Plating for a Restaurant Look
Presentation is about contrast. To make these thighs look as good as they taste, use the "Board Dressing" technique. Chop some fresh parsley and a little extra garlic on your cutting board, then rest the cooked chicken right on top of it.
The heat from the meat will bloom the aromatics, creating a flavorful "dressing" on the bottom of each piece.
Use a white or dark slate plate to make the mahogany color of the skin pop. Avoid pouring gravy directly over the top of the skin; instead, pool it on the bottom of the plate and nestle the chicken on top. This keeps the skin high and dry, ensuring that every bite maintains that signature shatter crisp texture.
Finish with a final sprinkle of flaky sea salt and a sprig of fresh herbs for a touch of vibrant green.

Critical High in Sodium
1475 mg mg of sodium per serving (64% of daily value)
The American Heart Association recommends limiting sodium intake to about 2,300mg per day.
Tips to Reduce Sodium in Your Chicken Recipe
-
Reduce Salt by Half-25%
The primary source of sodium is the Kosher salt. Reduce the amount of Kosher salt from 15g (1 tbsp) to 7.5g (1/2 tbsp). Taste and adjust after cooking. This will significantly lower the sodium content.
-
Skip the Smoked Paprika-10%
Smoked paprika can sometimes contain added salt. Removing this ingredient will slightly reduce the sodium content without sacrificing flavor.
-
Unsalted Butter Only-5%
Make sure you are using unsalted butter, not salted butter, as specified in the recipe, to avoid unnecessary sodium addition.
-
Flavor with Herbs
Enhance the flavor profile with a wider variety of fresh or dried herbs and spices. Consider adding onion powder, different types of chili flakes (not chili powder blends that contain salt), or more fresh herbs like parsley or sage.
Recipe FAQs
How long do you cook chicken thighs on a skillet?
About 25 minutes total, plus resting time. Cook skin side down over medium heat for 15 minutes until the skin renders and becomes deeply golden. Flip and baste with butter for another 10 minutes until the internal temperature reaches 74°C.
Is it better to bake or skillet chicken thighs?
Skillet searing is better for the skin, baking is better for uniform internal cooking. Searing in a skillet renders the fat exceptionally well for shatter crisp skin, especially using a cold pan start. Baking is often used to finish the cook gently after the initial sear.
How to pan fry chicken thighs properly?
Place the seasoned, bone-in thighs skin side down in a cold skillet with oil. Turn the heat to medium and allow the fat to render slowly for 15 minutes until the skin is rigid and mahogany brown. Only flip once the skin naturally releases from the pan surface.
What seasoning is good on chicken thighs?
A simple mix of Kosher salt, black pepper, garlic powder, and smoked paprika works best. The salt is crucial for drawing out surface moisture to aid crisping, while paprika adds depth to the Maillard reaction. This profile complements rich flavors, similar to the savory base we use in the Marry Me Chicken recipe.
Should I use bone-in or boneless thighs for skillet cooking?
Bone-in, skin-on thighs are strongly recommended for the best results. The bone helps insulate the meat from the intense pan heat, preventing the interior from overcooking before the thick skin has time to render completely.
What internal temperature should skillet chicken thighs reach?
The USDA safe minimum is 74°C (165°F), but pull them at 72°C and let them rest. Resting is crucial; the carryover cooking will push them to the safe temperature while allowing the muscle fibers to relax and retain juices, keeping the meat tender.
Can I make this recipe using a stainless steel pan instead of cast iron?
Yes, but you must use a heavy bottomed stainless steel pan. Cast iron has superior thermal mass, but heavy stainless steel will also hold the heat necessary for a consistent render. Avoid thin pans, as they create hot spots that burn the skin before the fat melts out.
Crispy Skillet Chicken Thighs

Ingredients:
Instructions:
Nutrition Facts:
| Calories | 548 kcal |
|---|---|
| Protein | 40 g |
| Fat | 42 g |
| Carbs | 2 g |
| Fiber | 0.5 g |
| Sugar | 0.2 g |
| Sodium | 1475 mg |
