Crispy Sticky Tofu: Golden and Glazed
- Time: Active 15 minutes, Passive 15 minutes, Total 30 minutes
- Flavor/Texture Hook: Shattering cornstarch crust with a velvety, sticky maple soy glaze
- Perfect for: High protein weeknight dinners or impressive vegan meal prep
- Achieving Perfection with This Crispy Sticky Tofu
- Why This Works
- Component Analysis for Maximum Flavor
- The Tools for Shattering Results
- Gathering Your Essentials
- Step-by-Step for Sauce Clinging Crunch
- Solving Common Soggy Tofu Problems
- Smart Substitutions and Recipe Scaling
- Storing Leftovers Without Losing Texture
- Plating for Maximum Visual Impact
- Very High in Sodium
- Recipe FAQs
- 📝 Recipe Card
Achieving Perfection with This Crispy Sticky Tofu
Forget everything you’ve heard about tofu being a bland, spongy block of sadness that only exists as a meat substitute. For the longest time, I thought getting that "shattering" crunch required gallons of oil and a professional kitchen setup.
I spent way too many nights staring at soggy, grey cubes in my pan, wondering why they wouldn't crisp up like the ones from my favorite takeout spot. It turns out, most of us are treating tofu like meat, but it’s actually more like a sponge that needs careful management of moisture and surface area.
The secret isn't more oil; it's physics. When you tear the tofu instead of slicing it into perfect cubes, you create a jagged landscape of nooks and crannies that catch the cornstarch and the sauce.
I remember the first time I ditched the knife and just started ripping the block apart the difference was night and day. That extra surface area means more "crunch zones," and when that hitting the shimmering oil, the sound is like tiny firecrackers.
It's incredibly satisfying to hear that sizzle transform into a hard, golden shell.
We’re going to crack the code on that glossy, sticky glaze too. It shouldn't be a watery pool at the bottom of the bowl. We want a sauce that undergoes a "flash reduction," turning into a thick, concentrated syrup that grips the tofu so tightly it becomes part of the crust.
This recipe isn't just about eating; it's about that specific contrast between the velvet smooth sauce and the loud, audible crunch of the first bite. Let’s get into the mechanics of how we make this happen without making a mess of your kitchen.
Why This Works
- Surface Dehydration: Pressing the tofu for 15 minutes removes the internal water that usually turns into steam, which is the number one enemy of a crispy exterior.
- Starch Gelatinization: The cornstarch forms a moisture resistant barrier that fries instantly upon contact with the hot oil, creating a rigid, airy lattice.
- Flash Reduction: Including cornstarch in the sauce allows it to thicken in under 60 seconds, preventing the tofu from sitting in liquid long enough to lose its crunch.
- Jagged Edges: Tearing the tofu creates 30% more surface area than clean knife cuts, providing more "hooks" for the starch and sauce to cling to.
| Method | Time | Texture | Best For |
|---|---|---|---|
| Stovetop Skillet | 15 minutes | Maximum crunch, charred edges | Quick weeknight dinners |
| oven-roasted | 25 minutes | Uniformly firm, less oily | Large batch meal prep |
| Air Fryer | 12 minutes | Extremely dry and airy crust | Maximum "shatter" effect |
Choosing the right method depends on how much you value that specific "sear" flavor. The stovetop method, which we’re focusing on here, provides those little browned bits of garlic and ginger that get trapped in the glaze, adding a layer of complexity you just can't get in the oven.
It's the difference between "cooked" and "caramelized," and in the world of high impact flavors, that sear is everything.
Component Analysis for Maximum Flavor
| Ingredient | Science Role | Pro Secret |
|---|---|---|
| Extra Firm Tofu | Protein structure | Freeze and thaw it first for a "meaty" layered texture. |
| Cornstarch | Moisture absorber | Toss until the tofu looks chalky and bone dry; no damp spots allowed. |
| Maple Syrup | Sugar for browning | Use Grade A Dark for more mineral depth and faster caramelization. |
| Rice Vinegar | Acidic balance | It cuts through the salt of the soy sauce to brighten the heavy glaze. |
Selecting your tofu is the most critical decision you'll make before you even turn on the stove. I always reach for the "extra firm" variety in the water filled tubs. Silken or soft tofu will simply disintegrate the moment you try to toss it in the starch.
If you can find "super firm" (the vacuum sealed kind), you can actually skip the 15 minute pressing step entirely, which is a massive win for those "I need to eat in ten minutes" kind of nights.
The Tools for Shattering Results
You don't need a lab full of gadgets, but a heavy bottomed skillet is non negotiable here. I prefer a well seasoned carbon steel pan or a large non stick skillet. If you use a thin stainless steel pan, the tofu tends to stick and tear, leaving that beautiful crispy skin glued to the bottom of the pan instead of on your dinner.
You want something that holds heat consistently so the oil doesn't drop in temperature when you add the cold tofu.
A set of silicone tipped tongs is also your best friend here. Unlike a spatula, which can knock the starch coating off, tongs allow you to gently flip each piece to ensure every side gets its time against the heat. You’re looking for a deep, golden brown hue on at least three or four sides of each piece. This isn't just for looks; that color represents the Maillard reaction, which is where all that savory, complex flavor lives. Much like achieving the perfect crust on Homemade Roast Potatoes, the goal is a rigid exterior that can withstand being bathed in sauce.
Gathering Your Essentials
- 16 oz extra firm tofu: Must be pressed and cubed (or torn!). Why this? Provides the structural integrity needed for over high heat searing.
- 3 tbsp cornstarch: For the initial coating. Why this? Creates the characteristic "shattering" crust better than flour.
- 0.5 tsp fine sea salt: To season the crust.
- 0.5 tsp garlic powder: Adds savory depth to the starch layer.
- 2 tbsp neutral oil: Use avocado or grapeseed oil. Why this? High smoke points prevent the oil from burning during the 10 minute sear.
- 0.25 cup low sodium soy sauce: The salty base. Why this? Low sodium allows you to reduce the sauce without it becoming a salt bomb.
- 2 tbsp maple syrup: For sweetness and stickiness.
- 1 tbsp rice vinegar: For a necessary tangy punch.
- 1 tsp fresh ginger: Grated finely for aroma.
- 2 cloves garlic: Minced into a paste.
- 1 tsp toasted sesame oil: For that signature nutty finish.
- 1 tsp sriracha: Just enough for a back of-the throat hum.
- 1 tsp cornstarch (for sauce): To ensure the glaze thickens instantly.
Substitute Options
| Original Ingredient | Substitute | Why It Works |
|---|---|---|
| Maple Syrup | Brown Sugar | Provides a similar molasses like depth and high sugar content for sticking. |
| Rice Vinegar | Apple Cider Vinegar | Similar acidity level, though slightly fruitier. |
| Soy Sauce | Tamari | Keeps the dish 100% gluten-free without losing the umami punch. |
If you're looking for a bit more heat, you can swap the sriracha for a spoonful of Gochujang. Just keep in mind that Gochujang is much thicker and saltier, so you might want to add a splash of water to the sauce mixture to keep it pourable. The goal is a sauce that looks like thin maple syrup before it hits the pan, then transforms into a thick glaze within seconds of heat exposure. This is a similar concept to the spicy, sticky coatings used in a Buffalo Chicken Pizza recipe, where the sauce needs to cling rather than soak.
step-by-step for Sauce Clinging Crunch

- Drain and press the tofu. Wrap the block in a clean lint free towel and place a heavy cast iron skillet or a couple of cookbooks on top for 15 minutes.
- Tear the tofu into pieces. Instead of cutting, use your hands to rip the tofu into bite sized, irregular chunks until you see jagged, rough edges.
- Prepare the dredging station. In a large bowl, whisk 3 tablespoons of cornstarch, salt, and garlic powder together.
- Coat the tofu thoroughly. Add the pieces to the bowl and toss vigorously until every surface is covered in a dry, chalky white powder.
- Mix the sticky glaze. Whisk the soy sauce, maple syrup, vinegar, ginger, minced garlic, sesame oil, sriracha, and the 1 teaspoon of cornstarch in a small bowl.
- Heat the skillet. Add 2 tablespoons of oil to your pan over medium high heat until the oil is shimmering and just starting to faintly smoke.
- Sear the tofu. Place the pieces in a single layer and cook for 8-10 minutes, turning every 2 minutes until all sides are deep golden brown and feel hard to the touch.
- Thicken the sauce. Lower the heat slightly and pour the glaze over the tofu, stirring constantly for 1-2 minutes until the liquid bubbles and turns into a glossy, thick syrup.
- Finish and serve. Remove from heat immediately once the sauce has shrink wrapped around the tofu to prevent the sugars from burning.
Chef's Tip: Don't crowd the pan! If the tofu pieces are touching, they will steam each other and turn soft. Cook in two batches if your skillet isn't large enough to keep at least half an inch of space between the pieces.
Solving Common Soggy Tofu Problems
Why Your Tofu is Soft
The most common culprit is trapped moisture. If you don't press the tofu long enough, or if you use "firm" instead of "extra firm," the water inside will turn to steam. This steam pushes outward, turning your carefully applied cornstarch into a gummy paste rather than a crispy shell.
Always ensure the surface of the tofu feels dry to the touch before you even think about adding the cornstarch.
The Sauce is Clumpy
If your sauce turns into a gelatinous glob the second it hits the pan, the heat was likely too high or you didn't whisk the cornstarch slurry well enough. Cornstarch activates at around 144°F (62°C) and thickens rapidly.
If the pan is screaming hot, the starch in the sauce will cook before it has a chance to distribute evenly. Always give the sauce a final whisk right before pouring it in to re incorporate the starch that settled at the bottom.
| Problem | Root Cause | Solution |
|---|---|---|
| Coating falls off | Tofu was too wet | Press longer and pat dry with paper towels before dredging. |
| Sauce is too salty | High sodium soy sauce | Use low sodium soy or dilute with 1 tbsp of water/mirin. |
| Tofu sticks to pan | Pan wasn't hot enough | Wait for the oil to shimmer before adding the first piece of tofu. |
Common Mistakes Checklist:
- ✓ Never skip the pressing step; 15 minutes is the absolute minimum for texture.
- ✓ Use a neutral oil with a high smoke point; olive oil will burn and taste bitter.
- ✓ Don't move the tofu for the first 3 minutes; let that initial crust form undisturbed.
- ✓ Whisk the sauce slurry immediately before pouring to prevent "starch sludge" at the bottom.
- ✓ Remove the pan from heat the moment the sauce is glossy to avoid burning the sugars.
Smart Substitutions and Recipe Scaling
Scaling this recipe up for a crowd requires a bit of strategy. If you're doubling the batch, don't just throw 2 lbs of tofu into one pan. You'll end up with a pile of steamed soy. Instead, sear the tofu in batches and set the crispy pieces aside on a wire rack.
Once all the tofu is crispy, wipe the pan, add all the tofu back in, and then pour in the doubled sauce. This ensures every piece gets that "flash reduction" treatment without losing its structural integrity.
For a "Firecracker" variation, triple the sriracha and add a teaspoon of red pepper flakes to the starch coating. If you want an "Orange Tofu" vibe, replace the rice vinegar with fresh orange juice and add a teaspoon of orange zest to the sauce.
The beauty of this template is that the ratio of starch to liquid remains the same, so you can play with the flavor profile as much as you like.
| Servings | Tofu Amount | Pan Size | Cook Time |
|---|---|---|---|
| 2 People | 8 oz | 10 inch skillet | 15 minutes |
| 4 People | 16 oz | 12 inch skillet | 15 minutes |
| 8 People | 32 oz | Two 12 inch pans | 25 minutes (batches) |
When reducing the recipe for a solo dinner, don't forget to scale down the oil. Using too much oil for a small amount of tofu will lead to greasy results. Also, when using half an egg for other recipes, it's easy, but for tofu, just ensure the starch to tofu ratio stays consistent so the "chalky" layer is maintained.
Storing Leftovers Without Losing Texture
Let’s be honest: crispy tofu is at its absolute peak about 45 seconds after it leaves the pan. However, if you do have leftovers, you can keep them in an airtight container in the fridge for up to 3 days.
The sauce will continue to soak into the crust, so it won't be "shattering" the next day, but the flavor actually deepens as the ginger and garlic meld.
To reheat, avoid the microwave at all costs it will turn your tofu into a rubbery mess. Instead, toss the cold tofu back into a dry non stick skillet over medium heat for 4-5 minutes. The heat will wake up the sugars in the glaze and help re crisp the edges.
If you're feeling adventurous, you can even air fry the leftovers at 375°F (190°C) for 3 minutes to bring back some of that lost crunch.
For a zero waste tip, don't throw away the leftover starch in the dredging bowl. If you have some broccoli or snap peas, toss them in the remaining starch and quick fry them after the tofu is done. They'll pick up those crispy bits and leftover seasoning, making for a perfect side dish.
Also, the liquid from the tofu package (aquafaba) can be used as a thickener for soups or even whipped into a vegan mousse if you're feeling ambitious.
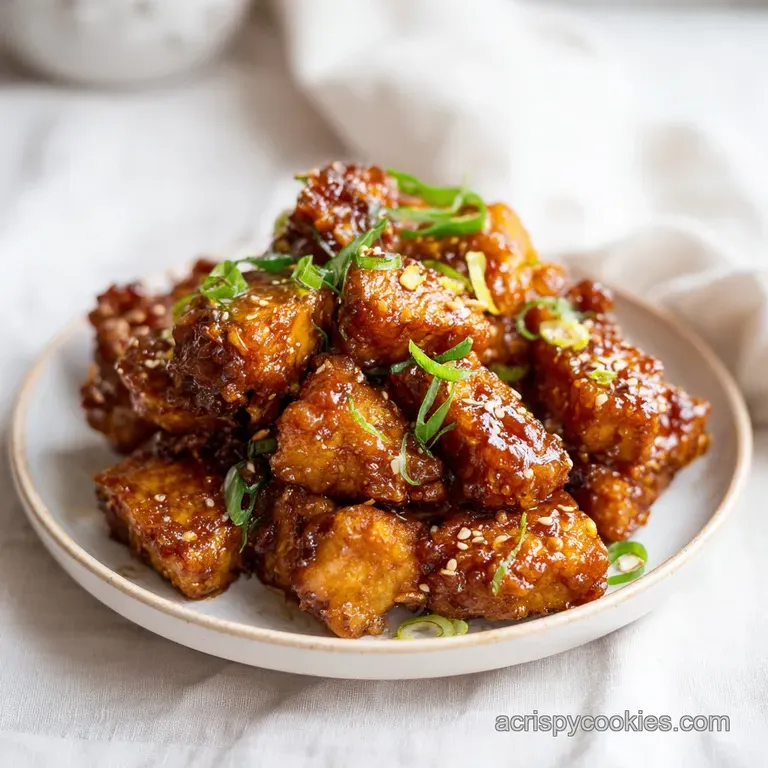
Plating for Maximum Visual Impact
This dish is all about the gloss. To make it look as good as it tastes, serve it over a bed of fluffy jasmine rice or glass noodles. The stark white of the rice makes the deep amber of the glaze pop. I like to finish with a heavy sprinkle of toasted sesame seeds and a handful of sliced scallions cut on a sharp bias.
The green of the onions adds a fresh, bright contrast to the rich, dark sauce.
If you want to go full restaurant style, add some thinly sliced red radishes or a ribboned cucumber salad on the side. The cool, crisp vegetables act as a palate cleanser between the bold, sticky bites of tofu.
Remember, we eat with our eyes first, and that contrast between the sticky, dark tofu and bright, fresh garnishes is what makes people ask for the recipe before they've even taken a bite.
It's the ultimate "flavor detective" move taking humble ingredients and presenting them with the confidence of a high end bistro.

Very High in Sodium
824 mg of sodium (36% of daily value)
The American Heart Association recommends limiting sodium intake to no more than 2,300mg per day, with an ideal limit of 1,500mg for most adults.
Tips to Reduce Sodium
-
Swap Soy Sauce-25%
Replace the 0.25 cup of low-sodium soy sauce with an equal amount of coconut aminos or a specialized sodium free soy sauce alternative. This is the largest contributor to sodium.
-
Reduce Added Salt-10%
Eliminate the 0.5 tsp of fine sea salt entirely. The soy sauce (even low-sodium) and other ingredients will still provide ample flavor.
-
Control Sriracha-5%
Reduce the 1 tsp of sriracha to 0.5 tsp or omit it if you prefer less heat and sodium. Some sriracha varieties can be high in sodium.
-
Boost Aromatics
Increase the fresh ginger and minced garlic, and consider adding other fresh aromatics like chopped scallions or cilantro. This adds flavor without sodium.
Recipe FAQs
How to ensure the tofu gets a shattering crust?
Press the tofu for 15 minutes before tearing it into jagged, irregular chunks. Those rough edges created by tearing provide extra surface area for the cornstarch to grip, which creates that signature crunch.
Is it true I should cut my tofu with a knife for even pieces?
No, this is a common misconception. Tearing the tofu into bite sized pieces by hand creates more uneven, jagged surfaces than a knife, which results in a crunchier final texture.
How to prevent the tofu from sticking to the pan?
Heat 2 tablespoons of oil over medium high heat until it is shimmering before adding the tofu. If you enjoyed mastering this high heat searing technique, you will find it equally useful for creating a perfect crust on our smoky pan-seared chicken.
How to reheat leftovers without losing the texture?
Toss the cold tofu into a dry non-stick skillet over medium heat for 4-5 minutes. Never use the microwave, as it will cause the tofu to become rubbery and destroy the remaining crispness.
Can I prepare the glaze in advance?
Yes, you can whisk the soy sauce, maple syrup, rice vinegar, ginger, garlic, sesame oil, sriracha, and cornstarch slurry together ahead of time. Keep it in a sealed container and give it a quick whisk again before adding it to the skillet, as the cornstarch tends to settle at the bottom.
What should I do if the sauce is not thickening?
Continue stirring the sauce constantly for the full 1-2 minutes while the pan is on the heat. The cornstarch in the sauce slurry requires that short window of heat to hydrate and thicken into a sticky glaze that clings to the tofu.
How long can I store this in the refrigerator?
Store your leftovers in an airtight container for up to 3 days. While the crust will soften slightly as it absorbs the sauce, the flavors from the ginger and garlic actually intensify during that time.
Crispy Sticky Tofu

Ingredients:
Instructions:
Nutrition Facts:
| Calories | 248 kcal |
|---|---|
| Protein | 12.4 g |
| Fat | 13.8 g |
| Carbs | 18.6 g |
| Fiber | 1.2 g |
| Sugar | 6.9 g |
| Sodium | 824 mg |
