Best Swedish Princess & Disney Princess Cake
This Swedish Princess Cake (Prinsesstårta) & Disney Princess Cake guide is fun and easy! Discover their flavors, designs, and how to make them.
Ingredients
- Making this cake requires a few key ingredients. Whether you're making a Swedish Princess Cake or a Disney Princess Cake here’s what you’ll need:
For Swedish Princess Cake
- Sponge Cake – A light and fluffy base made with eggs sugar, flour, and butter.
- Pastry Cream – A rich and creamy custard filling made with milk sugar, egg yolks, and cornstarch.
- Whipped Cream – Soft and airy cream used for layering and covering the cake.
- Raspberry Jam – Adds a fruity and slightly tart flavor between layers.
- Marzipan – A sweet almond paste used to cover the cake traditionally colored light green.
- Powdered Sugar – For dusting on top to add a beautiful finish.
For Disney Princess Cake
- Cake Base – Can be vanilla chocolate, or funfetti, depending on the theme.
- Buttercream or Fondant – Used to frost and decorate the cake.
- Food Coloring – Helps create vibrant princess-themed colors.
- Princess Cake Toppers – Small plastic or edible decorations featuring Disney princesses.
- Edible Glitter & Pearls – Adds sparkle and a magical touch.
- With these ingredients you can make a beautiful and delicious Princess Cake perfect for any celebration!
Instructions
- Creating a Princess Cake takes time and patience, but the end result is stunning. Follow these steps carefully to achieve the perfect cake.
Baking the Cake Layers
- A soft and fluffy sponge cake is the foundation of a great Princess Cake.
- Preheat the Oven – Set your oven to 350°F (175°C). Grease and line two round cake pans with parchment paper.
- Whisk Eggs and Sugar – In a large mixing bowl, beat the eggs and sugar with an electric mixer on high speed until the mixture turns pale and fluffy (about 5 minutes).
- Sift Dry Ingredients – In a separate bowl, whisk together flour and baking powder. Gently fold this into the egg mixture using a spatula.
- Add Butter and Vanilla – Carefully pour in the melted butter and vanilla extract, folding everything together until smooth.
- Bake the Cake – Divide the batter evenly between the two pans. Bake for 25-30 minutes or until a toothpick inserted in the center comes out clean.
- Cool Completely – Let the cakes cool in the pans for 10 minutes, then transfer them to a wire rack to cool completely before assembling.
Preparing the Pastry Cream (Custard Filling)
- This creamy filling adds a rich and delicious layer to the cake.
- Heat the Milk – In a saucepan over medium heat, warm the milk until it starts to steam. Do not let it boil.
- Mix Sugar, Cornstarch, and Egg Yolks – In a separate bowl, whisk together sugar, cornstarch, and egg yolks until smooth.
- Temper the Eggs – Slowly pour about ½ cup of warm milk into the egg mixture while whisking continuously. This prevents the eggs from scrambling.
- Cook the Custard – Pour the egg mixture back into the saucepan with the rest of the milk. Stir constantly over medium heat until the mixture thickens (about 5 minutes).
- Add Vanilla and Butter – Remove from heat, stir in vanilla extract and butter until smooth.
- Cool Completely – Transfer to a bowl, cover with plastic wrap (pressing it against the custard to prevent a skin from forming), and refrigerate until chilled.
Whipping the Cream
- Fluffy whipped cream makes the cake light and airy.
- Chill Your Tools – Place a mixing bowl and whisk in the fridge for 15 minutes before starting.
- Whip the Cream – Pour the cold heavy cream into the bowl and beat on medium speed until it starts to thicken.
- Add Sugar and Vanilla – Add powdered sugar and vanilla extract, then continue beating until stiff peaks form.
- Store in the Fridge – Keep whipped cream refrigerated until ready to use.
Assembling the Cake
- Now it’s time to put everything together!
Steps for Layering:
- Slice the Cake Layers – If your cakes have domed tops, level them with a serrated knife. Then, carefully slice each cake layer in half horizontally, creating 3-4 thin layers.
- Spread Raspberry Jam – Place the first cake layer on a serving plate. Spread a thin layer of raspberry jam on top.
- Add Pastry Cream – Spoon a generous amount of pastry cream over the jam and spread evenly.
- Repeat the Layers – Place another cake layer on top and repeat the process with more jam and pastry cream.
- Shape the Cake – Place the final cake layer on top. Use a spatula to spread a thick layer of whipped cream over the entire cake, shaping it into a dome.
- Chill the Cake – Refrigerate for at least 30 minutes to let the layers set.
Covering with Marzipan or Fondant
- The smooth marzipan or fondant layer gives the cake its signature look.
- Color the Marzipan – Knead a few drops of green food coloring into the marzipan until the color is evenly distributed.
- Roll it Out – Dust a clean surface with powdered sugar. Roll the marzipan into a large, thin circle (about ¼-inch thick).
- Cover the Cake – Carefully lift the marzipan and drape it over the cake. Gently press it down to smooth out any wrinkles.
- Trim the Edges – Use a sharp knife to cut off any excess marzipan around the bottom.
- For a Disney Princess Cake, you can use colored fondant instead of marzipan to match different princess themes.
Final Decoration
- Now, it’s time to add the finishing touches!
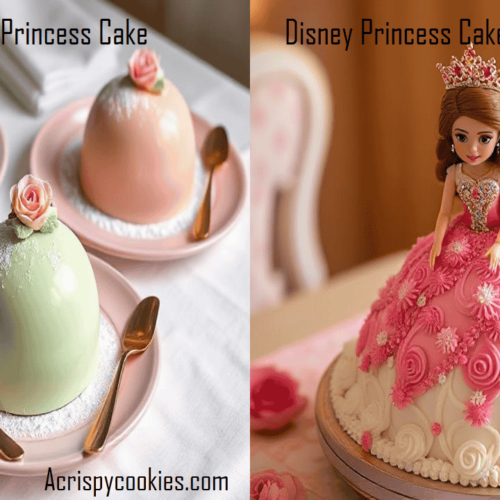
For a Swedish Princess Cake:
- Marzipan Rose – Roll pink marzipan into a small rose and place it on top.
- Powdered Sugar Dusting – Lightly dust the cake with powdered sugar for a classic look.
For a Disney Princess Cake:
- Princess Cake Toppers – Place small plastic or edible princess figurines on the cake.
- Edible Glitter & Pearls – Add sparkles for a magical effect.
- Buttercream Piping – Use colored frosting to decorate the edges or create a princess dress design.
Let the Cake Set & Serve
- Chill the Cake – Refrigerate for at least 1 hour before serving. This helps the layers firm up.
- Slice and enjoy – Use a sharp knife to cut clean slices and serve!