Authentic Fry Bread Recipe
- Time: Active 15 minutes, Passive 40 minutes, Total 55 minutes
- Flavor/Texture Hook: Airy, chewy crumb with a golden, bubbly crust
- Perfect for: Cultural celebrations, weeknight "Indian Tacos," or a heavy hitting dessert
- Master the Golden Crunch of This Authentic Fry Bread Recipe
- The Physics of the Golden Bubble
- Component Analysis for Perfect Dough
- Necessary Components for Your Homemade Fry Bread Recipe
- Essential Kitchen Tools for Frying Success
- Step by Step Guide to Frying Golden Discs
- Fixing Common Frying Flubs and Texture Issues
- Easy Scaling for Groups or Couples
- Sweet and Savory Ways to Top Your Bread
- Kitchen Myths Debunked
- Keeping Your Fried Bread Fresh and Crisp
- The Best Main Dishes to Serve Alongside
- Recipe FAQs
- 📝 Recipe Card
Master the Golden Crunch of This Authentic Fry Bread Recipe
The first time I saw a real fry bread recipe in action, I was standing in a dusty kitchen in the Southwest, watching a grandmother move with a speed that defied her age. There was no measuring cup in sight - just a feel for the dough that I spent years trying to replicate.
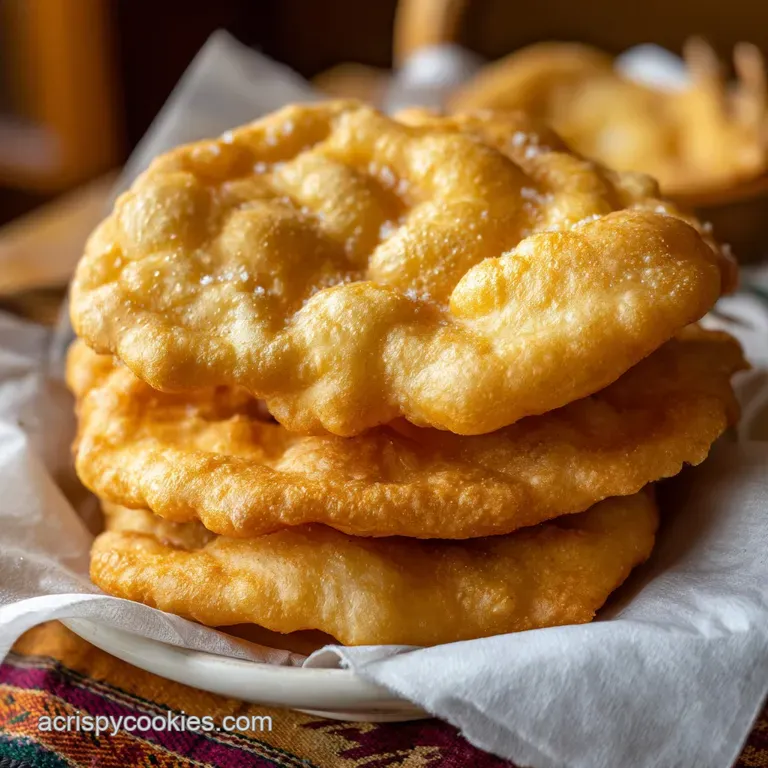
The oil hit the pan with a specific, rhythmic sizzle, and within seconds, a flat disc of dough transformed into a puffy, golden cloud that smelled like pure comfort. It was a sensory overload of hot oil, toasted grain, and the promise of a heavy, satisfying meal.
I've made the mistake of treating this like a standard yeast bread before, and trust me, that's the fastest way to end up with a greasy brick. This version is all about the chemistry of the rise and the temperature of the fat.
We’re going for a texture that is velvety on the inside but has enough structural integrity to hold a mountain of taco meat without collapsing. If you've ever had a soggy, limp piece of fried dough at a fair, we are doing the exact opposite of that here.
The Physics of the Golden Bubble
Chemical Aeration: Unlike yeast, baking powder reacts twice - once when it hits the warm milk and again when the heat of the oil hits it, creating instant air pockets. This rapid expansion is what prevents the dough from absorbing too much grease and becoming heavy.
Fat Saturation: Using melted lard inside the dough creates a "short" texture by coating flour proteins, which limits gluten development. This ensures the bread remains tender and easy to pull apart rather than snappy or bread like.
| Method | Time | Texture | Best For |
|---|---|---|---|
| Stovetop (Deep Fry) | 2-4 mins | Shatter crisp exterior, hollow middle | Authentic Navajo style, tacos |
| Stovetop (Shallow) | 5-6 mins | Denser, more uniform browning | Budget conscious, easy cleanup |
| Oven (Bake) | 12-15 mins | Soft, biscuit like, no bubbles | Healthy alternative, "flatbread" style |
Choosing your cooking method changes everything about the final result. While the oven is great for a quick fix, if you want that iconic "bubbling" look, the stovetop deep fry is the only way to go.
It’s that thermal shock from the 350°F oil that forces the steam to expand the dough instantly.
Component Analysis for Perfect Dough
| Ingredient | Science Role | Pro Secret |
|---|---|---|
| All Purpose Flour | Provides structure through gluten | Sift it first to ensure no dense lumps ruin the air pockets |
| Baking Powder | Primary leavening agent | Check the date; old powder means flat, greasy bread every time |
| Warm Whole Milk | Hydration and richness | Use 110°F milk to "bloom" the fat and soften the flour instantly |
| Melted Lard | Tenderness and flavor | Lard has a higher smoke point and better flavor than butter here |
Necessary Components for Your Homemade Fry Bread Recipe
To get this right, you need to stick to these quantities. I’ve tested variations, but this specific hydration level is what keeps the dough from sticking to your hands while remaining soft enough to stretch.
- 3 cups all purpose flour: Why this? Provides enough protein for structure without being as tough as bread flour.
- 1.5 tablespoons baking powder: Why this? This high amount is required for that signature "puff" in the hot oil.
- 1 teaspoon fine sea salt: Why this? Enhances the nutty flavor of the fried flour; don't skip it.
- 1.125 cups warm whole milk: Why this? The fat in whole milk creates a more velvety crumb than water.
- 1 tablespoon melted lard: Why this? Traditional fat that offers a subtle savory depth and perfect texture.
- 3 cups vegetable oil for frying: Why this? A neutral oil with a high smoke point prevents the bread from tasting burnt.
| Original Ingredient | Substitute | Why It Works |
|---|---|---|
| Melted Lard (1 tbsp) | Vegetable Shortening | Similar melting point and fat structure. Note: Less savory flavor than lard. |
| Whole Milk (1.125 cups) | Warm Water | Makes a leaner, crustier bread. Note: The bread will stale faster without the milk fats. |
| Fine Sea Salt (1 tsp) | Table Salt | Same salinity; just ensure it is finely ground to dissolve quickly. |
Essential Kitchen Tools for Frying Success
You don't need a professional deep fryer for this, but the right pan makes a massive difference in how the oil recovers its temperature between batches. I personally swear by a heavy cast iron skillet. It holds heat like a champ, which is the secret to a non greasy finish.
- Large Mixing Bowl: Plenty of room to stir without flour flying everywhere.
- Cast Iron Skillet or Heavy Dutch Oven: For consistent oil temperature.
- Tongs or a Slotted Spoon: To flip the bread safely without splashing.
- Wire Cooling Rack: Essential for letting excess oil drip off without making the bottom soggy.
- Candy Thermometer: To track that 350°F sweet spot.
Chef's Tip: If you don't have a thermometer, drop a tiny piece of dough into the oil. If it sinks and then pops up sizzling within 2 seconds, you're ready to fry.
step-by-step Guide to Frying Golden Discs
- Whisk dry goods. Combine the flour, baking powder, and sea salt in your large bowl. Note: Whisking aerates the flour, making the final bread lighter.
- Add liquids. Pour in the warm milk and melted lard, stirring with a sturdy spoon.
- Form dough. Mix until a shaggy ball forms and no dry flour remains at the bottom.
- Brief knead. Turn onto a lightly floured surface and knead 3-4 times. Note: Do not overwork it or the bread will be tough.
- Let it rest. Cover the dough with a clean cloth and let it sit for 30 minutes. Wait until the dough feels relaxed and soft.
- Heat the oil. Pour 3 cups of oil into your skillet and heat to 350°F.
- Shape the rounds. Pull off a golf ball sized piece of dough and pat it into a 5-6 inch circle.
- The center hole. Poke a small hole in the center of the disc with your thumb. Note: This prevents the center from ballooning up and undercooking.
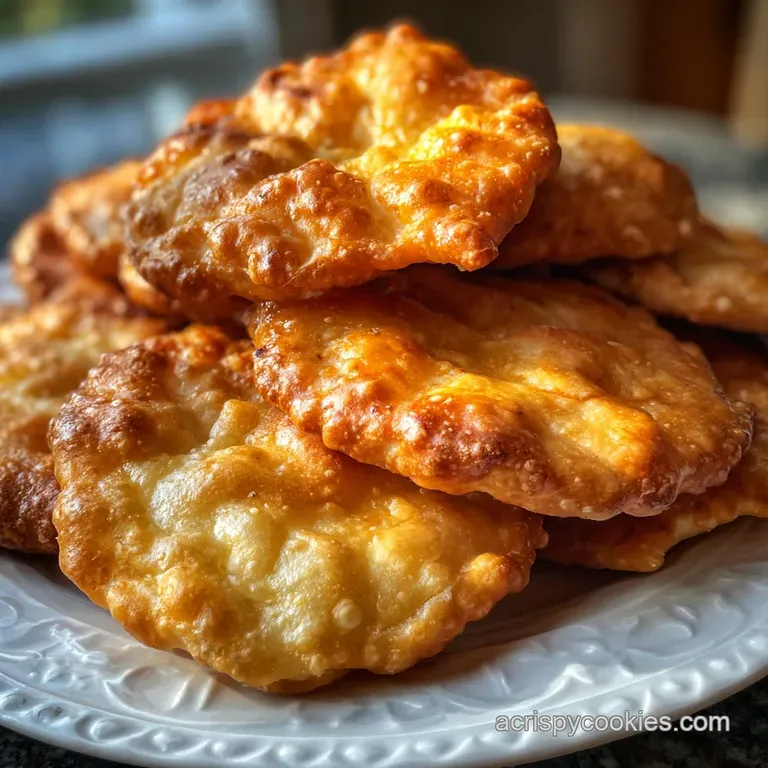
- Fry until golden. Carefully slide the dough into the oil and cook for 1-2 minutes per side until the exterior is puffed and deeply bronzed.
- Drain and cool. Place the hot bread onto a wire rack.
Fixing Common Frying Flubs and Texture Issues
Why is my fry bread hard and flat?
This usually happens because the baking powder is expired or the oil wasn't hot enough. If the oil is too cool, the dough just sits there absorbing fat instead of expanding. Another culprit is over kneading.
If you work the dough like you're making a baguette, you develop too much gluten, which traps the air bubbles and results in a rubbery disc.
Why is the center doughy while the outside is burnt?
Temperature control is the main issue here. If your oil is screaming hot (above 375°F), it will char the outside before the interior has a chance to set. Also, ensure you aren't making the dough discs too thick. They should be about 1/4 inch thick before they hit the oil.
| Problem | Root Cause | Solution |
|---|---|---|
| Greasy/Soggy Bread | Oil temperature dropped | Only fry one piece at a time and wait for oil to return to 350°F. |
| No "Puff" or Bubbles | Expired baking powder | Test powder in a splash of vinegar; it should bubble violently. |
| Tough/Rubbery Crumb | Over kneading | Only knead until the dough just comes together; stop immediately. |
Common Mistakes Checklist
- ✓ Never skip the 30 minute rest; it allows the gluten to relax for a softer bite.
- ✓ Always use a thermometer; "guessing" the oil temp is how bread gets ruined.
- ✓ Don't use a paper towel to drain; a wire rack prevents the "steaming" effect that makes the bottom soggy.
- ✓ Use warm milk, not cold; cold milk shocks the fat and makes for a lumpy dough.
- ✓ Make the center hole; it’s a traditional trick that ensures even cooking.
Easy Scaling for Groups or Couples
If you are cooking for a crowd, you can easily double this recipe. However, keep in mind that the salt and spices should only be increased by 1.5x to avoid an overly salty batch. When doubling the liquid, reduce the total by about 10% initially, then add more only if the dough is too dry.
For a smaller batch, halving the recipe is straightforward. Since the recipe calls for 1.125 cups of milk, you'll want to use about 9 tablespoons (which is half a cup plus one tablespoon). Always use the same size pan for frying, even for a smaller batch, to maintain the oil depth.
Sweet and Savory Ways to Top Your Bread
For a Classic Indian Taco
This is the most popular way to use this fry bread recipe. Pile on seasoned ground beef, shredded lettuce, chopped tomatoes, sharp cheddar cheese, and a dollop of sour cream. The bread acts like a thick, pillowy tortilla that absorbs the juices from the meat. It's similar to the hearty vibe of a Cheddar Bay Biscuit recipe but with a more rustic, fried finish.
For the "Sweet State Fair" Style
If you have a sweet tooth, brush the hot bread with a little extra melted butter and toss it in a mixture of cinnamon and sugar. Alternatively, a simple drizzle of honey and a dusting of powdered sugar makes this feel like a gourmet donut. It’s a quick fix for a dessert craving when you don't have time for a full Moist Vanilla Cake recipe.
Decision Shortcut: If you want a taco base, keep the discs large (6-8 inches) and slightly thicker. If you want a dessert snack, make smaller 3 inch "poppers" for easier dipping.
If you want a side bread, fry them until they are just barely golden for a softer, more pliable texture.
Kitchen Myths Debunked
Many people think you need yeast for an authentic Navajo fry bread recipe, but that's actually a common misconception. Traditional recipes almost always rely on baking powder because it was a staple ration ingredient.
Yeast provides a different flavor profile that can sometimes overshadow the simple, nutty taste of the fried dough.
Another myth is that you need a deep fryer. A simple cast iron skillet is actually superior because the wide surface area allows for easier flipping and better moisture evaporation. You don't need gallons of oil; three cups in a standard skillet provides plenty of depth for the bread to float.
Keeping Your Fried Bread Fresh and Crisp
Storage: Fry bread is undeniably best the second it comes out of the oil. However, if you have leftovers, store them in a paper bag at room temperature for up to 2 days. Avoid plastic bags, as they trap moisture and turn the bread into a gummy mess.
Reheating: Never use the microwave! It will turn your bread into a piece of leather. Instead, pop the bread into a 350°F oven for 5 minutes or use a dry skillet over medium heat to regain that signature crunch.
Zero Waste: If you have leftover dough that you haven't fried yet, wrap it tightly in plastic wrap and keep it in the fridge for up to 24 hours. If the bread has gone stale, cut it into small pieces, fry them again briefly, and toss with cinnamon sugar to make "fry bread croutons" for ice cream.
The Best Main Dishes to Serve Alongside
While the Indian Taco is the king of pairings, this bread is a fantastic side for heavy stews and chilis. The chewy texture is perfect for mopping up sauces. I love serving this alongside a bowl of slow cooked beans or even a creamy pasta dish. If you're looking for a more formal meal, the crispy edges of the bread contrast beautifully with the soft textures found in an Oven Baked Cheesy recipe.
- 1. Dough Temperature
- The milk should be exactly 110°F to ensure the lard melts evenly into the flour.
- 2. Resting Time
- A full 30 minutes is non negotiable for the gluten to relax.
- 3. Oil Depth
- Ensure you have at least 1 inch of oil in the pan so the dough doesn't hit the bottom and burn.

Recipe FAQs
How to make perfect fried bread?
Rest the dough for exactly 30 minutes before shaping. This allows the gluten to relax, ensuring the bread puffs up rather than snapping back when you stretch it. Use oil heated precisely to 350°F for the optimal balance of crisp exterior and tender interior.
What flour do I use for fry bread?
Use all-purpose flour. It provides sufficient protein structure without developing the tough gluten associated with bread flour. For extra lightness, sift the flour with your baking powder before adding liquids.
What's the best oil to make fry bread in?
Use a neutral oil with a high smoke point, like vegetable or canola. The oil must maintain a steady temperature of 350°F; if it drops too low, the bread absorbs excessive grease.
Why isn't my fry bread fluffy?
Your baking powder is likely old, or you over kneaded the dough. Baking powder must be fresh to create the rapid steam expansion necessary for puffiness. If you overwork the dough, you strengthen the gluten too much, preventing expansion.
Is it true I must poke a hole in the center of the dough?
Yes, this is a necessary step for even cooking. The hole prevents the center from rising too much, which traps steam and results in a doughy, uncooked interior while the outside burns.
Can I substitute the lard in the dough?
Yes, substitute with an equal amount of solid vegetable shortening. Shortening has a similar fat structure that inhibits gluten, ensuring a tender crumb. If you master the technique of fat integration here, you'll find the same principle applies when creating the texture for our Crispy Thin Chocolate recipe.
What is the best way to reheat leftover fry bread?
Reheat in a 350°F oven for about 5 minutes. Do not use the microwave, as it traps moisture and ruins the crisp texture instantly. The dry heat of the oven revives the crust.
Authentic Fry Bread Recipe

Ingredients:
Instructions:
Nutrition Facts:
| Calories | 259 kcal |
|---|---|
| Protein | 5.8 g |
| Fat | 9.1 g |
| Carbs | 37.3 g |
| Fiber | 1.3 g |
| Sugar | 1.6 g |
| Sodium | 581 mg |
