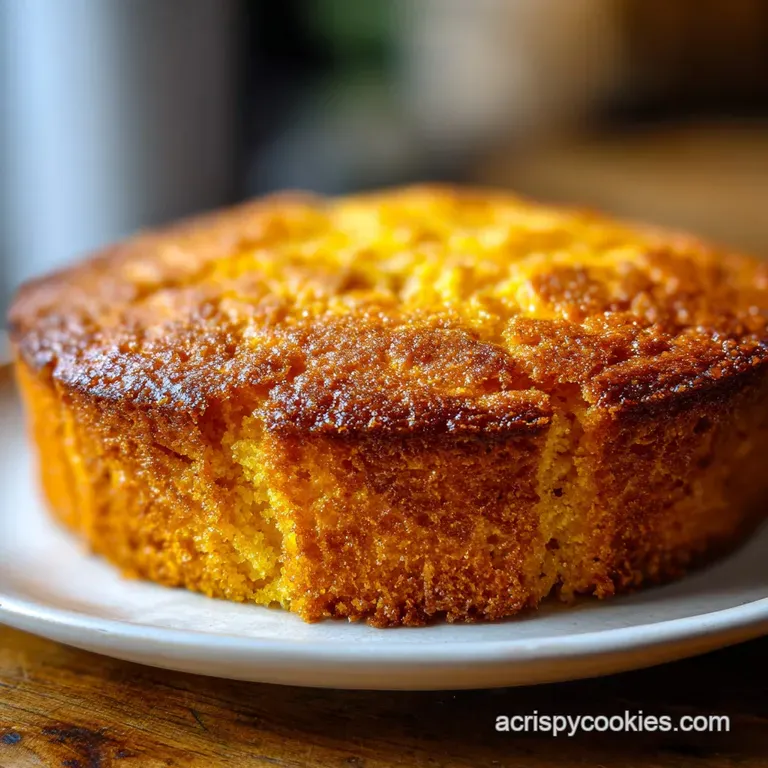
Cast Iron Cornbread: Craggy Crust
- Time: Active 10 minutes, Passive 20 minutes, Total 30 minutes
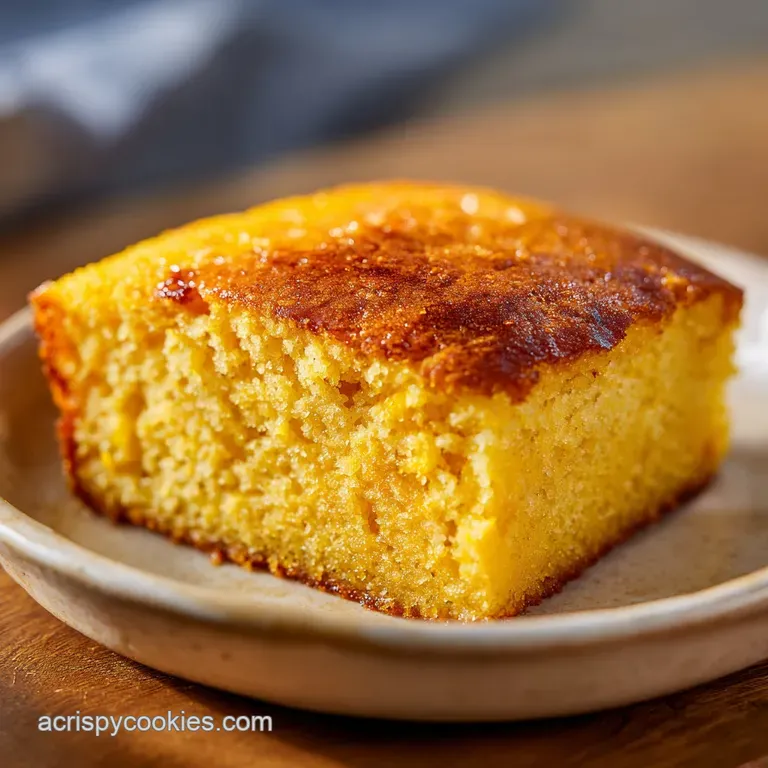
- Flavor/Texture Hook: Craggy, golden brown crust with a tender, honey kissed crumb
- Perfect for: Cozy Sunday dinners, chili nights, or a foolproof side for barbecue
- Achieving the Golden Shatter of Cast Iron Cornbread
- The Physics of the Pre Sear
- Identifying the Essential Components for Structural Success
- Selecting High-Quality Elements for a Sturdy Crumb
- Coordinating the Execution for a Perfect Golden Bake
- Solving Texture and Browning Issues with Precision
- Strategic Scaling for Different Skillet Sizes
- Debunking Common Skillet Baking Misconceptions
- Maintaining Freshness and Repurposing Your Leftovers
- Finishing Touches for a Southern Social Spread
- Recipe FAQs
- 📝 Recipe Card
Achieving the Golden Shatter of Cast Iron Cornbread
There is a specific sound that defines a successful kitchen morning: the aggressive hiss of cold batter hitting a smoking hot, buttered skillet. I remember the first time I actually got this right. For years, my cornbread was basically a yellow sponge dry, dull, and requiring a gallon of chili just to swallow.
Then I realized the skillet isn't just a pan; it’s an active ingredient that dictates the texture of the crust.
When you drop that batter into the sizzling fat, the edges fry instantly, creating a structural ring that prevents the bread from sticking and builds that sought after mahogany base. It’s the difference between a sad, pale loaf and a piece of bread that actually has a "snap" when you bite into it.
Trust me, once you hear that sizzle, you’ll never go back to a room temperature baking dish.
We are aiming for a specific architectural balance here. We want a sturdy base that can hold up to a heavy swipe of butter, but a center that feels almost like a savory cake. By incorporating a few scientific tweaks like Greek yogurt for moisture retention and a resting period for the cornmeal, we’re going to turn a humble side dish into the star of the table.
The Physics of the Pre Sear
Thermal Momentum: The cast iron acts as a heat reservoir, transferring energy instantly to the batter to trigger the Maillard reaction before the center even begins to warm. This creates a crisp, non stick exterior without the need for excessive grease.
Precision Checkpoints
- Skillet Temperature: 200°C (400°F) for at least 10 minutes before adding the fat.
- Batter Hydration: 300ml of buttermilk to ensure the cornmeal grains fully soften during the 20 minute bake.
- Internal Doneness: 93°C (200°F) at the center for a crumb that is set but not desiccated.
Choosing Your Baking Strategy
| Method | Total Time | Crust Texture | Best For |
|---|---|---|---|
| Traditional Skillet | 30 minutes | Thick, fried shatter | Maximum flavor and "wow" factor |
| Muffin Tin | 20 minutes | Soft, uniform edges | Meal prep and portion control |
| Sheet Pan | 25 minutes | Thin and crunchy | Large crowds and sandwich slices |
Choosing the right method depends on how much of that "fried" edge you actually want. If you love that deep fried crunch, you've got to try this Fry Bread Recipe next time, but for today, we are sticking with the heavy duty skillet for that iconic Southern profile.
Identifying the Essential Components for Structural Success
| Ingredient | Science Role | Pro Secret |
|---|---|---|
| Stone Ground Cornmeal | Provides grit and "corn forward" flavor | Use stone ground specifically for a rustic, varied texture |
| Full Fat Buttermilk | Acids react with baking soda for a vertical rise | Shake the carton well to redistribute the milk solids |
| Plain Greek Yogurt | Increases fat content and traps moisture | Prevents the common "sawdust" texture found in leaner recipes |
| Unsalted Butter | Facilitates the Maillard reaction on the crust | Use high-quality butter with low water content for a better fry |
Selecting high-quality Elements for a Sturdy Crumb
- 1.5 cups (240g) yellow stone ground cornmeal: Why this? Stone ground retains the germ, offering a richer flavor and superior "bite."
- Sub: Fine cornmeal (will result in a softer, more cake like texture).
- 0.5 cup (65g) all purpose flour: Why this? Provides the gluten needed to hold the heavy cornmeal together.
- Sub: 1 to-1 gluten-free flour blend (works well here due to the cornmeal's dominance).
- 1 tbsp baking powder: Why this? The primary leavening agent for a light, airy rise.
- Sub: 1 tsp baking soda + 0.5 cup extra buttermilk (but stick to the recipe for best results).
- 0.5 tsp baking soda: Why this? Neutralizes the buttermilk acidity and promotes browning.
- Sub: Omit if using regular milk instead of buttermilk (not recommended).
- 1 tsp fine sea salt: Why this? Sharpens the sweetness of the corn and honey.
- Sub: Kosher salt (use 1.5 tsp).
- 1.25 cups (300ml) full fat buttermilk: Why this? Adds tang and tenderizes the gluten structure.
- Sub: 300ml whole milk + 1 tbsp lemon juice (let sit for 5 mins).
- 0.25 cup (60g) plain Greek yogurt: Why this? Its thickness keeps the crumb moist even on day two.
- Sub: Sour cream (provides a similar fat profile and acidity).
- 1 large egg, room temperature: Why this? Binds the fats and liquids into a cohesive batter.
- Sub: Flax egg (1 tbsp ground flax + 3 tbsp water, let sit 10 mins).
- 2 tbsp honey: Why this? Adds a floral sweetness that balances the salt.
- Sub: Maple syrup or granulated sugar.
- 3 tbsp unsalted butter: Why this? Essential for greasing the skillet and adding a nutty finish.
- Sub: Bacon drippings (for a traditional, smoky Southern flavor).
Chef's Tip: Freeze your butter for 10 minutes before melting it. When cold butter hits a hot skillet, the small amount of water in the butter evaporates instantly, creating tiny steam pockets that help lift the edges of the bread.
Coordinating the Execution for a Perfect Golden Bake
- Preheat the vessel. Place a 10 inch cast iron skillet in the oven and preheat to 200°C (400°F). Note: This ensures the pan is a uniform heat source.
- Whisk the dry base. In a large bowl, combine 240g cornmeal, 65g flour, baking powder, baking soda, and salt.
- Emulsify the wet mix. In a separate jug, whisk 300ml buttermilk, 60g yogurt, the egg, and 2 tbsp honey until the mixture is completely smooth.
- Integrate the components. Pour the wet ingredients into the dry. Fold gently with a spatula until just combined.
- Allow a hydration rest. Let the batter sit for 5 minutes. Note: This allows the cornmeal to absorb moisture, preventing a gritty texture.
- Sizzle the fat. Carefully remove the hot skillet from the oven. Add 3 tbsp butter and swirl until it is foamy and slightly browned.
- Initiate the sear. Pour the batter into the center of the skillet. The edges should immediately sizzle and turn translucent.
- Bake to set. Return the skillet to the oven and bake for 20 minutes until the top is golden and a toothpick comes out clean.
- Rest and release. Let the bread cool in the skillet for 5 minutes before slicing. Note: Residual heat finishes cooking the very center.
For a heartier meal, this pairs brilliantly with a Cheddar Bay Biscuit recipe based casserole if you're hosting a large crowd and need variety.
Solving Texture and Browning Issues with Precision
Why Your Cornbread Is Gritty
If the texture feels like sand, the cornmeal didn't have enough time to hydrate. Stone ground meal is thicker and requires more "soak time" than highly processed versions. Next time, let the batter rest for 10 minutes before it hits the skillet.
Why The Bottom Is Pale
A pale bottom means the skillet wasn't hot enough. Cast iron takes a long time to heat through. If you just put it in when the oven beeped, it’s likely not at 200°C yet. Give it a full 15 minutes of preheating.
| Problem | Root Cause | Solution |
|---|---|---|
| Crumbly texture | Too much cornmeal or overbaked | Ensure you use exactly 65g flour; check temp at 18 mins |
| Soggy middle | Underbaked or too much honey | Bake until 93°C (200°F) internally; don't exceed 2 tbsp honey |
| Burnt edges | Skillet was too hot or too much sugar | Reduce oven to 190°C; move rack to middle position |
Common Mistakes Checklist
- ✓ Never skip the preheating of the skillet (it's the secret to the crust).
- ✓ Don't overmix the batter; stop as soon as the dry streaks disappear.
- ✓ Use full fat buttermilk low-fat versions lack the viscosity needed for a tender crumb.
- ✓ Always use a kitchen scale for the cornmeal (240g) to ensure consistency.
- ✓ Let the cornbread rest for 5 minutes before cutting to let the steam settle.
Strategic Scaling for Different Skillet Sizes
When scaling down for a 6 inch skillet, halve all ingredients. Use a small egg or beat one egg and use half by weight. Reduce the baking time by about 5 minutes, as the smaller surface area heats more rapidly.
When scaling up for a 12 inch skillet, multiply the recipe by 1.5. Keep the baking temperature the same, but you may need an extra 5-7 minutes of oven time. Decision Shortcut: If you want a thicker, "cake like" bread, use a 9 inch skillet with the full recipe.
If you want more "crunchy edge" per bite, use a 12 inch skillet (the bread will be thinner). If you want a savory kick, add 50g of sharp cheddar and 1 chopped jalapeño.
| Problem | Cause | Fix |
|---|---|---|
| Dry Crumbs | Over mixing | Fold only until combined |
| Sunken Center | Old Baking Powder | Replace leaveners every 6 months |
| Sticky Bottom | Unseasoned Skillet | Use more butter or re season the pan |
Debunking Common Skillet Baking Misconceptions
One major myth is that sugar has no place in "authentic" southern cornbread. While some purists disagree, the science shows that a small amount of honey or sugar actually helps the Maillard reaction, leading to a more complex, browned flavor profile. It’s not just about sweetness; it’s about chemistry.
Another common error is thinking that you can't use a stainless steel pan. While you can, you won't get the same result. Cast iron has a much lower thermal conductivity but higher heat capacity, meaning it stays hot when the cold batter hits it, whereas stainless steel drops in temperature instantly, leading to a steamed rather than fried crust.
Maintaining Freshness and Repurposing Your Leftovers
- Fridge
- Wrap tightly in foil or store in an airtight container for up to 4 days.
- Freezer
- Slice before freezing. Wrap individual pieces in plastic wrap and store in a freezer bag for up to 3 months.
- Reheating
- To restore the crunch, reheat in a 180°C (350°F) oven for 5-8 minutes. Avoid the microwave, as it will make the crust rubbery.
Zero Waste Tips Don't toss those dry end pieces! Stale cornbread makes the absolute best croutons for a spicy black bean soup. Simply cube the leftovers, toss with a little olive oil and chili powder, and toast in the skillet until they are rock hard and crunchy.
You can also crumble old cornbread into a "cornbread salad" with tomatoes, beans, and a lime vinaigrette.
Finishing Touches for a Southern Social Spread
To really make this look like a centerpiece, don't just cut it into squares. Bring the entire skillet to the table. There is something primal and inviting about a heavy iron pan filled with golden bread.
I like to serve mine with a small bowl of "hot honey" just honey simmered for 2 minutes with a few red pepper flakes.
For a true social experience, provide a variety of toppings. A whipped maple butter (half butter, half maple syrup, whipped until airy) is a classic, but a dollop of pimento cheese on a warm slice is a total game changer. The heat from the bread melts the cheese just enough to make it velvety and spreadable. This dish isn't just a side; it's the foundation of the meal. If you enjoy this savory meets sweet balance, the Italian Beef Sandwich recipe is another great one for feeding a crowd with big, bold flavors.

Recipe FAQs
Do I need to season the cast iron skillet before making cornbread?
No, preheating is more critical than seasoning for this recipe. The extreme heat and fat create an instant non-stick barrier; ensure the skillet is fully preheated to 400°F for at least 15 minutes.
How to prevent the cornbread from having a gritty or sandy texture?
Allow the batter to rest for 5 to 10 minutes before pouring. This rest period lets the stone ground cornmeal fully hydrate and soften, ensuring a smooth, tender interior crumb.
Is using buttermilk absolutely necessary for proper lift?
Yes, buttermilk is highly recommended for optimal lift and tenderness. The acid in the buttermilk reacts with the baking soda to produce carbon dioxide, giving the cornbread its essential rise.
How to achieve that signature dark brown, shatteringly crisp crust?
Pour the batter into a smoking hot skillet coated with melted butter. The sudden thermal shock causes the edges to fry instantly, creating the desired Maillard reaction and structural crust.
Can I substitute yogurt with sour cream or regular milk?
Substitute with sour cream if needed, but avoid using plain milk. Sour cream offers similar fat and acidity to tenderize the crumb, unlike regular milk which results in a drier, less moist final product.
How long can I store leftover cast iron cornbread?
Store tightly wrapped in foil at room temperature for up to 4 days. To restore the crust’s crunch, reheat slices in a 350°F oven for about 8 minutes; the microwave will ruin the texture.
Can I make this recipe ahead of time, like in muffin tins?
Yes, you can use a muffin tin, but expect a faster bake time. For individual portions, fill tins about 2/3 full and reduce the bake time to around 18 minutes, checking for doneness earlier.
Cast Iron Cornbread Perfection

Ingredients:
Instructions:
Nutrition Facts:
| Calories | 229 kcal |
|---|---|
| Protein | 6.1 g |
| Fat | 7.4 g |
| Carbs | 35.9 g |
| Fiber | 2.2 g |
| Sugar | 6.2 g |
| Sodium | 542 mg |
