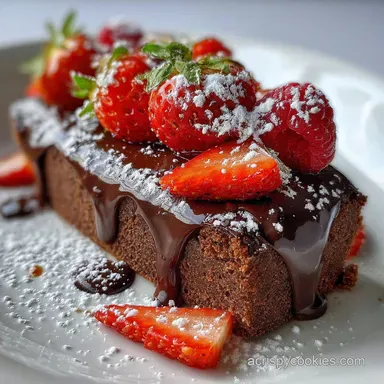
Easy Chocolate Ricotta Brick Cake
- Time: Active 15 minutes, Passive 45 minutes, Total 60 minutes
- Flavor/Texture Hook: Velvety, fudge heavy crumb with a matte cocoa finish
- Perfect for: Elegant dinner parties or a sturdy afternoon snack cake
- Simple Secrets to Easy Chocolate Ricotta Brick Cake
- The Physics of Dense Texture
- Essential Specs for the Bake
- Selecting Your Building Blocks
- Component Analysis
- Necessary Tools for Success
- Step-by-Step Construction Guide
- Solving Common Baking Hurdles
- Scaling the Recipe
- Creative Variations to Try
- Myths Regarding Ricotta Baking
- Preservation and Freshness Tips
- Presentation and Serving Ideas
- Recipe FAQs
- 📝 Recipe Card
Simple Secrets to Easy Chocolate Ricotta Brick Cake
The first time I pulled this easy chocolate ricotta brick cake out of the oven, I thought I had made a massive mistake. I was expecting the tall, airy puff of a sponge, but instead, I greeted a heavy, dark, and brooding rectangle that looked like it could anchor a ship.
The aroma, though, was what stopped me in my tracks - a deep, concentrated scent of Dutch process cocoa and the fruity, grassy notes of olive oil.
I let it cool, sliced into it, and realized this wasn't a "fail" at all. It was a revelation in density. It didn't crumble under the knife, it gave way like cold fudge. That velvety interior, studded with molten chocolate chips, felt intentional and sophisticated.
If you've ever felt that standard cakes are too "fluffy" and lack substance, this is the specific texture you've been hunting for.
We are leaving the world of light and airy behind today. This recipe is all about structure, moisture, and a crumb that feels substantial on the fork. It is a "brick" in name and weight, but a cloud in mouthfeel.
Let's look at why this specific combination of ingredients creates such a unique, sturdy result every single time.
The Physics of Dense Texture
- Emulsion Stability: The proteins in the whole milk ricotta act as a secondary emulsifier, binding the olive oil and egg yolks into a tight, stable matrix that prevents the cake from feeling oily while maintaining a heavy, "brick" feel.
- Acid Base Neutralization: Dutch process cocoa is alkalized, meaning it won't react with baking soda alone, so we use a combination of powder and soda to manage the lift and ensure a dark, matte finish without a soapy aftertaste.
- Starch Gelatinization: The high water content in ricotta (even when drained) hydrates the flour's starches thoroughly, leading to a moist, tightly knit crumb that stays flexible rather than brittle.
- Fat Suspension: Unlike butter, which solidifies at room temperature, olive oil stays liquid, ensuring the "brick" remains soft and fudgy even when eaten straight from the fridge.
| Method Type | Texture Profile | Best Served | Bake Complexity |
|---|---|---|---|
| Brick Method | Dense, fudgy, heavy | Room temp or cold | Low |
| Classic Sponge | Airy, light, porous | Warm with cream | High |
| Flourless Style | Custard like, rich | Cold | Medium |
Choosing the right approach depends on the vibe of your evening. While a classic sponge is great for birthdays, the brick method used here is far more forgiving for home cooks because it doesn't rely on aeration or whipped egg whites. It is effectively a "dump and stir" recipe that yields professional grade results.
Essential Specs for the Bake
- Internal Temperature: 200°F to 205°F (93°C to 96°C) for a set center that isn't gummy.
- Pan Dimensions: A standard 9x5 inch loaf pan provides the necessary wall height for the "brick" shape.
- Ricotta Density: 340g (1.5 cups) post draining is the specific weight needed for structural integrity.
Selecting Your Building Blocks
- 1.5 cups (190g) All purpose flour: Why this? Provides the protein structure needed to support the heavy ricotta and cocoa.
- Substitute: 1:1 gluten-free baking blend (ensure it contains xanthan gum).
- 0.75 cup (65g) Unsweetened Dutch process cocoa powder: Why this? Alkalized cocoa offers a deeper color and smoother flavor than natural cocoa.
- Substitute: Natural cocoa powder (note: the cake will be lighter in color and slightly tangier).
- 1.5 cups (340g) Whole milk ricotta cheese: Why this? The fat and moisture source that creates the "brick" density.
- Substitute: Full fat Greek yogurt (adds more tang and a slightly softer crumb).
- 0.5 cup (120ml) Extra virgin olive oil: Why this? Adds fruitiness and keeps the cake moist for up to 5 days.
- Substitute: Neutral oil like avocado or grapeseed.
- 3 Large eggs: Why this? Provides lift and binds the fats to the flour.
- Substitute: 0.75 cup unsweetened applesauce (yields a much denser, wetter cake).
- 1 cup (200g) Granulated sugar: Why this? Sweetens and assists in moisture retention through hygroscopy.
- Substitute: Coconut sugar (adds a caramel note but darkens the cake further).
- 0.5 cup (90g) Semi sweet chocolate chips: Why this? Provides pockets of intense chocolate and textural contrast.
- Substitute: Chopped dark chocolate bars for a more "rustic" look.
- 2 tsp Pure vanilla extract: Why this? Rounds out the bitterness of the cocoa.
- Substitute: Almond extract (use only 0.5 tsp as it is very strong).
When you are choosing your ingredients, remember that the quality of your olive oil matters. I usually go for a mid range, cold pressed oil that has a mild, buttery finish rather than something too peppery. If you find yourself enjoying the moisture profile of oil based cakes, you might also want to try this Moist Vanilla Cake recipe which uses a similar fat suspension technique to keep the crumb tender.
Component Analysis
| Ingredient | Science Role | Pro Secret |
|---|---|---|
| Whole Milk Ricotta | Structural moisture | Drain it in a fine mesh sieve for 20 minutes to prevent a soggy bottom. |
| Dutch Process Cocoa | Flavor & Color | Sift this twice; it's prone to stubborn lumps that won't bake out. |
| Olive Oil | Lipid barrier | Use "Early Harvest" oil for a subtle floral note that pairs with chocolate. |
| Sea Salt | Flavor Enhancer | Use flaky sea salt on top before baking to make the chocolate pop. |
Necessary Tools for Success
1. The Baking Vessel
A heavy duty aluminum 9x5 loaf pan is the gold standard here. Glass or ceramic pans hold heat differently and can lead to the edges overcooking before the "brick" center is set. If you use a dark non stick pan, reduce your oven temperature by 25°F to prevent the exterior from becoming too tough.
2. Sifting and Mixing
A fine mesh sieve is non negotiable for the cocoa powder. For mixing, a large balloon whisk and a flexible silicone spatula are all you need. We aren't looking to incorporate air, so a stand mixer is actually overkill and might lead to over mixing the gluten.
step-by-step Construction Guide

- Prep the environment. Preheat your oven to 350°F (175°C) and line your loaf pan with parchment paper, leaving an overhang on the long sides. Note: This "sling" makes it easy to lift the heavy cake out without it breaking.
- Sift the foundation. Whisk 1.5 cups flour, 0.75 cup cocoa, 1 tsp baking powder, 0.5 tsp baking soda, and 0.5 tsp sea salt in a medium bowl until the color is a uniform, pale mahogany.
- Emulsify the wet base. In a separate large bowl, whisk 1.5 cups drained ricotta, 3 eggs, 1 cup sugar, 0.5 cup olive oil, and 2 tsp vanilla until the mixture looks like smooth, pale yellow custard.
- Combine the elements. Pour the dry ingredients into the wet. Using a spatula, fold the mixture gently until no white streaks of flour remain visible.
- Add the texture. Toss 0.5 cup chocolate chips into the batter. Tip: Lightly coat the chips in a teaspoon of flour first to prevent them from sinking to the bottom.
- Transfer and level. Pour the thick batter into the prepared pan. Use the back of a spoon to smooth the top into a flat surface.
- Bake the brick. Place in the center of the oven and bake for 45 minutes until a skewer inserted into the center comes out with only a few moist crumbs.
- Initial cooling. Let the cake sit in the pan on a wire rack for 15 minutes. Note: The cake is very fragile while hot and needs this time to set its structure.
- Final release. Use the parchment sling to lift the cake out. Let it cool completely (about 1 hour) before slicing until the exterior feels firm and the aroma is concentrated.
Chef's Note: To get that professional "crack" down the center of your brick cake, dip a knife in melted butter and draw a shallow line down the middle of the batter just before putting it in the oven.
Solving Common Baking Hurdles
Why Your Cake Sinks in the Middle
This usually happens if the ricotta wasn't drained properly. Excess whey creates steam pockets that expand during baking but collapse once cooled. It can also occur if the oven door is opened too early, causing a sudden temperature drop that shocks the leavening agents before the crumb has set.
Dealing with Dense Crumb
While this is a "brick" cake, it shouldn't be "rubbery." Over mixing the batter once the flour is added develops too much gluten. To fix this, only mix until the flour disappears. If the cake feels dry, you likely over baked it; check your oven calibration with a thermometer.
Preventing Over Browning
Because of the sugar and cocoa content, the top can darken quickly. If the cake looks done at 30 minutes but the center is still liquid, tent the pan loosely with foil. This reflects the radiant heat while allowing the ambient heat to finish cooking the core.
| Problem | Root Cause | Solution |
|---|---|---|
| Gummy Center | Underbaked or too much moisture | Bake until internal temp reaches 200°F; drain ricotta longer. |
| Chocolate Chips Sunk | Heavy chips/thin batter | Coat chips in flour before folding into the batter. |
| Dry/Crumbly Edges | Oven too hot | Lower temp by 25°F and use a light colored metal pan. |
Common Mistakes Checklist
- ✓ Always use room temperature eggs to ensure the olive oil doesn't seize or clump.
- ✓ Don't skip the parchment paper; the high sugar and ricotta content makes this cake very sticky.
- ✓ Measure your flour by weight (190g) if possible; "scooping" with a cup often packs too much flour, making the brick too dry.
- ✓ Avoid low-fat or "part skim" ricotta, as it contains more water and less stabilizing fat.
Scaling the Recipe
If you need to make a smaller version, you can halve the recipe and bake it in a standard 6 inch round cake pan. Reduce the baking time by about 10 minutes. When halving the eggs (3 eggs becomes 1.5), crack two eggs into a bowl, whisk them together, and use half of the total weight for the "half" egg.
For doubling the recipe to feed a crowd, use a 9x13 inch rectangular pan. Note that the "brick" height will be lower, so the baking time will likely drop to 30-35 minutes. Don't simply double the baking time!
Keep an eye on the visual cues - the edges should pull away slightly from the sides of the pan when it's ready.
Creative Variations to Try
How Do I Add an Italian Twist?
To lean into the Italian heritage of this recipe, add 1 tablespoon of finely grated orange zest to the sugar before whisking. You can also replace the vanilla extract with 0.5 teaspoon of Fiori di Sicilia or add a splash of Amaretto liqueur.
This transforms the profile from a standard chocolate treat to something reminiscent of a Sicilian bakery.
What If I Don't Have Olive Oil?
You can use melted unsalted butter in a 1:1 ratio. The flavor will be richer and more "traditional," but the cake will be firmer when cold. If you're looking for something lighter, try this No Bake Chocolate recipe which avoids the oven entirely but still hits those deep cocoa notes.
Myths Regarding Ricotta Baking
One common misconception is that ricotta will leave "white chunks" in the cake. If you use whole milk ricotta and whisk it properly with the eggs and sugar, it completely melts into the batter, creating a uniform, velvety texture. You aren't making a cheesecake; you're using the cheese as a fat and moisture source.
Another myth is that you can't over bake a ricotta cake because it's "too moist." While it's true that the ricotta provides a buffer, the eggs and flour will still dry out and become tough if left in the oven for even 5-10 minutes too long.
Always use the "moist crumb" test rather than waiting for the skewer to come out completely clean.
Preservation and Freshness Tips
Storage: Store the cake in an airtight container at room temperature for up to 2 days. For longer storage, keep it in the refrigerator for up to 5 days. Interestingly, this cake actually tastes better on day two as the olive oil and cocoa have more time to marry.
Freezing: This is an excellent cake for freezing. Wrap individual slices tightly in plastic wrap, then place them in a freezer safe bag. It will stay fresh for up to 3 months. Thaw at room temperature for an hour before eating.
Zero Waste Tip: If you have leftover ricotta that didn't make it into the cake, whisk it with a little honey and spread it on toast the next morning. If the cake itself gets a bit dry after a few days, turn it into "cake croutons" by cubing it and toasting it lightly in the oven to serve over vanilla bean ice cream.
Presentation and Serving Ideas
For a casual afternoon, a simple dusting of powdered sugar is enough. But if you want to lean into the "brick" name, serve thick, heavy slices with a dollop of mascarpone whipped cream. The tang of the mascarpone cuts through the density of the Dutch cocoa perfectly.
If you enjoy a bit of crunch with your soft cakes, consider serving this alongside some Crispy Thin Chocolate recipe shards. The contrast between the "shatter" of the cookies and the velvety "give" of the ricotta cake is a texture lover's dream. For an "Affogato" style dessert, place a slice of the cake in a shallow bowl, top with a scoop of hazelnut gelato, and pour a hot shot of espresso over the whole thing. The cake will soak up the coffee like a sponge, becoming even more decadent.

Recipe FAQs
Can I substitute the olive oil for melted butter?
Yes, you can substitute 1:1 by volume, but the texture will change. Butter yields a richer flavor but the cake will become firmer and less soft when served cold, as butter solidifies.
Is it necessary to drain the ricotta cheese before using it?
Yes, draining the ricotta is essential for structure. Excess whey will create steam pockets, leading to a gummy center or a sunken cake structure.
How do I ensure the cake does not become oily from the olive oil?
The ricotta acts as a stabilizing emulsifier that binds the oil. Ensure your ricotta is well mixed with the eggs and sugar first to create a tight emulsion before adding the dry ingredients.
What internal temperature should the cake reach before removal?
Pull the cake when the internal temperature reads 200°F to 205°F (93°C to 96°C). This range ensures the center is set but retains the fudgy, moist quality typical of a "brick" cake.
What is the primary difference between Dutch process and natural cocoa in this recipe?
Dutch process cocoa provides a darker color and smoother, less acidic flavor. Natural cocoa would result in a slightly lighter cake with a tangier profile due to its higher acidity.
How far in advance can I safely bake this cake?
Bake the cake up to 24 hours ahead of serving for optimal flavor melding. The olive oil content keeps it incredibly moist, making it ideal for make-ahead dessert preparation.
How to prevent the chocolate chips from sinking to the bottom?
Toss the chocolate chips in about one teaspoon of the dry flour mixture first. This light coating creates enough friction to help suspend the chips evenly throughout the thick batter during baking.
Chocolate Ricotta Brick Cake
Ingredients:
Instructions:
Nutrition Facts:
| Calories | 377 kcal |
|---|---|
| Protein | 8.1 g |
| Fat | 19.4 g |
| Carbs | 47 g |
| Fiber | 2.6 g |
| Sugar | 27 g |
| Sodium | 255 mg |
