
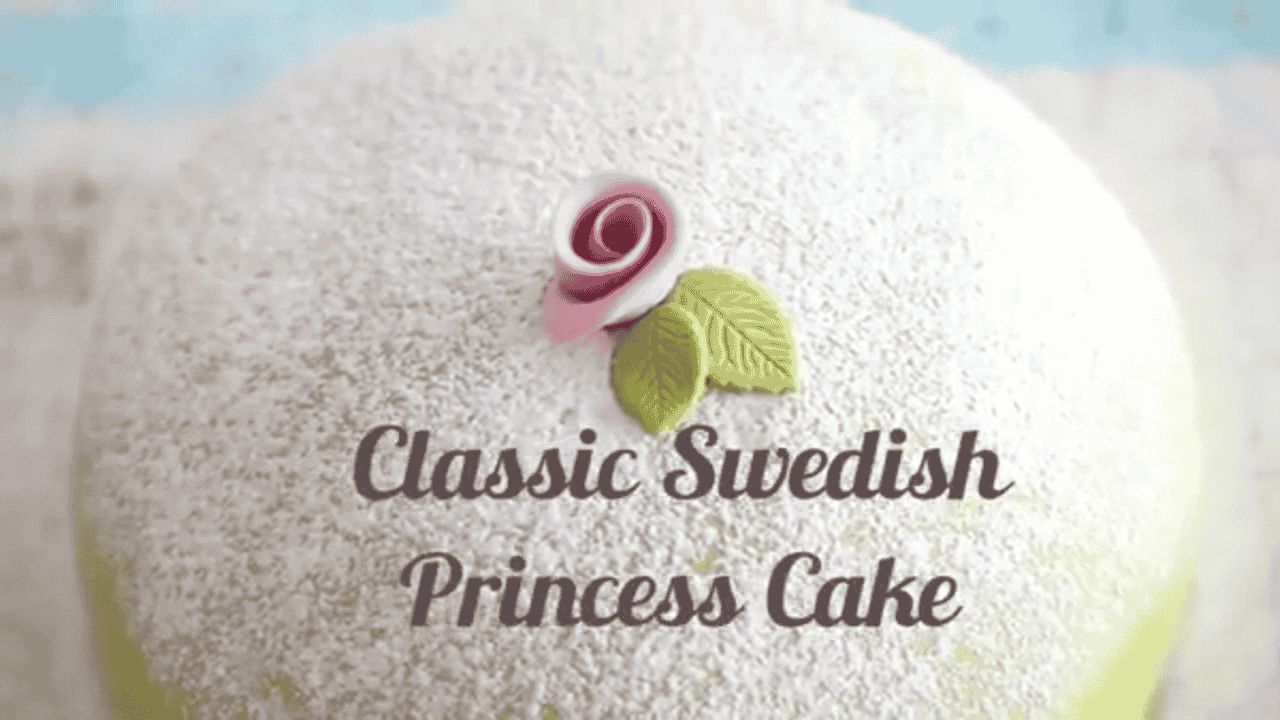
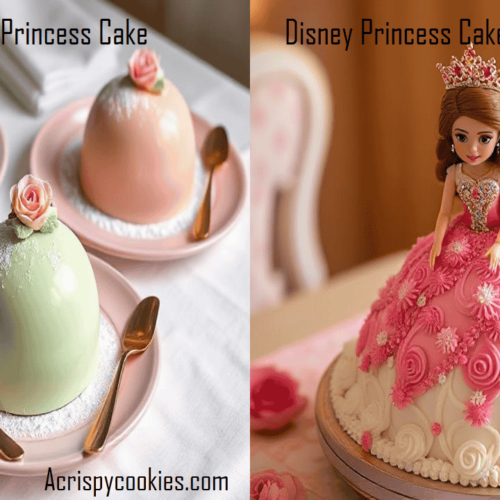
A Princess Cake is a beautiful and delicious dessert loved by many. It comes in two popular styles: the Swedish Princess Cake (Prinsesstårta) and the Disney Princess Doll Cake. Both cakes are perfect for birthdays, celebrations, and special occasions.
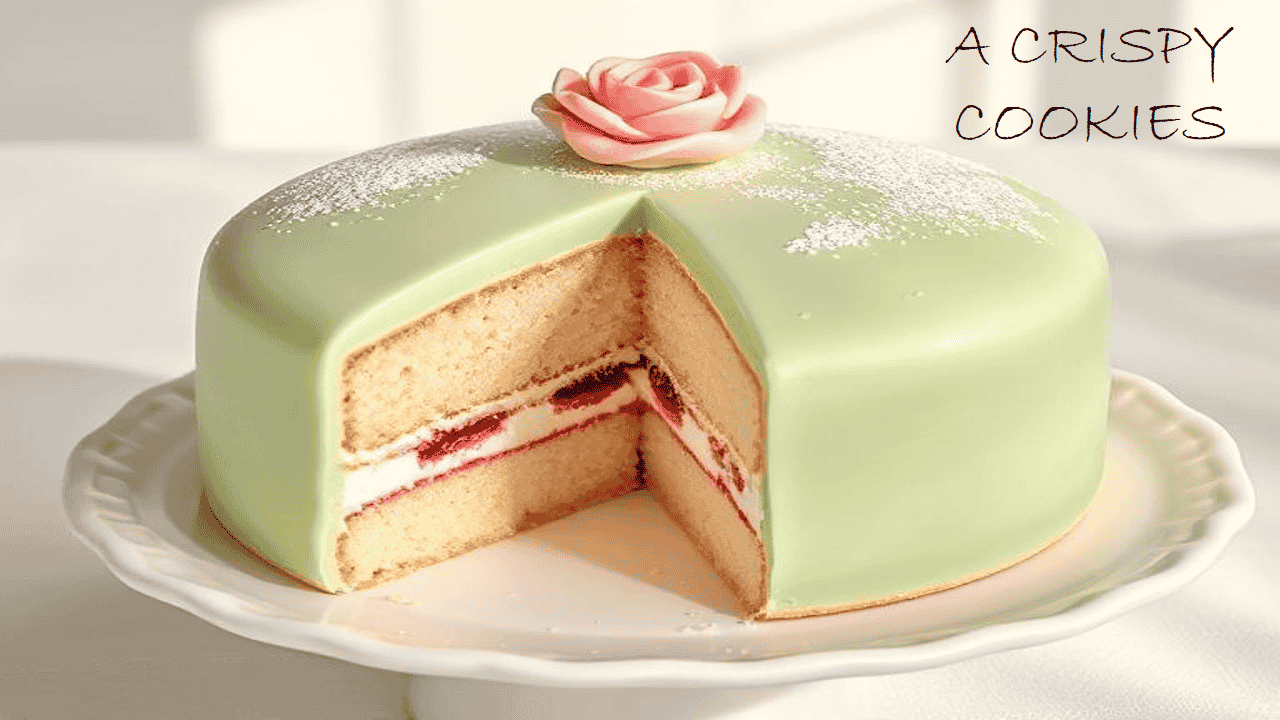
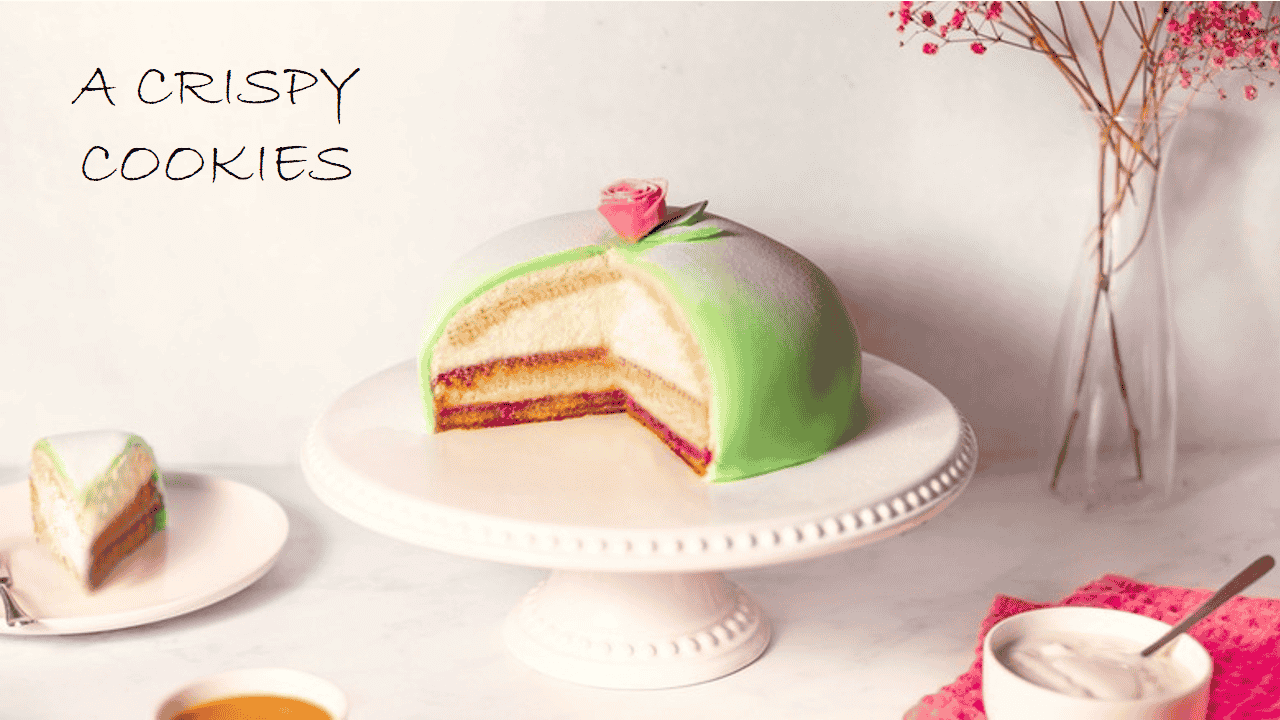
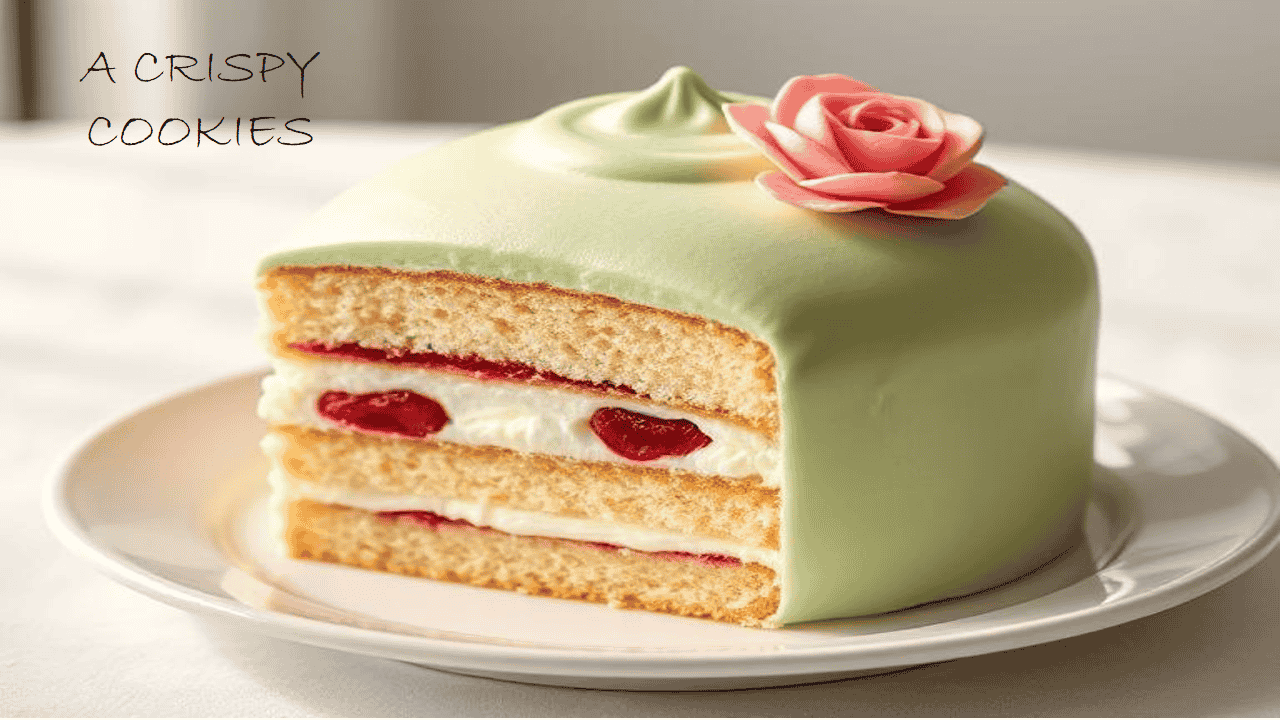
The Swedish Princess Cake is a classic treat from Sweden. It has soft sponge cake, creamy pastry cream, fluffy whipped cream, and a smooth layer of marzipan on top. Traditionally, the marzipan is light green with a pink rose in the center.
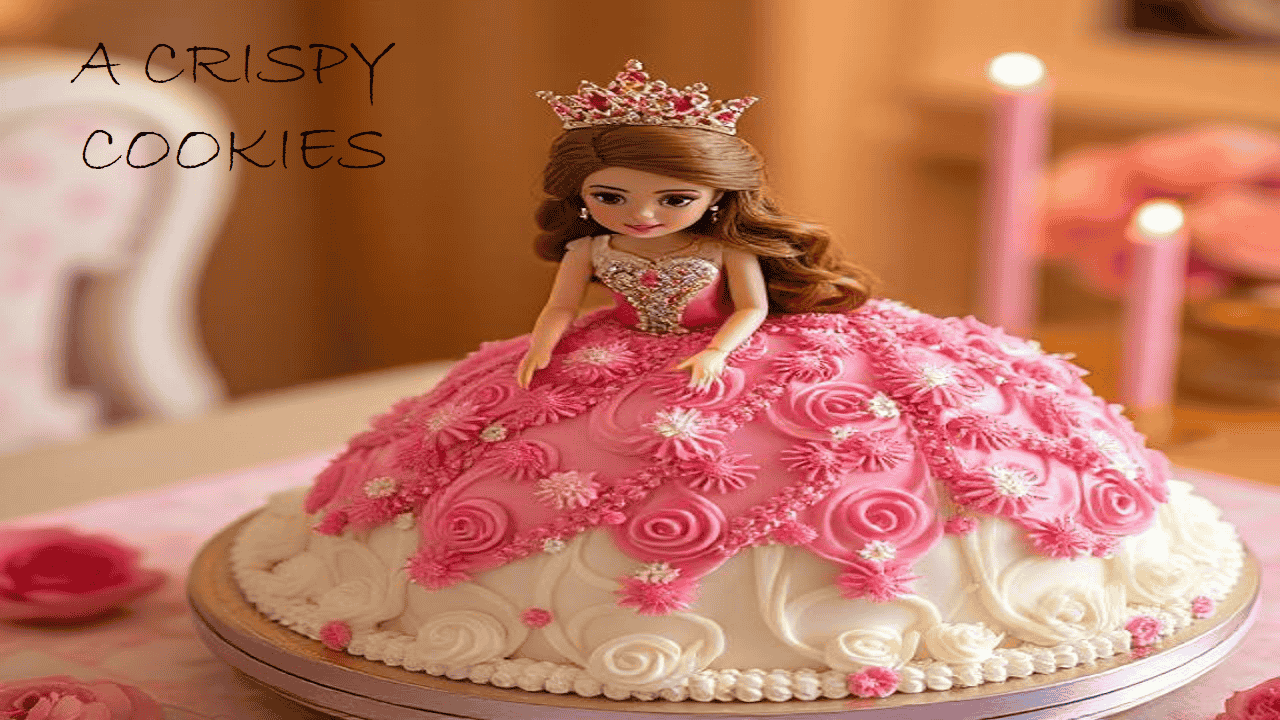
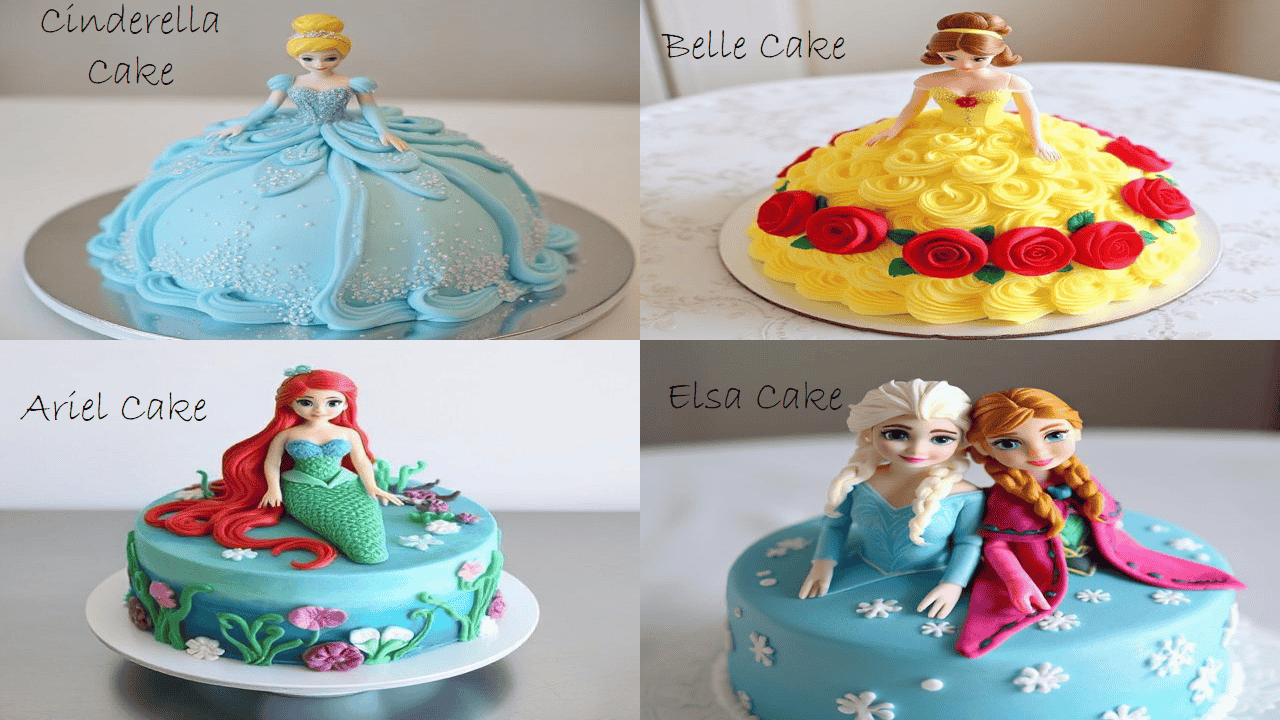
The Disney Princess Cake is a fun and colorful cake inspired by famous princesses like Cinderella, Belle, and Ariel. These cakes can be decorated with princess cake toppers, fondant dresses, or castle designs.
No matter which type you choose, a Princess Tsunami Cake is a magical dessert that makes every occasion special. In this guide, you will learn how to make, decorate, and customize your own!
If you love celebrating with unique cakes, you’ll enjoy trying my other birthday cake creations. From Birthday Cake Cookies for a bite-sized treat to a fun Cat Birthday Cake for pet lovers, there’s something for everyone. A dreamy Pink Birthday Cake adds a soft, elegant touch, while a Barbie Birthday Cake is perfect for a princess-themed celebration. Fans of animated fun will adore the Bluey Birthday Cake, and if you’re looking for something indulgent, the Italian Hangover Cake is a must-try. Each cake is made to bring joy and delicious flavors to your special day!
History & Origins of Princess Cake
The Swedish Princess Cake (Prinsesstårta) comes from Sweden and has a royal background. It was first created in the 1920s by Jenny Åkerström, a teacher for three Swedish princesses. She made this cake for them, and they loved it so much that it became known as Princess Cake.
At first, the cake had a pink marzipan topping, but over time, the traditional color changed to light green. Today, it is one of Sweden’s most famous cakes, often served at birthdays and celebrations.
The Disney Doll Cake is a modern version inspired by fairy tales and movies. It became popular as more children wanted birthday cakes featuring their favorite princesses like Cinderella, Belle, and Elsa. These cakes can be decorated in many creative ways, using princess cake toppers, fondant dresses, or castle designs.
Both cakes bring joy and magic, making them perfect for any celebration!

Ingredients Needed
Making this cake requires a few key ingredients. Whether you’re making a Swedish Princess Cake or a Disney Princess Cake, here’s what you’ll need:
For Swedish Princess Cake
- Sponge Cake – A light and fluffy base made with eggs, sugar, flour, and butter.
- Pastry Cream – A rich and creamy custard filling made with milk, sugar, egg yolks, and cornstarch.
- Whipped Cream – Soft and airy cream used for layering and covering the cake.
- Raspberry Jam – Adds a fruity and slightly tart flavor between layers.
- Marzipan – A sweet almond paste used to cover the cake, traditionally colored light green.
- Powdered Sugar – For dusting on top to add a beautiful finish.
For Disney Princess Cake
- Cake Base – Can be vanilla, chocolate, or funfetti, depending on the theme.
- Buttercream or Fondant – Used to frost and decorate the cake.
- Food Coloring – Helps create vibrant princess-themed colors.
- Princess Cake Toppers – Small plastic or edible decorations featuring Disney princesses.
- Edible Glitter & Pearls – Adds sparkle and a magical touch.
With these ingredients, you can make a beautiful and delicious Princess Cake perfect for any celebration!
How to Make a Recipe for Both Princess Cake
Creating a Princess Cake recipe takes time and patience, but the end result is stunning. Follow these steps carefully to achieve the perfect cake.
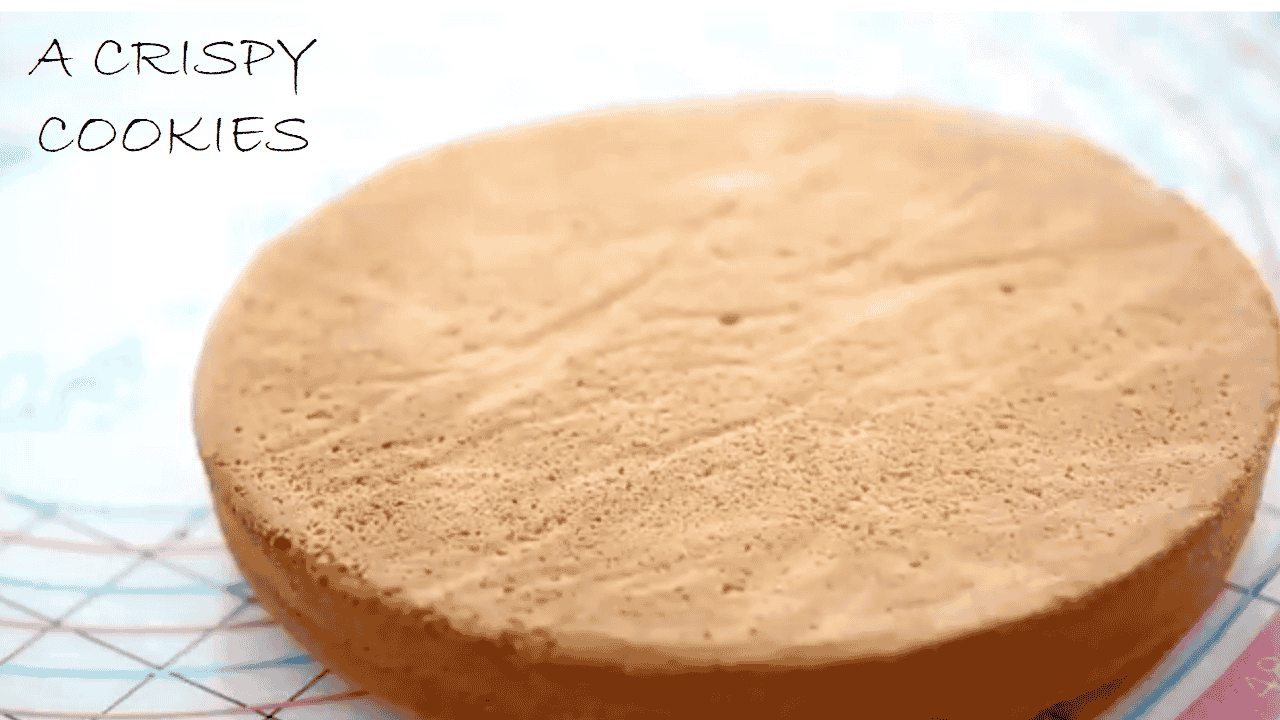
1. Baking the Cake Layers
A soft and fluffy sponge cake is the foundation of a great Princess Cake.
Ingredients for the Sponge Cake:
- 4 large eggs
- 1 cup (200g) granulated sugar
- 1 cup (125g) all-purpose flour
- 1 teaspoon baking powder
- ¼ cup (60ml) melted butter (cooled)
- 1 teaspoon vanilla extract
Instructions:
- Preheat the Oven – Set your oven to 350°F (175°C). Grease and line two round cake pans with parchment paper.
- Whisk Eggs and Sugar – In a large mixing bowl, beat the eggs and sugar with an electric mixer on high speed until the mixture turns pale and fluffy (about 5 minutes).
- Sift Dry Ingredients – In a separate bowl, whisk together flour and baking powder. Gently fold this into the egg mixture using a spatula.
- Add Butter and Vanilla – Carefully pour in the melted butter and vanilla extract, folding everything together until smooth.
- Bake the Cake – Divide the batter evenly between the two pans. Bake for 25-30 minutes or until a toothpick inserted in the center comes out clean.
- Cool Completely – Let the cakes cool in the pans for 10 minutes, then transfer them to a wire rack to cool completely before assembling.
2. Preparing the Pastry Cream (Custard Filling)
This creamy filling adds a rich and delicious layer to the cake.

Ingredients for Pastry Cream:
- 2 cups (500ml) whole milk
- ½ cup (100g) granulated sugar
- 3 egg yolks
- 3 tablespoons cornstarch
- 1 teaspoon vanilla extract
- 2 tablespoons butter
Instructions:
- Heat the Milk – In a saucepan over medium heat, warm the milk until it starts to steam. Do not let it boil.
- Mix Sugar, Cornstarch, and Egg Yolks – In a separate bowl, whisk together sugar, cornstarch, and egg yolks until smooth.
- Temper the Eggs – Slowly pour about ½ cup of warm milk into the egg mixture while whisking continuously. This prevents the eggs from scrambling.
- Cook the Custard – Pour the egg mixture back into the saucepan with the rest of the milk. Stir constantly over medium heat until the mixture thickens (about 5 minutes).
- Add Vanilla and Butter – Remove from heat, stir in vanilla extract and butter until smooth.
- Cool Completely – Transfer to a bowl, cover with plastic wrap (pressing it against the custard to prevent a skin from forming), and refrigerate until chilled.
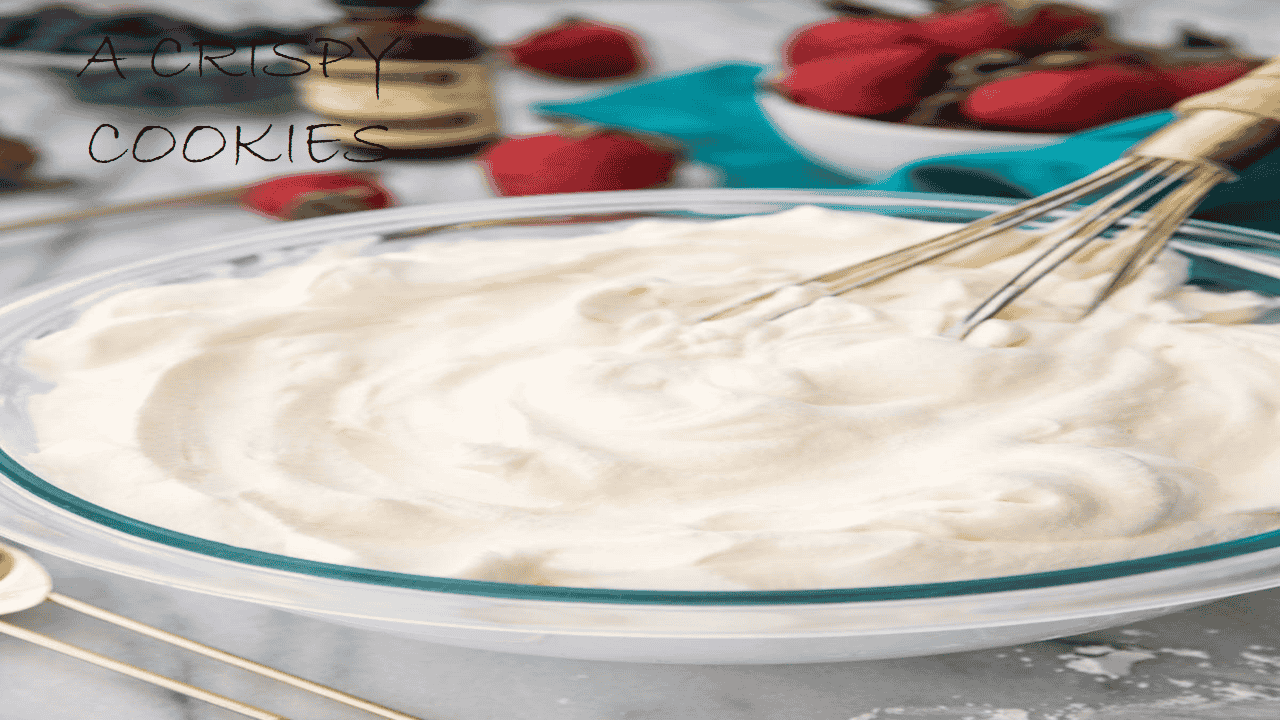
3. Whipping the Cream
Fluffy whipped cream makes the cake light and airy.
Ingredients for Whipped Cream:
- 2 cups (500ml) heavy whipping cream
- ¼ cup (30g) powdered sugar
- 1 teaspoon vanilla extract
Instructions:
- Chill Your Tools – Place a mixing bowl and whisk in the fridge for 15 minutes before starting.
- Whip the Cream – Pour the cold heavy cream into the bowl and beat on medium speed until it starts to thicken.
- Add Sugar and Vanilla – Add powdered sugar and vanilla extract, then continue beating until stiff peaks
- Store in the Fridge – Keep whipped cream refrigerated until ready to use.
4. Assembling the Cake
Now it’s time to put everything together!
Steps for Layering
- Slice the Cake Layers – If your cakes have domed tops, level them with a serrated knife. Then, carefully slice each cake layer in half horizontally, creating 3-4 thin layers.
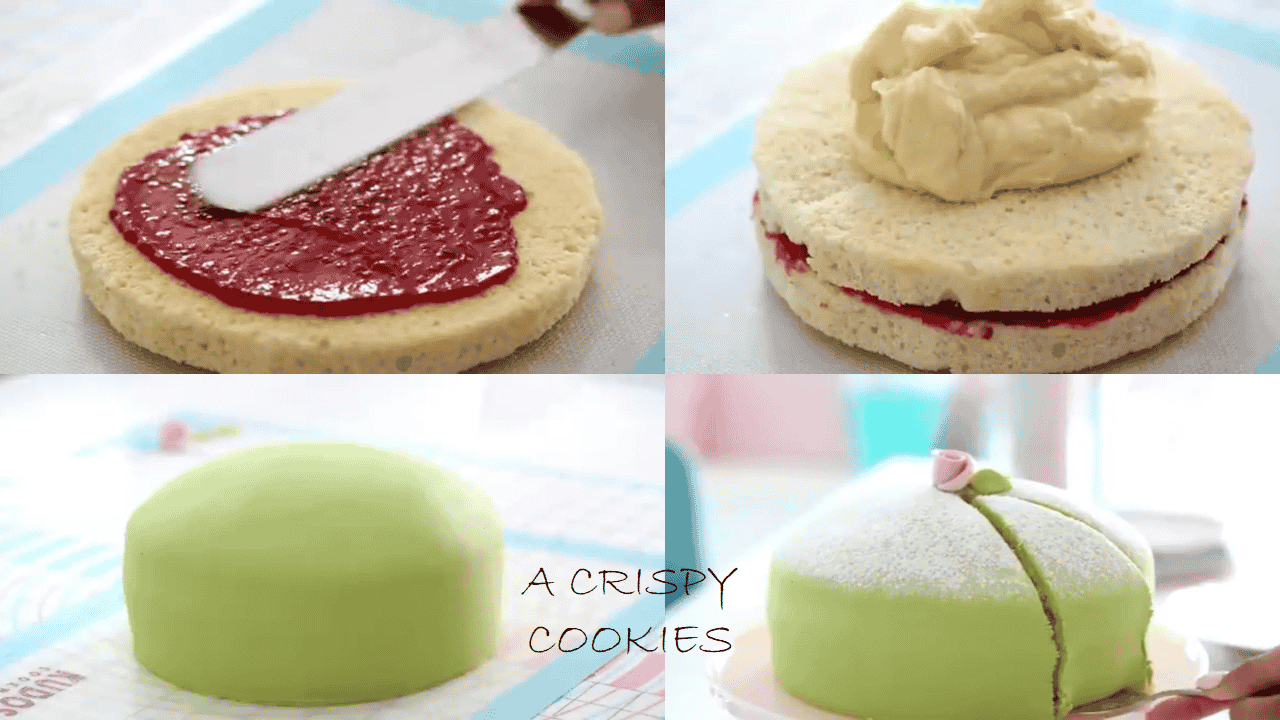
- Spread Raspberry Jam – Place the first cake layer on a serving plate. Spread a thin layer of raspberry jam on top.
- Add Pastry Cream – Spoon a generous amount of pastry cream over the jam and spread evenly.
- Repeat the Layers – Place another cake layer on top and repeat the process with more jam and pastry cream.
- Shape the Cake – Place the final cake layer on top. Use a spatula to spread a thick layer of whipped cream over the entire cake, shaping it into a dome.
- Chill the Cake – Refrigerate for at least 30 minutes to let the layers set.
5. Covering with Marzipan or Fondant
The smooth marzipan or fondant layer gives the cake its signature look.
Ingredients for Marzipan Covering:
- 10 oz (300g) marzipan
- Green food coloring (for traditional Swedish style)
- Powdered sugar (for rolling)
Instructions:
- Color the Marzipan – Knead a few drops of green food coloring into the marzipan until the color is evenly distributed.
- Roll it Out – Dust a clean surface with powdered sugar. Roll the marzipan into a large, thin circle (about ¼-inch thick).
- Cover the Cake – Carefully lift the marzipan and drape it over the cake. Gently press it down to smooth out any wrinkles.
- Trim the Edges – Use a sharp knife to cut off any excess marzipan around the bottom.
For a Disney Princess Cake, you can use colored fondant instead of marzipan to match different princess themes.
6. Final Decoration
Now, it’s time to add the finishing touches!
For a Swedish Princess Cake:
- Marzipan Rose – Roll pink marzipan into a small rose and place it on top.
- Powdered Sugar Dusting – Lightly dust the cake with powdered sugar for a classic look.
For a Disney Princess Cake:
- Princess Cake Toppers – Place small plastic or edible princess figurines on the cake.
- Edible Glitter & Pearls – Add sparkles for a magical effect.
- Buttercream Piping – Use colored frosting to decorate the edges or create a princess dress design.
7. Let the Cake Set & Serve
- Chill the Cake – Refrigerate for at least 1 hour before serving. This helps the layers firm up.
- Slice and enjoy – Use a sharp knife to cut clean slices and serve!
Now you’re ready to enjoy a Perfect Princess Birthday Cake!
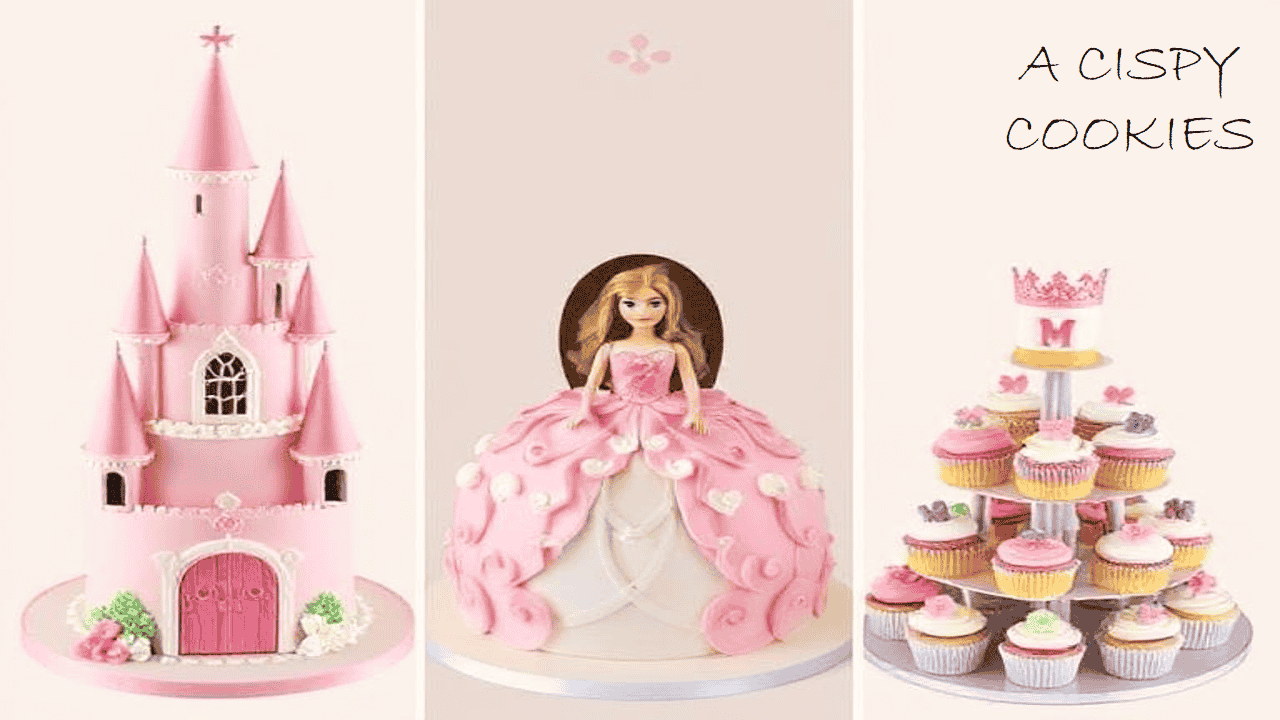
Princess Cake Decoration Ideas
-
Traditional Swedish Princess Cake Decoration
The Swedish Princess Cake has a simple yet elegant design.
Key Decoration Elements:
- Green Marzipan Covering – The traditional cake is covered in smooth, light green marzipan.
- Powdered Sugar Dusting – A light dusting of powdered sugar gives a soft, elegant finish.
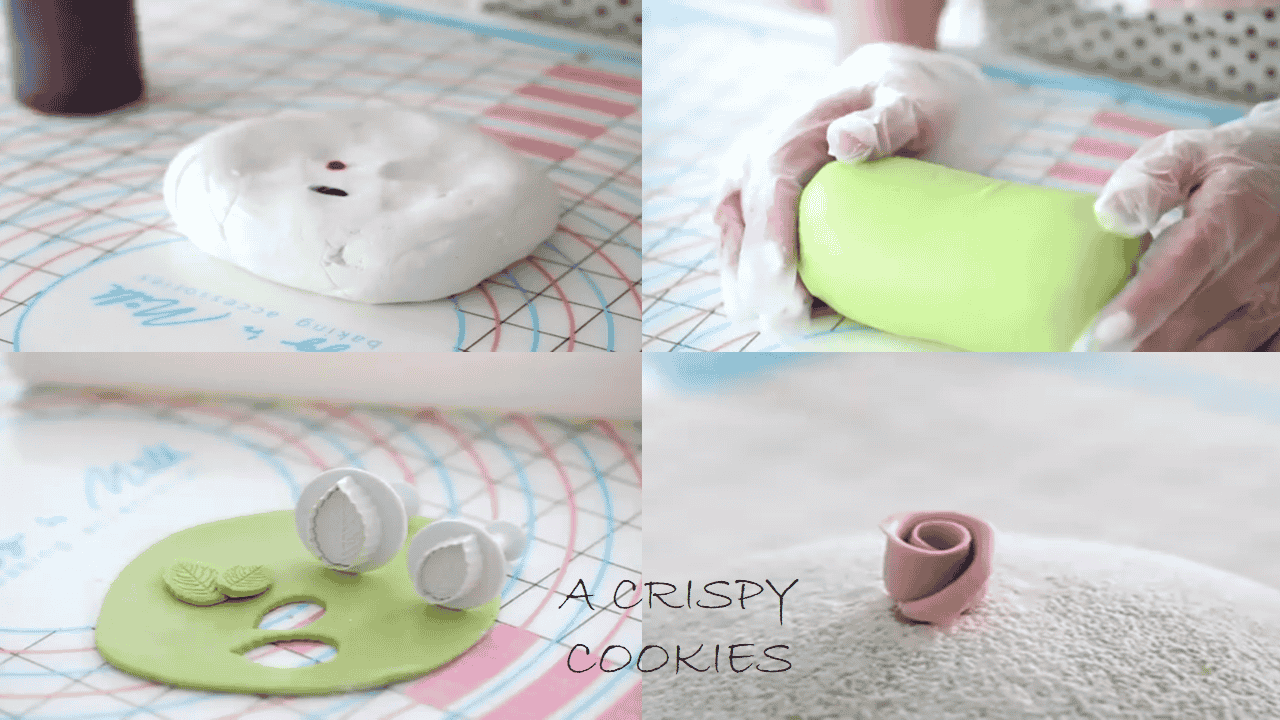
- Marzipan Rose – A handmade pink marzipan rose is placed on top, with two green marzipan leaves for a classic look.
How to Make a Marzipan Rose:
- Roll a small piece of pink marzipan into a thin strip.
- Fold and curl it to form the shape of a rose.
- Use green marzipan to create two small leaves.
- Place the rose and leaves in the center of the cake.
This simple design is perfect for traditional celebrations and elegant tea parties.
-
Disney Princess Cake Decoration
A Disney Princess Cake is all about bright colors, sparkles, and fun princess themes.
Popular Decoration Styles:
- Princess Dress Cake – Shaped like a dress, decorated with colored frosting or fondant.
- Castle Cake – Designed to look like a magical castle with towers and princess details.
- Layered Theme Cake – Different layers feature different princesses, colors, and decorations.
Decoration Ideas:
- Use Fondant or Buttercream – Choose colors that match the princess theme (pink for Aurora, blue for Cinderella, yellow for Belle, etc.).
- Princess Cake Toppers – Add small Disney Princess Cake toppers, like figurines or edible images.
- Edible Glitter & Pearls – Sprinkle edible glitter, pearls, or shimmer dust for a magical effect.
- Piping Designs – Use a piping bag to create swirls, flowers, or lace patterns.
Easy DIY Princess Cake Toppers:
- Print edible images of Disney princesses and place them on the cake.
- Use toy princess figurines that can be kept as a gift after the cake is eaten.
- Make a simple crown or tiara topper using fondant or chocolate.
-
Creative Color Themes
The color of the cake can match different princesses. Here are some ideas:
- Cinderella Cake – Light blue frosting with silver decorations.
- Belle Cake – Yellow frosting with red roses.
- Ariel Cake – Ocean blue and purple with seashell details.
- Elsa Cake – Icy blue with white snowflakes and silver glitter.
If you’re making a multi-princess cake, each tier can have a different color theme for each princess.
-
Final Touches for a Magical Look
- Ribbons & Bows – Add edible ribbons made from fondant or real decorative ribbons.
- Shiny Drip Effect – Use white chocolate or colored ganache for a dripping effect on the edges.
- Gold or Silver Accents – Use edible gold leaf or metallic sprinkles for a royal touch.
Variations of Princess Cake
There are many ways to change a Princess Cake to make it unique. You can try different flavors, create fun designs, or make the cake fit special diets. Here are some ideas!
-
Different Flavors
The traditional Swedish Princess Cake has a vanilla sponge, raspberry jam, pastry cream, and marzipan. But you can try new flavors:
- Chocolate Cake – A rich and sweet option.
- Red Velvet Cake – A soft, red-colored cake with a light cocoa taste.
- Funfetti Cake – A vanilla sponge with colorful sprinkles inside.
You can also use different fillings:
- Strawberry Jam – A sweeter and fruitier choice.
- Lemon Curd – Adds a fresh and tangy flavor.
- Nutella or Chocolate Ganache – Great for chocolate lovers!
For frosting, you can use:
- Cream Cheese Frosting – Tastes great with red velvet cake.
- White Chocolate Ganache – A smooth and creamy topping.
- Fruit-Flavored Buttercream – Like strawberry or mango for extra sweetness.
-
Themed Princess Cakes
You can design a cake based on your favorite Disney Princess.
- Cinderella Cake – Light blue with silver sprinkles.
- Belle Cake – Yellow frosting with red roses.
- Ariel Cake – Blue and green colors like the ocean.
- Frozen Cake (Elsa & Anna) – Icy blue with white snowflakes.
Fun designs include:
- Castle Cake – A tall cake shaped like a fairytale castle.
- Doll Cake – A cake that looks like a princess dress with a doll in the center.
- Cupcake Tower – Small cupcakes decorated with princess themes.
-
Cakes for Special Diets
Some people can’t eat regular cake, but they can still enjoy a Princess Cake with these changes:
- Gluten-Free Cake – Use special flour like almond or rice flour.
- Dairy-Free Cake – Replace milk with almond, coconut, or oat milk.
- Vegan Cake – No eggs or dairy. Use plant-based milk and a vegan frosting.
-
Mini Princess Cakes
If you don’t want a big cake, try these:
- Mini Cakes – Small, single-serving cakes.
- Princess Cupcakes – Easy-to-eat cupcakes with cute decorations.
- Cake Pops – Bite-sized cake covered in chocolate or frosting.
Which One Will You Make?
There are so many ways to change a Princess Cake to fit your style. Pick your favorite idea and make a cake that is both fun and delicious!
Where can I buy a Swedish Princess cake?
You can buy a Swedish Princess Cake from:
- Local Bakeries – Check nearby bakeries that offer European-style cakes.
- Online Retailers – Order from Goldbelly, Amazon, or specialty cake shops.
- IKEA Cafés – Some IKEA locations sell Swedish Princess Cake.
- European Pastry Shops – Look for Scandinavian bakeries in your area.
Tips and Troubleshooting
Making a Princess Cake can be fun, but sometimes things don’t go as planned. Here are some tips to help you make a perfect cake and fix common problems.
Tips for a Perfect Princess Cake
- ✔ Use Fresh Ingredients – Fresh eggs, butter, and cream make the cake taste better.
- ✔ Chill the Cake Before Decorating – A cold cake is easier to work with and won’t fall apart.
- ✔ Roll Marzipan Thin – If it’s too thick, it will be hard to cover the cake.
- ✔ Use Powdered Sugar for Rolling – This prevents marzipan from sticking.
- ✔ Keep the Layers Even – Trim the cake layers so they stack neatly.
- ✔ Work on a Cool Surface – Marzipan and buttercream melt in warm rooms.
Common Problems and How to Fix Them
Here’s a quick guide to solving common Princess Cake problems:
| Problem | Cause | How to Fix It |
| The Cake is too dry | Overbaked or not enough moisture | Brush layers with simple syrup or fruit juice |
| Sponge cake collapsed | Underbaked or the oven door opened early | Beat eggs and sugar well; don’t open the oven too soon |
| Pastry cream is too runny | Not cooked long enough or too much liquid | Cook longer until thick; chill before using |
| Whipped cream is too soft | Not whipped enough or has too warm | Use cold cream and whip until stiff peaks form |
| Marzipan is cracking | Too dry or rolled too thin | Knead well before rolling; add a little water if needed |
| Marzipan is sticky | Too warm or has too much moisture | Dust with powdered sugar before rolling |
How to Store a Princess Cake
To keep your Princess Cake fresh, follow these storage tips:
- In the Fridge – Place the cake in an airtight container and store it in the refrigerator for up to 3 days. Before serving, let it sit at room temperature for about 15 minutes to soften.
- Freezing the Sponge Cake – If you want to prepare in advance, you can freeze the sponge cake layers. Wrap each layer tightly in plastic wrap and then in foil. It will stay fresh for up to 2 months. However, do not freeze the fully decorated cake, as marzipan becomes sticky when thawed.
- At Room Temperature – If you plan to serve the cake on the same day, you can leave it at room temperature for a few hours. Keep it in a cool place away from direct sunlight to prevent the marzipan from melting.
How to Serve a Princess Tsunami Cake
Serving a Princess Cake the right way ensures the best taste and presentation. Here’s how to do it:
- Chill Before Serving – A Princess Cake tastes best when slightly chilled. Keep it in the fridge for at least 1-2 hours before serving so the layers hold their shape.
- Use a Sharp Knife – Marzipan can be delicate, so use a sharp, serrated knife to slice the cake. Wipe the knife between cuts for clean slices.
- Portion Sizes – A standard Princess Cake serves 8 to 10 people, depending on the slice size. Cut small wedges since the cake is rich and creamy.
- Best Pairings – Enjoy Princess Cake with a cup of coffee, tea, or hot chocolate. The slightly nutty marzipan and sweet cream balance well with warm drinks.
- Serving Temperature – Take the cake out of the fridge for 10–15 minutes before serving to soften the marzipan slightly. This makes it easier to slice and enhances the flavor.
FAQs
-
Why is it called a Princess Cake?
The Princess Cake was named after three Swedish princesses—Margaretha, Märtha, and Astrid—who loved this cake. It became famous in Sweden and is now enjoyed worldwide.
-
What does Princess Cake taste like?
A Princess Cake has a soft, fluffy texture with a mix of sweet and creamy flavors. It combines light sponge cake, rich pastry cream, fluffy whipped cream, and a slightly nutty marzipan covering.
-
Which cake flavor is best for a Princess Cake?
The traditional vanilla sponge cake is the most popular, but you can also try chocolate, almond, or lemon flavors for a twist.
-
Why is the marzipan usually green?
The classic Swedish Princess Cake is covered in green marzipan because it was the original color used. Today, people also use pink, white, or other colors to match different themes.
-
How do I prevent marzipan from cracking?
To keep marzipan smooth and crack-free:
- Knead it well before rolling to make it soft.
- Use powdered sugar on the surface to stop it from sticking.
- Roll it slightly thick so it doesn’t tear.
- Gently lift and place it over the cake without pulling too much.
Conclusion
No matter which Princess Cake you choose to make—the classic Swedish Princess Cake or a magical Disney Princess Cake—both are special in their own way and bring joy to any celebration.
A Swedish Princess Cake is a traditional treat with soft sponge cake, creamy pastry filling, fluffy whipped cream, and a smooth marzipan covering. It’s elegant, delicious, and perfect for those who love a light yet rich dessert.
A Disney Princess Cake, on the other hand, is all about creativity and fun. It can be decorated with fondant, buttercream, edible glitter, and princess-themed toppers to create the perfect cake for birthdays and themed parties.
Whichever cake you choose, the most important thing is to enjoy the process and have fun decorating. So, grab your ingredients, get creative, and make your own beautiful Princess Cake that will bring smiles to everyone! 😊
IF YOU LIKE BOTH PRINCESS CAKE RECIPES
- Connect with us on “Crispy Cookies” by tagging us.
- Stay updated on Facebook, Instagram, Pinterest, and Twitterby following us.
- Spread the sweetness by sharing or pinning this recipe on Pinterest.
- Leave a comment down below!!
“Thanks for joining our baking family. We’re glad to have you here. Happy baking! 🍰🎉.”
Best Swedish Princess & Disney Princess Cake
Ingredients
- Making this cake requires a few key ingredients. Whether you're making a Swedish Princess Cake or a Disney Princess Cake here’s what you’ll need:
For Swedish Princess Cake
- Sponge Cake – A light and fluffy base made with eggs sugar, flour, and butter.
- Pastry Cream – A rich and creamy custard filling made with milk sugar, egg yolks, and cornstarch.
- Whipped Cream – Soft and airy cream used for layering and covering the cake.
- Raspberry Jam – Adds a fruity and slightly tart flavor between layers.
- Marzipan – A sweet almond paste used to cover the cake traditionally colored light green.
- Powdered Sugar – For dusting on top to add a beautiful finish.
For Disney Princess Cake
- Cake Base – Can be vanilla chocolate, or funfetti, depending on the theme.
- Buttercream or Fondant – Used to frost and decorate the cake.
- Food Coloring – Helps create vibrant princess-themed colors.
- Princess Cake Toppers – Small plastic or edible decorations featuring Disney princesses.
- Edible Glitter & Pearls – Adds sparkle and a magical touch.
- With these ingredients you can make a beautiful and delicious Princess Cake perfect for any celebration!
Instructions
- Creating a Princess Cake takes time and patience, but the end result is stunning. Follow these steps carefully to achieve the perfect cake.
Baking the Cake Layers
- A soft and fluffy sponge cake is the foundation of a great Princess Cake.
- Preheat the Oven – Set your oven to 350°F (175°C). Grease and line two round cake pans with parchment paper.
- Whisk Eggs and Sugar – In a large mixing bowl, beat the eggs and sugar with an electric mixer on high speed until the mixture turns pale and fluffy (about 5 minutes).
- Sift Dry Ingredients – In a separate bowl, whisk together flour and baking powder. Gently fold this into the egg mixture using a spatula.
- Add Butter and Vanilla – Carefully pour in the melted butter and vanilla extract, folding everything together until smooth.
- Bake the Cake – Divide the batter evenly between the two pans. Bake for 25-30 minutes or until a toothpick inserted in the center comes out clean.
- Cool Completely – Let the cakes cool in the pans for 10 minutes, then transfer them to a wire rack to cool completely before assembling.
Preparing the Pastry Cream (Custard Filling)
- This creamy filling adds a rich and delicious layer to the cake.
- Heat the Milk – In a saucepan over medium heat, warm the milk until it starts to steam. Do not let it boil.
- Mix Sugar, Cornstarch, and Egg Yolks – In a separate bowl, whisk together sugar, cornstarch, and egg yolks until smooth.
- Temper the Eggs – Slowly pour about ½ cup of warm milk into the egg mixture while whisking continuously. This prevents the eggs from scrambling.
- Cook the Custard – Pour the egg mixture back into the saucepan with the rest of the milk. Stir constantly over medium heat until the mixture thickens (about 5 minutes).
- Add Vanilla and Butter – Remove from heat, stir in vanilla extract and butter until smooth.
- Cool Completely – Transfer to a bowl, cover with plastic wrap (pressing it against the custard to prevent a skin from forming), and refrigerate until chilled.
Whipping the Cream
- Fluffy whipped cream makes the cake light and airy.
- Chill Your Tools – Place a mixing bowl and whisk in the fridge for 15 minutes before starting.
- Whip the Cream – Pour the cold heavy cream into the bowl and beat on medium speed until it starts to thicken.
- Add Sugar and Vanilla – Add powdered sugar and vanilla extract, then continue beating until stiff peaks form.
- Store in the Fridge – Keep whipped cream refrigerated until ready to use.
Assembling the Cake
- Now it’s time to put everything together!
Steps for Layering:
- Slice the Cake Layers – If your cakes have domed tops, level them with a serrated knife. Then, carefully slice each cake layer in half horizontally, creating 3-4 thin layers.
- Spread Raspberry Jam – Place the first cake layer on a serving plate. Spread a thin layer of raspberry jam on top.
- Add Pastry Cream – Spoon a generous amount of pastry cream over the jam and spread evenly.
- Repeat the Layers – Place another cake layer on top and repeat the process with more jam and pastry cream.
- Shape the Cake – Place the final cake layer on top. Use a spatula to spread a thick layer of whipped cream over the entire cake, shaping it into a dome.
- Chill the Cake – Refrigerate for at least 30 minutes to let the layers set.
Covering with Marzipan or Fondant
- The smooth marzipan or fondant layer gives the cake its signature look.
- Color the Marzipan – Knead a few drops of green food coloring into the marzipan until the color is evenly distributed.
- Roll it Out – Dust a clean surface with powdered sugar. Roll the marzipan into a large, thin circle (about ¼-inch thick).
- Cover the Cake – Carefully lift the marzipan and drape it over the cake. Gently press it down to smooth out any wrinkles.
- Trim the Edges – Use a sharp knife to cut off any excess marzipan around the bottom.
- For a Disney Princess Cake, you can use colored fondant instead of marzipan to match different princess themes.
Final Decoration
- Now, it’s time to add the finishing touches!
For a Swedish Princess Cake:
- Marzipan Rose – Roll pink marzipan into a small rose and place it on top.
- Powdered Sugar Dusting – Lightly dust the cake with powdered sugar for a classic look.
For a Disney Princess Cake:
- Princess Cake Toppers – Place small plastic or edible princess figurines on the cake.
- Edible Glitter & Pearls – Add sparkles for a magical effect.
- Buttercream Piping – Use colored frosting to decorate the edges or create a princess dress design.
Let the Cake Set & Serve
- Chill the Cake – Refrigerate for at least 1 hour before serving. This helps the layers firm up.
- Slice and enjoy – Use a sharp knife to cut clean slices and serve!
Now you’re ready to enjoy a Perfect Princess Birthday Cake!