Cookie Ice Cream Sandwiches: Soft-Bite

- Time: 20 min active + 6 hours 30 mins total (including chilling)
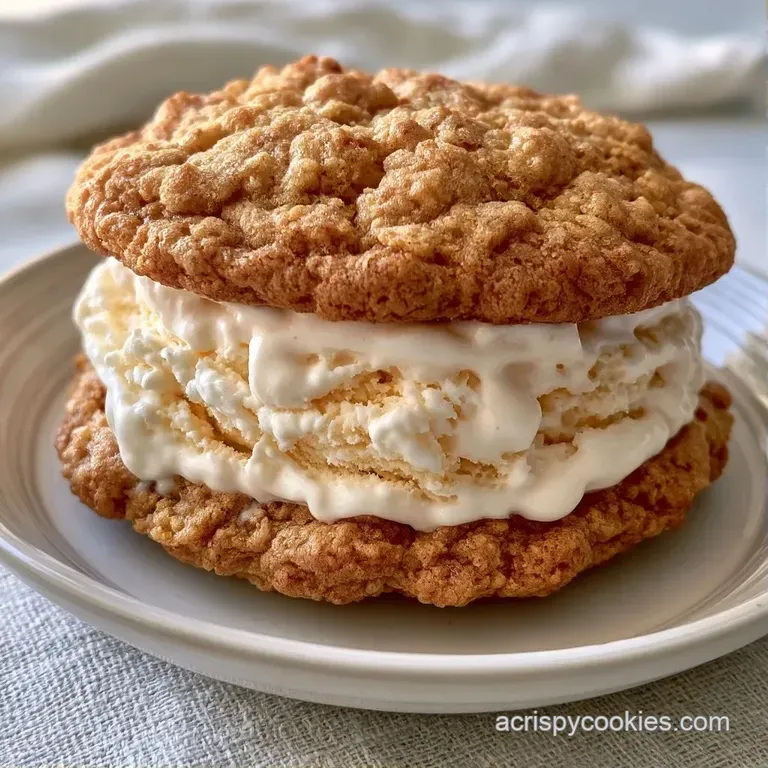
- Flavor/Texture Hook: Chewy chocolate chip cookies with a creamy, frozen center
- Perfect for: Summer parties, bake sales, or kids' treats
Easy Cookie Ice Cream Sandwiches
That smell of browning butter and vanilla hitting the oven air is the best part of the day. But let's be honest, most of us have had a disaster with these. You bite into a frozen treat and it feels like you're chewing on a chilled coaster.
The cookies get too hard, or the ice cream squirts out the sides before you can even take a second bite.
I remember making a batch for a birthday where the cookies were so overbaked they actually cracked my filling. It was a mess. I spent the next few weekends messing with the oven temp and the pull time.
The fix is all in the "under bake." You want the center to look almost raw when they come out. Once they hit the freezer, that texture stabilizes into a chewy bite rather than a frozen brick. These Cookie Ice Cream Sandwiches are all about that balance of a soft cookie and a firm scoop.
Avoiding the Frozen Brick
Most people bake their cookies until they look "done," but that's the trap. Once you freeze a fully baked cookie, the starches recrystallize and make the dough rigid.
The Underbake: Pulling cookies while the center is pale keeps them bendy. This means they'll actually give way when you bite into them while frozen.
The Temperature Gap: Cooling cookies completely prevents the ice cream from melting instantly. If the cookie is even slightly warm, you get a soupy mess that's impossible to wrap.
The Press Technique: Flattening the ice cream toward the edges creates a seal. This stops the filling from sliding out the sides during your first bite.
| Method | Time | Texture | Best For |
|---|---|---|---|
| Fast (store-bought) | 15 mins | Firm/Dry | Last minute guests |
| Classic (Homemade) | 6 hours 30 mins | Chewy/Rich | Parties & Gifts |
Ingredient Guide
The balance of sugars is what prevents these from becoming too crispy. Brown sugar adds moisture, while granulated sugar gives the edges that slight snap.
What Each Ingredient Does
| Ingredient | What It Does | Best Swap |
|---|---|---|
| Brown Sugar | Adds chew and moisture | Dark brown sugar for more molasses |
| Baking Soda | Helps the cookie spread | 1/4 tsp baking powder (less spread) |
| All Purpose Flour | Provides the structure | 1:1 gluten-free flour blend |
| Vanilla Ice Cream | The creamy core | Strawberry or Mint Chip |
The Shopping List
- 1 cup (225g) unsalted butter, softened Why this? High fat content ensures a soft crumb
- ¾ cup (150g) brown sugar, packed
- ½ cup (100g) granulated sugar
- 2 large (100g) eggs, room temperature
- 1 tsp (5ml) vanilla extract
- 2 ¼ cups (280g) all purpose flour
- 1 tsp (5g) baking soda
- ½ tsp (3g) salt
- 1 cup (170g) semi sweet chocolate chips
- 1 quart (946ml) premium vanilla ice cream, slightly softened Why this? Easier to scoop and spread
Necessary Gear
You don't need a professional kitchen for this, but a few things make it easier. I use a stand mixer such as KitchenAid to get the butter and sugar really fluffy.
- Baking sheets (two)
- Parchment paper
- Wire cooling rack
- Large mixing bowl
- Ice cream scoop (small)
- Plastic wrap for individual packaging
Assembly Steps
Preparing the Dough
- Cream the softened butter, brown sugar, and granulated sugar together until the mixture is pale and fluffy (about 3 minutes).
- Beat in the eggs one at a time, then stir in the vanilla extract.
- Whisk together the flour, baking soda, and salt in a separate bowl.
- Gradually incorporate the dry ingredients into the wet mixture on low speed until just combined. Note: Overmixing makes the cookies tough
- Fold in the chocolate chips by hand using a spatula.
Baking for Texture
- Preheat your oven to 350°F (175°C) and line your baking sheet with parchment paper.
- Scoop rounded tablespoons of dough and space them 2 inches apart.
- Bake for 9–11 minutes. Remove them when the edges are just set but the centers still look slightly underbaked.
- Cool on the pan for 5 minutes before transferring to a wire rack to cool completely.
Assembling the Sandwiches
- Place 12 cookies flat side up on a tray.
- Scoop a generous ball of vanilla ice cream onto the center of each cookie.
- Press a second cookie on top, gently flattening the ice cream toward the edges to create a uniform disc.
- Wrap each sandwich individually in plastic wrap or parchment paper.
- Freeze for at least 2 hours.
Common Pitfalls
It's easy to overthink these, but most issues come down to temperature. If your cookies are too flat, your butter might have been too warm. If the ice cream is melting too fast, your cookies weren't cooled long enough.
Why Your Cookies Cracked
This usually happens if you press the top cookie too hard or if the cookies were overbaked and brittle. Use a gentle pressing motion and ensure you're following the underbaking rule. For a more reliable base, you can check out these Classic Chocolate Chip Cookies recipe for a standard chewy texture.
Why the Filling Squeezes Out
If the ice cream pushes out the sides, you likely didn't flatten it enough toward the edges. The ice cream should almost touch the edge of the cookie before you put the lid on.
| Problem | Root Cause | Solution |
|---|---|---|
| Hard Cookies | Overbaked | Pull them 1 minute earlier |
| Melting Base | Warm cookies | Cool 1 hour on a rack |
| Uneven Layers | Poor scooping | Use a measured ice cream scoop |
Chef's Note: If you're struggling with the ice cream sliding, pop the assembled sandwiches in the freezer for 10 minutes before wrapping them. This "sets" the shape.
Flavor Swaps
If you want to change the vibe, you can easily tweak the base or the center. For a more colorful look, try a Homemade Custard Ice Cream that you can dye with food coloring.
Creating a Vanilla Ice Cream Sandwich Recipe Twist
Instead of chocolate chips, leave the dough plain and add a swirl of raspberry jam to the ice cream. This creates a bright, tart contrast to the rich butter.
Crafting a Sugar Cookie Ice Cream Sandwich Recipe
Swap the brown sugar for granulated sugar and omit the chocolate chips. These are great for kids because they look cleaner and pair well with mint chip ice cream.
Making it gluten-free
Use a 1:1 gluten-free baking flour. I find that adding an extra 1/2 teaspoon of xanthan gum helps the cookies hold the weight of the ice cream without snapping.
Transitioning to Vegan
Use vegan butter sticks and a flax egg (1 tbsp ground flax + 3 tbsp water). Use a coconut based vanilla ice cream, though keep in mind it melts faster than dairy.
| Original Ingredient | Substitute | Why It Works |
|---|---|---|
| Semi sweet Chips | White Chocolate | Adds creaminess; Note: Sweeter than semi sweet |
| Vanilla Ice Cream | Mango Sorbet | Fruity and refreshing; Note: Melts faster |
| Butter | Coconut Oil (Solid) | Similar fat; Note: Adds coconut flavor |
Sizing Up or Down
If you're making these for a small group or a huge party, don't just multiply everything blindly.
Scaling Down (Half Batch): Use a smaller baking sheet and reduce the bake time by about 1-2 minutes. For the egg, beat one large egg in a bowl and use exactly 2 tablespoons.
Scaling Up (Double Batch): Work in batches. If you crowd the oven, the temperature drops and the cookies won't set properly. Keep the salt and baking soda at 1.5x instead of 2x to avoid a metallic taste.
Baking Adjustments: When doubling the recipe, lower the oven temp to 325°F (160°C) and extend the time by 2-3 minutes to ensure the centers stay soft without burning the bottoms.
Cookie Myths
Some people say you need to freeze the dough first for better Cookie Ice Cream Sandwiches. While chilling dough prevents spread, it's not necessary here since we actually want a slightly softer, flatter cookie to cradle the ice cream.
Another myth is that you should use a "hard" ice cream. Actually, a premium, high fat ice cream is better because it's more pliable and doesn't crystallize as harshly in the freezer.
Storage Tips
Keep these wrapped individually. If you leave them open in the freezer, the cookies will absorb the "freezer smell" and the ice cream will develop ice crystals on the surface.
Fridge and Freezer: Store in an airtight container in the freezer for up to 2 weeks. Do not store them in the fridge, as the cookies will turn soggy and the ice cream will melt.
Zero Waste: If you have leftover dough, roll it into tiny balls and bake them as "mini bites." If you have leftover ice cream, blend it with a bit of milk for a quick milkshake.
Serving Your Treats
To get that viral look, roll the edges of the assembled sandwiches in sprinkles, crushed nuts, or mini chocolate chips before the final freeze. This adds a pop of color and a bit of crunch.
For the best experience, let the sandwiches sit on the counter for 2-3 minutes before serving. This softens the cookie just enough so it doesn't crack when you take that first big bite. Serve them on a platter with a few fresh berries to cut through the richness of the Cookie Ice Cream Sandwiches.
Recipe FAQs
Can I make cookies and cream ice cream sandwiches with this recipe?
Yes, you can. Using the chocolate chip cookies and vanilla ice cream provided creates a classic flavor profile similar to cookies and cream.
What kind of cookie is used for these ice cream sandwiches?
Soft chocolate chip cookies. These provide the ideal balance of sweetness and a chewy texture that won't crack when you bite into the frozen center.
How to prevent cookies from getting soggy?
Freeze them immediately after assembly. Wrap each sandwich individually in plastic wrap or parchment paper to lock in moisture and prevent the cookies from absorbing freezer odors.
How to assemble the sandwiches without the ice cream melting?
Use slightly softened ice cream. Scoop a generous ball onto the center of the cookie and gently flatten it toward the edges before pressing the second cookie on top.
Can I store these in the refrigerator?
No, keep them in the freezer. Storing these in the fridge will cause the ice cream to melt and the cookies to become soggy.
How to ensure the cookies stay soft enough to bite through?
Bake for only 9 11 minutes at 350°F. Remove them when the edges are just set but the centers still look slightly underbaked. If you mastered the sensory doneness cues here, apply them to our peach cobbler muffins for perfect results.
Why should I wrap the sandwiches individually?
To prevent ice crystals from forming. Individual wrapping protects the surface of the ice cream and prevents the cookies from absorbing "freezer smell."
Cookie Ice Cream Sandwiches

