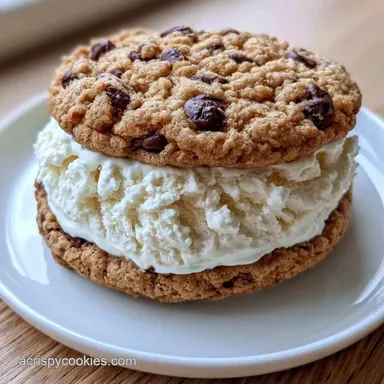
Homemade Chipwich Ice Cream Sandwich: Creamy Center
- Time: 20 min active + 2 hrs 10 mins chilling
- Flavor/Texture Hook: Chewy, buttery cookies with a cold, creamy center
- Perfect for: Summer parties, kid friendly treats, or weekend baking
Homemade Chipwich Ice Cream Sandwich
The smell of browning butter and melting chocolate fills the kitchen, and it's honestly the best part of the day. But let's be real, most home-made versions of this treat end up as a soggy mess.
You bite in, and the cookie has absorbed all the moisture from the ice cream, turning into a cakey sponge instead of a chewy biscuit.
I used to struggle with this until I realized the cookie temperature is everything. If you assemble these while the cookies are even slightly warm, you're just creating a melt zone. The trick is to treat the cookies like a frozen shield.
Making your own Homemade Chipwich Ice Cream Sandwich is actually a quick fix if you follow a strict timeline. You get that nostalgic, fairground vibe but high-quality chocolate and ice cream that doesn't taste like chemicals.
The Truth About Soggy Cookies
The biggest problem with this dessert is moisture migration. Ice cream is mostly water and fat, and a room temperature cookie is a sponge. When they meet, the cookie sucks up the moisture, losing its structure.
To stop this, we use a flash freeze. By putting the cookies in the freezer for 30 minutes before assembly, we create a thermal barrier. This keeps the ice cream from melting instantly upon contact, which preserves the chew of the cookie.
Another issue is overbaking. If the cookies are too hard, they crack when you press the ice cream in. If they're too soft, they collapse. We aim for "just set" edges and a slightly underdone center to ensure they stay flexible yet sturdy.
The Prep Flow
- Prep: 20 minutes
- Bake: 10 minutes
- Freeze/Set: 2 hours 10 minutes
| Fresh Baked | store-bought Shortcut | Impact |
|---|---|---|
| Chewy, buttery texture | Often dry or crumbly | Much better mouthfeel |
| Control over sugar/salt | High preservatives | Cleaner taste |
| Custom chip ratio | Random chocolate distribution | More chocolate per bite |
Recipe Details and Timing
Getting the timing right is where most people trip up. You can't rush the cooling process, or the cookies will spread too much and lose their shape. Trust the timer, not your eyes, when it comes to the final set.
Precision Checkpoints 1. Butter must be softened but not oily (about 65°F). 2. Bake for exactly 9-11 minutes, removing them the second the edges turn golden. 3. The final freeze must be at least 1.5 hours to lock the sandwich together.
For those who love the filling, you might consider using homemade custard ice cream to add more depth to the flavor.
Ingredient Deep Dive
The balance of sugars is what gives this recipe its specific chew. Brown sugar adds moisture and a molasses note, while granulated sugar helps the edges crisp up.
| Ingredient | What It Does | Best Swap |
|---|---|---|
| Unsalted Butter | Provides structure and richness | Salted butter (omit extra salt) |
| Brown Sugar | Creates the chewy center | Dark brown sugar for more molasses |
| AP Flour | Gives the cookie its body | 1:1 gluten-free blend |
| Vanilla Ice Cream | The creamy core | Strawberry or Mint Chip |
According to King Arthur Baking, the protein content in all purpose flour is what determines how much the cookie spreads. Using a standard AP flour ensures these stay thick enough to hold a heavy scoop of ice cream.
Essential Gear List
You don't need a professional kitchen for this, but a few tools make the process faster. A stand mixer such as a KitchenAid is great, but a hand mixer works just as well.
- Baking sheets (two)
- Parchment paper (essential to prevent sticking)
- Large mixing bowl
- Small whisk
- Ice cream scoop (preferably a spring loaded one)
- Flat spatula
Detailed Assembly Steps

Right then, let's get into the actual process. Follow these steps in order to avoid the "melting chaos" that happens when you're too eager to eat.
- Cream the softened butter and both sugars. Beat for about 3 minutes until the mixture looks pale and fluffy. Note: This incorporates air for a lighter bite.
- Beat in the eggs and vanilla extract. Mix until just combined.
- In a separate bowl, whisk the flour, baking soda, and salt. Gradually pour the dry ingredients into the wet mixture, mixing on low.
- Fold in the semi sweet chocolate chips using a spatula.
- Scoop rounded tablespoons of dough onto parchment lined sheets. Space them 2 inches apart.
- Bake at 350°F (175°C) for 9-11 minutes until the edges are golden but the centers look soft.
- Let the cookies cool completely on the pan. Don't move them too early or they'll break.
- Place the cooled cookies on a tray in the freezer for 30 minutes.
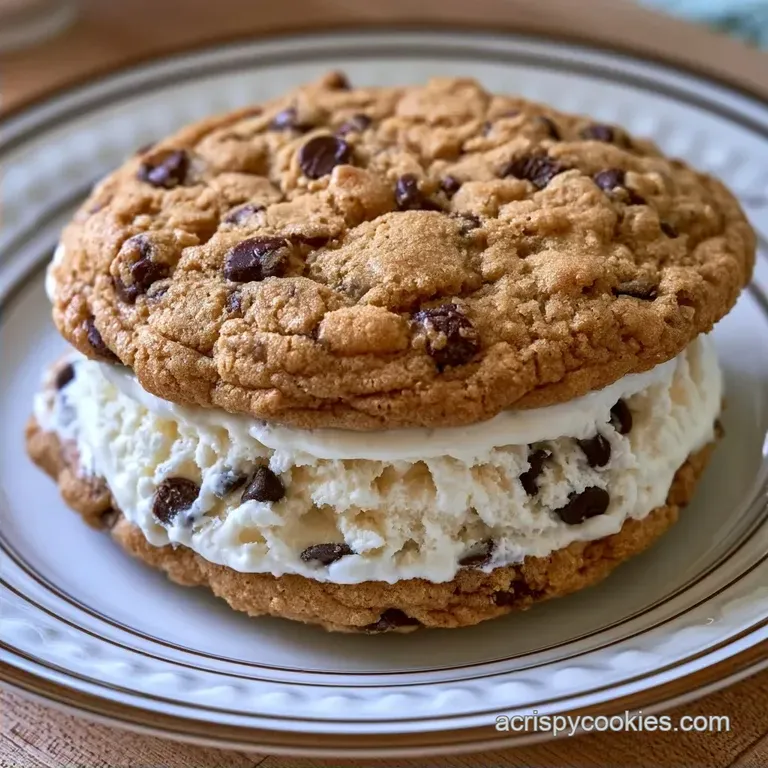
- Scoop a generous portion of softened vanilla ice cream onto the flat side of one frozen cookie. Sprinkle with mini chocolate chips.
- Press another frozen cookie on top. Freeze the assembled sandwiches for 1.5 hours before serving.
Avoiding Kitchen Disasters
When things go wrong with this recipe, it's usually a temperature issue. Whether it's the butter being too melted or the ice cream being too soft, heat is the enemy here.
Troubleshooting Common Issues
| Issue | Solution |
|---|---|
| Why Your Cookies Spread | If your cookies turn into thin pancakes, your butter was likely too warm. Butter that is "melted" rather than "softened" loses its ability to hold air, causing the dough to flatten in the oven. |
| Why The Filling Melts | Assembling the sandwiches with room temperature cookies creates instant heat transfer. This melts the outer layer of the ice cream, making the sandwich slide apart. |
| Why They Are Too Hard | Overbaking by even 2 minutes can turn a chewy cookie into a hard biscuit. This makes it impossible to press the ice cream in without the cookie cracking. |
Make It Your Own
Once you've got the base down, you can start playing with the flavors. The Homemade Chipwich Ice Cream Sandwich is a great canvas for experimentation.
Decision Shortcut
- If you want more chew: Increase brown sugar by 2 tablespoons.
- If you want a crunchier edge: Bake for an extra 60 seconds.
- If you want a fancy version: Roll the edges of the ice cream in sprinkles or crushed nuts.
For more ideas on different cookie bases, you can check out my cookie ice cream sandwiches guide. You could also swap the vanilla ice cream for salted caramel or a rich chocolate fudge to change the profile.
Dietary Swaps - dairy-free: Use coconut oil instead of butter and a full fat coconut milk ice cream. - Nut free: The recipe is naturally nut free, just double check your chocolate chip labels.
Storage Guidelines
Since these are frozen treats, storage is straightforward, but you have to prevent freezer burn. If you leave them uncovered, the ice cream will pick up the taste of whatever else is in your freezer.
Store the sandwiches in a single layer on a tray until they are fully set. Once hard, wrap each one individually in parchment paper or plastic wrap. Place them all in a heavy duty freezer bag. They'll stay good for up to 2 months.
For zero waste, don't throw away any leftover dough. Scoop them into tiny, dime sized balls and bake them for 6 minutes. These mini cookies are great for snacking while you wait for the main batch to freeze.
Presentation Tips
Serving these straight from the freezer can be a struggle because they're often too hard to bite into immediately. Let them sit on the counter for about 3-5 minutes. This softens the ice cream just enough to make the experience smooth.
To make them look like they came from a bakery, use a knife to trim the edges of the ice cream so they are perfectly flush with the cookies. You can also roll the sides in mini chocolate chips or crushed Oreos for extra texture.
If you're serving these at a party, place them on a chilled platter. To keep them from sliding, you can put a small dollop of melted chocolate on the bottom of the platter and set the sandwiches on top to "anchor" them.
Quick Fixes for Serving
- Too hard to bite? Let them thaw for 5 mins.
- Sliding off the plate? Use a chilled serving tray.
- Messy edges? Trim with a warm knife.
Recipe FAQs
What ingredients are needed for homemade Chipwich sandwiches?
Butter, sugars, eggs, vanilla, flour, baking soda, salt, semi sweet chocolate chips, vanilla ice cream, and mini chips. These create a base similar to our chewy chocolate chip cookies.
Why did my cookies spread too much in the oven?
Your butter was likely too warm. Butter that is melted rather than softened loses its ability to hold air, causing the dough to flatten during baking.
How to prevent the ice cream from melting during assembly?
Flash freeze the cooled cookies on a tray for 30 minutes. This prevents the cookies from transferring heat to the ice cream upon contact.
Why are my cookies hard instead of chewy?
They were likely overbaked. Even two extra minutes in the oven can turn a chewy cookie into a hard biscuit.
How to store these ice cream sandwiches to avoid freezer burn?
Wrap each sandwich individually in parchment or plastic wrap. Place them in a heavy duty freezer bag to keep them fresh for up to two months.
Is it true I can assemble the sandwiches with room temperature cookies?
No, this is a common misconception. Room temperature cookies create instant heat transfer that melts the filling and makes the sandwich slide apart.
How to assemble the sandwiches for the best set?
Scoop softened vanilla ice cream onto a frozen cookie, sprinkle with mini chips, and press another frozen cookie on top. Freeze the completed sandwiches for 1.5 hours before serving.
Homemade Chipwich Ice Cream Sandwich