Chewy Cocoa Brownie Cookies in 53 Minutes
- Time: 25 min active + 13 min bake
- Flavor/Texture Hook: Fudgy center with a shimmering, crisp crust
- Perfect for: Last minute cravings or a gluten-free dessert option
That smell of toasted cocoa hitting the air is the best part of baking. I used to think you had to melt expensive chocolate bars to get that dense, brownie like chew. I spent way too much time messing with double boilers and worrying about seizing the chocolate.
But honestly, you don't need the bars. A good cocoa powder and a bit of aeration do all the heavy lifting here. These are for when you want a treat that feels indulgent but doesn't take three hours of prep and a mountain of dishes.
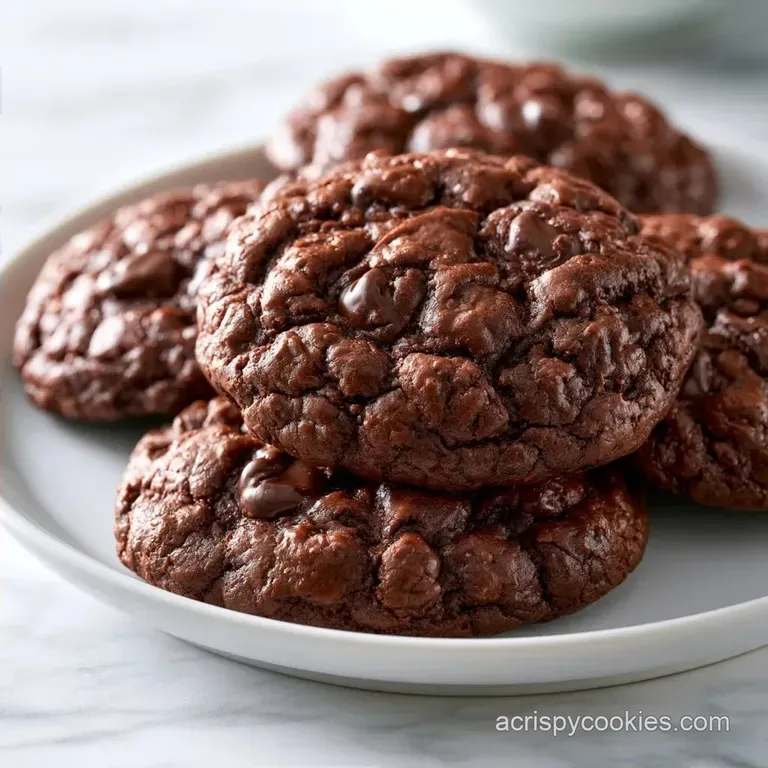
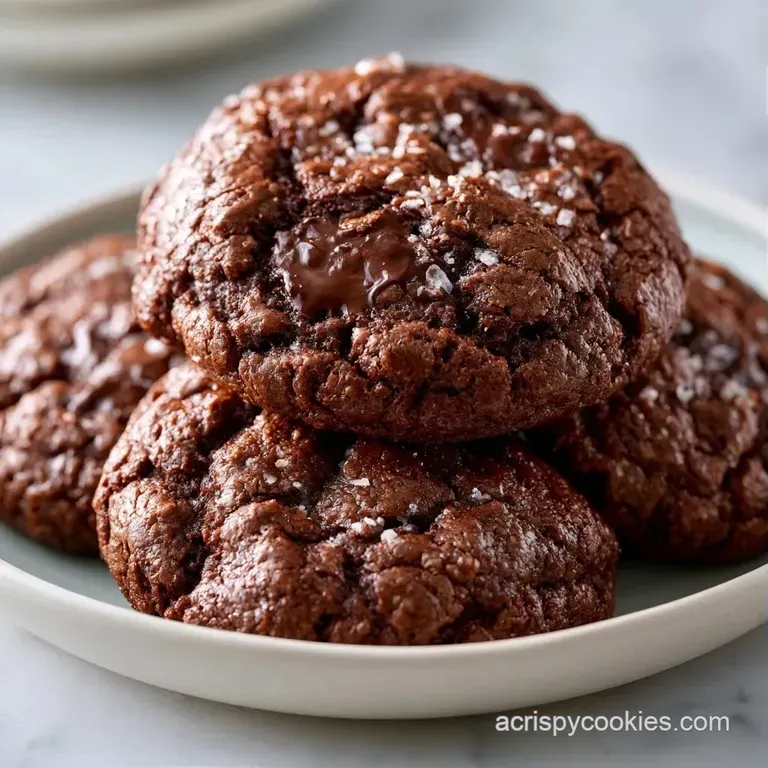
You can expect a cookie that stays soft in the middle but has those distinct, thin cracks on top. These Chewy Cocoa Brownie Cookies don't spread too much, so they keep a nice, thick profile. Let's crack on.
Chewy Cocoa Brownie Cookies: Texture Truth
The real magic happens during the whipping stage. Most people just mix the eggs and sugar until combined, but that's a mistake. When you beat them on high for a few minutes, you're trapping air that supports the structure of the cookie.
Since we're using almond flour, which doesn't have gluten to hold things up, this air is what prevents them from becoming flat pancakes.
Another factor is the fat source. Using melted butter that's cooled slightly ensures it incorporates without deflating that air we just whipped in. It creates a rich, dense crumb that mimics a fudge brownie rather than a cakey chocolate cookie.
Whipping Eggs: Beating eggs and sugar for 5 minutes creates a stable foam that lifts the heavy cocoa. Almond Flour: The higher fat content in almond flour keeps the interior moist and fudgy.
| Approach | Prep Time | Texture | Best For |
|---|---|---|---|
| From Scratch | 25 mins | Fudgy & Crackly | Authentic brownie taste |
| Pre mixed Flour | 15 mins | Slightly grainier | Absolute speed |
Quick Specs
This recipe is designed for a fast turnaround. You aren't chilling dough for 24 hours or tempering chocolate. Everything happens in one bowl and one pan.
Precision Checkpoints:
- Eggs and sugar must be beaten for 3-5 minutes until pale.
- Bake for exactly 12-13 minutes.
- Rest on the pan for 10 minutes before moving them.
Ingredient Breakdown
I've found that the quality of the cocoa makes or breaks this. I prefer a Dutch processed cocoa for a darker, more intense chocolate flavor that doesn't have that acidic bite.
| Ingredient | What It Does | Best Swap |
|---|---|---|
| Coconut Sugar | Adds caramel notes & chew | Brown sugar (will be slightly sweeter) |
| Almond Flour | Provides structure & moisture | Oat flour (denser, less rich) |
| Cocoa Powder | The primary chocolate flavor | Extra cocoa + 1 tbsp melted butter |
| Eggs | Binds and adds lift | Flax egg (will be denser/less crackly) |
The Tool Kit
Keep it simple. You don't need a professional kitchen to pull this off. A basic stand mixer or a handheld electric mixer is plenty.
3 Essential Tools
- Hand mixer: Necessary for the egg aeration.
- Digital scale: Baking is a game of grams, not cups.
- Parchment paper: Prevents sticking without adding extra grease to the pan.
The Baking Process
Right then, let's get into the flow. I like to melt my butter first and let it sit while I get the mixer going.
Phase 1: The Aeration
- Beat 100g room temperature eggs and 150g coconut sugar on high speed for 3-5 minutes. Note: Do this until the mix is a pale, thick cream that holds a soft peak.
- Stream in 113g melted and cooled unsalted butter and 5ml vanilla extract while mixing. Note: Pour slowly so you don't deflate the air.
Phase 2: Folding & Incorporation
- Sift in 65g unsweetened cocoa powder, 125g almond flour, 3g baking soda, and 1.5g fine sea salt.
- Fold gently with a spatula until just combined. Note: Stop as soon as the flour streaks disappear to avoid overworking the batter.
Phase 3: The Bake & Cool
- Scoop rounded tablespoons of dough onto a parchment lined baking sheet.
- Bake for 12-13 minutes until the edges are set and the tops have a shimmering crust.
- Let the cookies rest on the pan for 10 minutes. Note: They are fragile when hot and need this time to firm up.
Fixing Common Issues
The most common complaint with these is that they might come out too flat or too dry. Usually, it's a temperature or timing issue.
Troubleshooting Common Issues
| Issue | Solution |
|---|---|
| Why Your Cookies Are Flat | If they spread too much, your butter was likely too hot when it hit the eggs, or you didn't whip the eggs long enough. The air bubbles are what keep the cookie tall. |
| Why Your Cookies Are Dry | Overbaking is the enemy of the fudgy center. Because they are dark, it's hard to see them browning. Trust the timer more than your eyes. If the edges feel firm to the touch, take them out. |
| Why the Texture Is Grainy | This usually happens if the coconut sugar didn't dissolve into the eggs. Beating the mixture for the full 5 minutes usually fixes this, as the sugar crystals dissolve into the moisture of the eggs. |
Flavor Twists
Once you have the base down, you can play around with the additions. I've found that adding a pinch of espresso powder really brings out the chocolate without making it taste like coffee.
If you want something even richer, try Cocoa Powder Brownie Cookies recipe for a slightly different ratio. , for a bit of a swirl, these peanut butter brownie cookies are a great way to add some saltiness to the mix.
Decision Shortcut:
- Want more crackle? Beat eggs for an extra 2 minutes.
- Want more fudge? Underbake by 60 seconds.
- Want more depth? Add 1 tsp instant espresso powder to the cocoa.
Storage and Reheating
These actually stay chewy for a surprisingly long time because of the almond flour.
Room Temp & Fridge Keep them in an airtight container at room temperature for up to 4 days. If you put them in the fridge, they'll become more like a truffle, which is honestly a great way to eat them.
Freezing & Reheating Freeze the baked cookies for up to 3 months. Just pop them in the microwave for 10-15 seconds to get that fresh from the oven melt. You can also freeze the raw dough scoops and bake them directly from frozen, just add 2 minutes to the bake time.
Zero Waste Tip If you have leftover cocoa powder at the bottom of the bag, use it to dust the top of these cookies through a fine mesh sieve right after they come out of the oven for a professional look.
Truth About Brownie Cookies
There are a few things people get wrong about this style of baking. Let's clear them up.
You don't need to chill this dough. While some chocolate chip recipes require a 24 hour wait, this batter relies on the immediate structure of the whipped eggs. Chilling it actually deflates the air and ruins the crackle.
Also, almond flour isn't just a "healthy" swap here. It's a functional choice. Wheat flour can make these too bready; the almond flour ensures they stay dense and rich.
Serving Suggestions
To make these feel like they came from a bakery, sprinkle a tiny bit of flaky sea salt on top the second they come out of the oven. The salt cuts through the richness of the cocoa and makes the chocolate pop.
Pair them with a cold glass of almond milk or a strong black coffee. If you're feeling fancy, serve them warm with a scoop of vanilla bean ice cream on the side. The heat from the cookie will melt the ice cream into a creamy sauce that fills in those shimmering cracks on top.
Recipe FAQs
How to make these chewy cocoa brownie cookies?
Beat the eggs and coconut sugar on high speed for 3 5 minutes until thick and pale. Stream in melted butter and vanilla, fold in the sifted dry ingredients, and bake for 12-13 minutes.
How to make the texture dense and fudgy?
Fold the dry ingredients gently with a spatula. Avoid overmixing after adding the cocoa powder and almond flour to ensure the cookies stay dense rather than cakey.
Can you make these brownie cookies without using chocolate bars?
Yes, this recipe uses cocoa powder. It achieves a rich, deep chocolate flavor without requiring any melted chocolate or bars.
Why did my cookies turn out flat?
The butter was likely too hot or the eggs weren't whipped long enough. The air bubbles created during the initial whipping stage are what provide the necessary lift.
Why are my cookies dry instead of chewy?
You likely overbaked them. Since the dark color hides browning, rely on the timer and remove them as soon as the edges feel firm.
Can I freeze the raw dough for later?
Yes, freeze the raw dough scoops. Bake them directly from the freezer, simply adding 2 minutes to the standard bake time.
Which is better, brownie cookies or chocolate chip cookies?
It depends on if you prefer fudgy intensity or classic sweetness. If you are craving a more traditional buttery snap, try a chewy chocolate chip version instead.
Chewy Cocoa Brownie Cookies