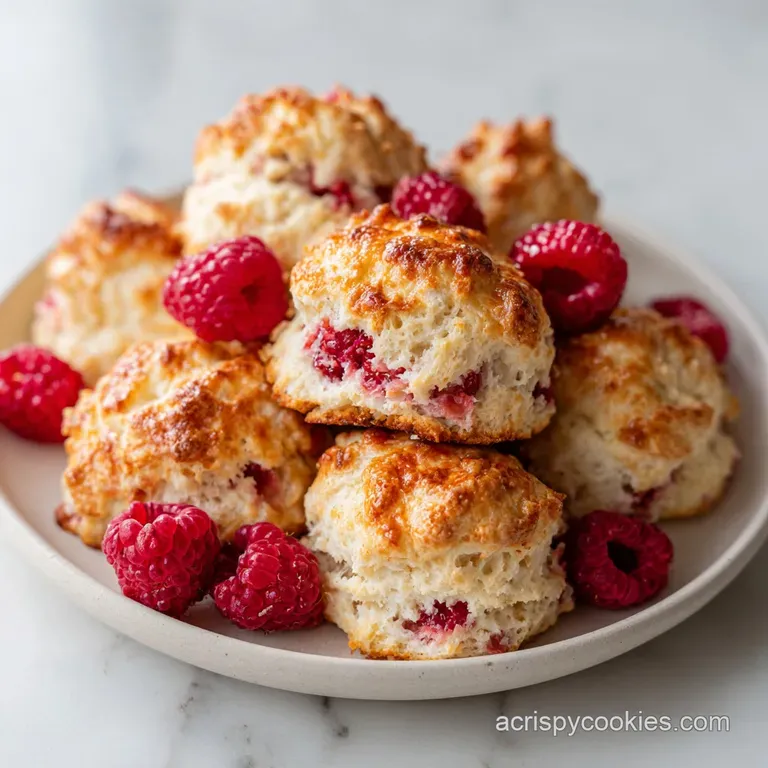
Lemon Raspberry Scones: Fluffy and Tender

- Time: 15 min active + 18 min baking = Total 43 mins
- Flavor/Texture Hook: Tangy lemon glaze with a shatter crisp exterior and velvety center
- Perfect for: Weekend brunches or a bright spring breakfast
The smell of fresh lemon zest hitting cold butter is honestly one of my favorite things in the kitchen. But let's be real, most of us have had that one experience where a scone comes out of the oven feeling more like a hockey puck than a pastry.
I remember making a batch where I overmixed the dough just a bit too much, and they turned out rubbery and tough, completely losing that delicate, flaky structure.
The trick isn't some secret ingredient, it's all about the temperature and the touch. If the butter melts before it hits the oven, you lose those tiny steam pockets that make the pastry rise. When you get the timing and the temperature right, these Lemon Raspberry Scones have a distinct, tender pull and a bright, zesty punch that cuts through the richness of the butter.
We're going to focus on preventing the common failures that turn a great recipe into a dense mess. From frozen butter to the "folding" technique, we'll make sure your batch is light, airy, and perfectly balanced.
Technical Secrets Explained
The goal here is to create a pastry that is sturdy enough to hold fresh berries but light enough to melt in your mouth. Most people treat scone dough like cookie dough, but it's actually closer to a biscuit. If you work it too much, you develop gluten, which leads to that bread like texture we're trying to avoid.
Steam Pockets: Frozen butter chunks melt rapidly in the 400°F heat, creating steam that pushes the flour layers apart for a flaky lift.
Acid Activation: The buttermilk reacts with the baking powder to create immediate carbon dioxide bubbles, ensuring the scones don't stay flat.
Minimal Gluten: Folding the dough instead of stirring prevents the proteins from bonding too tightly, keeping the crumb tender.
Berry Suspension: Adding the raspberries at the very end prevents the juices from bleeding and turning the whole batch purple.
| Method | Time | Texture | Best For |
|---|---|---|---|
| Traditional Oven | 18 mins | Even, golden rise | Full batches |
| Air Fryer | 12 mins | Crispier edges | 2-4 scones |
Component Analysis
| Ingredient | Science Role | Pro Secret |
|---|---|---|
| Frozen Butter | Leavening agent | Freeze cubes for 15 mins before use |
| Buttermilk | Tenderizer | Use full fat for a more velvety crumb |
| Baking Powder | Lift | Check expiration for maximum rise |
| Fresh Raspberries | Moisture/Flavor | Keep them chilled until the last second |
Necessary Kitchen Tools
You don't need a professional bakery, but a few specific tools make the process foolproof. A pastry cutter is great, but two forks work just as well if you're patient. I usually use a large stainless steel bowl because it stays cooler than plastic, which helps keep the butter from melting while I'm working.
For the shaping, a lightly floured surface is non negotiable. If the dough sticks to your counter, you'll end up kneading it more to get it off, which ruins the texture. A sharp bench scraper or a large chef's knife is essential for cutting clean wedges without squishing the dough.
The Cooking Process
Creating the Sandy Base
Preheat the oven to 400°F (200°C) and line a baking sheet with parchment paper. In a large mixing bowl, whisk together the all purpose flour, granulated sugar, baking powder, and salt.
Add the frozen, cubed butter to the flour mixture. Use a pastry cutter or two forks to work the butter into the flour until the mixture resembles coarse crumbs with some pea sized chunks remaining. Note: Those pea sized chunks are what create the layers.
The Wet Integration
In a separate small bowl, whisk together the buttermilk (or Greek yogurt), egg, and lemon zest. Pour the wet ingredients into the dry ingredients and fold gently with a spatula until just combined.
Gently fold in the fresh raspberries, stopping as soon as they are distributed to avoid streaking the dough. Trust me, if the dough looks a little shaggy, that's actually a good thing.
Shaping and Baking
Turn the dough onto a lightly floured surface and pat it into an 8 inch disc, approximately 1 inch thick. Cut the disc into 8 equal wedges and place them on the prepared baking sheet with 2 inches of space between each.
Bake for 15–18 minutes until the tops are a pale mahogany gold and the edges are firm. Allow the scones to cool on the pan for 10 minutes. If you move them too soon, they might break.
The Final Glaze
Whisk together the powdered sugar, fresh lemon juice, and vanilla extract until smooth. Drizzle this over the cooled scones. The glaze should set into a thin, translucent layer that adds a sharp tang to the sweet berries. For a similar zesty profile in a different format, you might enjoy an easy lemon bar as a dessert alternative.
What Can Go Wrong
The most common issue with Lemon Raspberry Scones is the "spread." When the butter is too warm, it leaks out during the first few minutes of baking, leaving you with a flat, greasy disc instead of a tall scone. This is why the frozen butter rule is so strict.
Scones Spread Too Much
If your scones look like pancakes, your butter likely melted before the structure set. This happens if the dough sits on the counter too long or if the oven wasn't fully preheated.
| Problem | Root Cause | Solution |
|---|---|---|
| Flat Scones | Butter too warm | Chill dough for 15 mins before baking |
| Rubbery Texture | Overmixing | Fold gently; stop when flour disappears |
| Sunk Berries | Berries too wet | Pat berries dry with a paper towel |
The Texture is Tough
Toughness comes from over developing the gluten. If you knead the dough like you're making bread, you're essentially building a strong protein web that traps the air too tightly. The result is a dense, chewy scone rather than a flaky one.
The Berries Bleed
Raspberries are delicate. If you stir them in vigorously, they break and dye the dough. Always use a "folding" motion, which means cutting through the center and lifting the dough over the fruit.
Prevention Checklist
- ✓ Butter is frozen and cubed, not just "cold"
- ✓ Flour is measured by weight (250g) for precision
- ✓ Dough is handled as little as possible
- ✓ Oven is fully preheated to 400°F (200°C)
- ✓ Raspberries are fresh and firm
Dietary Adaptations
If you need to tweak this recipe for different diets, you can definitely do it without ruining the structure. For a dairy-free version, you can use a cashew based Greek yogurt or a soy based buttermilk alternative. These still provide the acidity needed to react with the baking powder.
For those looking for a different flour, almond flour is an option, but it's moisture rich and creates a denser crumb than AP flour. If you go this route, reduce the buttermilk by 2 tablespoons. If you're into other fruity treats, this recipe pairs wonderfully with velvety homemade ice cream for a full dessert spread.
| Original Ingredient | Substitute | Why It Works |
|---|---|---|
| Buttermilk (3/4 cup) | Greek Yogurt (3/4 cup) | Similar acidity and thickness. Note: Result is slightly denser |
| AP Flour (2 cups) | Spelt Flour (2 cups) | Similar protein content. Note: Adds a nuttier, earthier flavor |
| Granulated Sugar | Coconut Sugar (1/3 cup) | Same sweetness level. Note: Changes color to a deeper brown |
Adjustment Guidelines
When you need to change the yield, you can't always just divide by two. For these Lemon Raspberry Scones, scaling down to a half batch means you have to deal with half an egg. The best way to do this is to whisk one egg in a small bowl and then measure out 25g.
If you're doubling the recipe, don't double the baking time. Work in batches so you don't crowd the oven, as too many scones can drop the oven temperature and lead to uneven baking. I recommend keeping the temperature at 400°F (200°C) regardless of the batch size.
Scone Truths
Sifting flour is often touted as a necessity for scones, but it's largely a myth. While it can help with clumping, whisking the dry ingredients vigorously for 30 seconds achieves the same aeration without the extra dishes.
Another common misconception is that you should use room temperature eggs for better emulsification. In this specific recipe, cold eggs are actually better. They help keep the overall temperature of the dough low, ensuring those butter chunks stay solid until they hit the oven.
Storage Guidelines
Keep your scones in an airtight container at room temperature for up to 2 days. However, because of the fresh raspberries and the glaze, they can get a bit tacky. I prefer storing them in the fridge for up to 5 days to keep the fruit fresh.
To reheat, don't use the microwave, as it makes them rubbery. Instead, pop them in a 350°F (180°C) oven for about 5 minutes. This restores the shatter crisp exterior. You can also freeze the unbaked wedges for up to 2 months.
Just bake them directly from the freezer, adding 2-3 minutes to the total cook time.
For zero waste, don't toss your lemon peels. Once you've zested the lemon, you can use the remaining peel to infuse vinegar for a natural kitchen cleaner or simmer it with a cinnamon stick to make the house smell amazing.
Presentation Tips
To get that professional bakery look, use a pastry brush to apply a thin layer of heavy cream or an egg wash to the tops of the wedges before baking. This creates a deep, golden brown sheen that contrasts beautifully with the white glaze.
When applying the lemon glaze, do it while the scones are just barely warm. If they're too hot, the glaze will melt and run off. If they're cold, the glaze sits on top in a thick layer. The "sweet spot" allows the glaze to seep slightly into the top crust while remaining visible.
Finally, a light dusting of powdered sugar or a few fresh raspberries placed on top of the glaze just before serving adds a pop of color that makes the dish look like it came from a high end cafe. For more insights on the science of baking, consider checking out King Arthur Baking for more great tips!
Recipe FAQs
How do I get my scones to rise and be fluffy?
Use frozen, cubed butter and fold the dough gently. Keeping the fat ice-cold creates steam pockets during baking for a better lift, while minimal mixing prevents the scones from becoming dense.
What is the 15 minute rule for scones?
This recipe does not require a 15-minute chill. Because the butter is frozen and cubed, the dough stays cold enough to be shaped and baked immediately without resting.
What is the trick in making good scones?
Minimize handling of the dough. Overworking the batter develops too much gluten, which turns a tender, crumbly scone into a tough, bread like texture.
Are fresh or frozen raspberries better for scones?
Fresh raspberries are best. Frozen berries release excess moisture and bleed color, which can make the dough soggy and turn the scones purple.
Can I use Greek yogurt instead of buttermilk?
Yes, Greek yogurt is an excellent substitute. It provide the same necessary acidity to activate the baking powder, similar to the moisture balance used in these apple cinnamon muffins.
How should I store these scones?
Store them in the fridge for up to 5 days. The fresh fruit and lemon glaze can become tacky at room temperature, so refrigeration keeps them fresh and stable.
Is it true that reheating scones in the microwave is the best method?
No, this is a common misconception. Microwaving makes scones rubbery; instead, reheat them in a 350°F (180°C) oven for 5 minutes to restore the shatter crisp exterior.
Lemon Raspberry Scones