Easy Crunchy Sugar Cookies: Golden and Crisp
- Time: 10 min active + 10 min baking = Total 25 minutes
- Flavor/Texture Hook: Shatter crisp edges with a velvety center
- Perfect for: Holiday cookie swaps, party platters, or a quick sweet craving
I can't tell you how many times I've pulled a tray of sugar cookies out of the oven only to find they had the texture of a damp sponge. It's the worst. You're expecting that satisfying crackle, but instead, you get something rubbery that tastes like a bland piece of bread.
It usually happens because there's too much moisture or the sugar didn't crystallize right, leaving you with a "cakey" disaster.
But we're not doing that today. I've learned that the secret is all in the ratio of butter to flour and that crucial sugar roll right before they hit the heat. When you do it right, the edges turn a deep mahogany and the center stays just tender enough to be luxurious without being soft.
These Easy Crunchy Sugar Cookies are designed for that "wow" factor. They hold their shape, look professional, and have a visual appeal that makes them look like they came from a high end bakery. Whether you're making cutouts for a party or just want a reliable snack, this is the targeted fix for every sugar cookie failure you've ever had.
Easy Crunchy Sugar Cookies
Right then, let's get into why these actually work. Most people just throw ingredients in a bowl, but there's a reason these stay crisp while others go limp.
- - Sugar Barrier
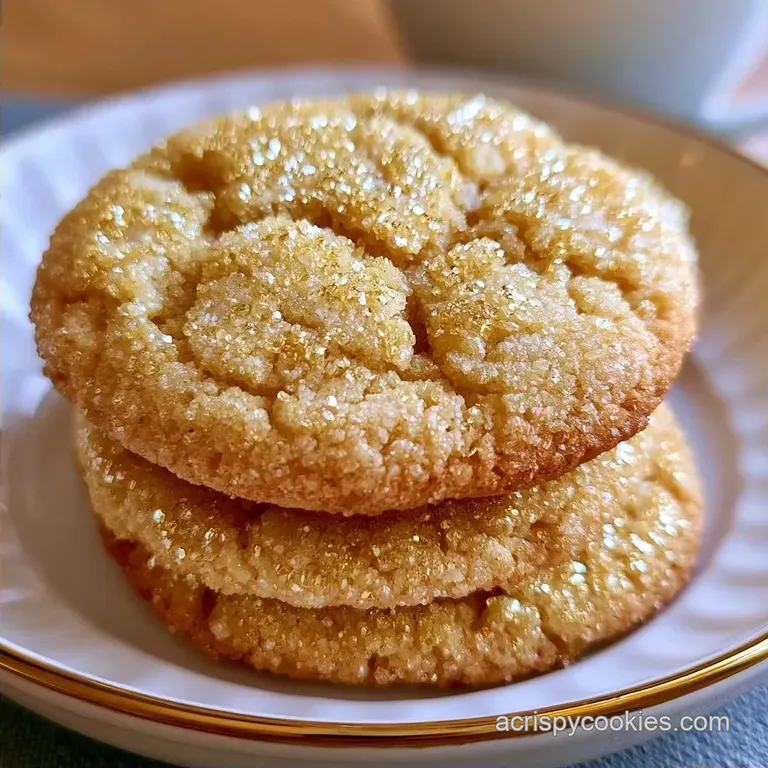
- Rolling the dough in granulated sugar creates a physical crust that prevents the cookie from spreading too much and adds a crystalline crunch.
- - Butter Temperature
- Using softened, not melted, butter ensures the air stays trapped in the dough, giving you a structure that shatters rather than collapses.
- - Low Moisture
- By keeping the egg count low and the flour precise, we avoid that dreaded "cakey" crumb.
- - Controlled Carryover
- Letting them set on the pan for 5 minutes allows the sugars to harden as they cool, locking in the crispness.
| Heat Method | Time | Texture | Best For |
|---|---|---|---|
| Standard Oven | 10 mins | Shatter crisp | Large, uniform batches |
| Stovetop Pan | 5 mins | Soft fried | Single, experimental treats |
This table shows why the oven is non negotiable for this specific result. While some people try to "fry" cookie dough in a pan, you lose the air circulation needed for that uniform golden finish.
Component Analysis
| Ingredient | Science Role | Pro Secret |
|---|---|---|
| Granulated Sugar | Structure & Crisp | Use extra fine sugar for a more velvety mouthfeel |
| Unsalted Butter | Fat & Tenderness | Don't over soften; it should be cool to the touch |
| All Purpose Flour | Bulk & Stability | Spoon and level to avoid a dry, crumbly cookie |
| Baking Powder | Lift & Air | Fresh powder ensures the cookies don't turn out flat |
Essential Shopping List
For this recipe, precision is everything. If you use "a bit of this" and "a splash of that," you'll end up back in cake town. Grab these exact items:
- 1/2 cup (115g) unsalted butter, softened Why this? Provides the rich, buttery base without adding unwanted salt.
- 3/4 cup (150g) granulated sugar Why this? Essential for the snap and sweetness.
- 1 large egg Why this? Binds the dough while adding richness.
- 1 tsp (5ml) vanilla extract Why this? Adds the classic aromatic warmth.
- 2 cups (250g) all purpose flour Why this? Provides the necessary structure for cutouts.
- 1/2 tsp (3g) baking powder Why this? Gives a slight lift without making it cakey.
- 1/4 tsp (1.5g) salt Why this? Balances the sugar so it's not cloying.
- 2 tbsp (25g) granulated sugar Why this? For the final outer coating.
If you find yourself wanting a different kind of treat after these, you might love the contrast of my Classic Chocolate Chip Cookies recipe, which lean more into the chewy side.
Necessary Baking Gear
You don't need a professional kitchen, but a few specific tools make this way easier. Trust me, trying to roll dough on a greasy counter is a nightmare.
First, an electric hand mixer or a stand mixer (like a KitchenAid) is a must for the creaming stage. You want that butter and sugar to be light and fluffy, not just mixed. Then, you'll need a rolling pin and some parchment paper. Please, for the love of all things baked, don't grease the pan with butter; use parchment.
Greasing the pan can cause the cookies to spread more and lose those sharp, clean edges.
Finally,, have your cookie cutters ready. Whether they're stars, hearts, or simple circles, make sure they're clean. If they're sticky, dip them in flour between cuts to avoid the dough clinging to the metal.
The step-by-step Process
Let's crack on. Follow these steps exactly to get that professional look.
- Cream the softened butter and 3/4 cup granulated sugar together using an electric mixer until light and fluffy. Note: This incorporates air for a better texture.
- Beat in the egg and vanilla extract until the mixture is smooth and velvety.
- Gradually stir in the all purpose flour, baking powder, and salt until a stiff dough forms.
- Turn the dough onto a lightly floured surface and roll to 1/4 inch thickness. Note: Use a ruler if you're unsure; consistency is key.
- Use cookie cutters to create shapes, then roll each cutout in the remaining 2 tablespoons of granulated sugar.
- Place cookies on a parchment lined baking sheet.
- Bake at 350°F (175°C) for 8-10 minutes until the edges turn a light mahogany color.
- Allow cookies to cool on the pan for 5 minutes to set the structure.
- Transfer to a wire rack to fully crisp up.
Chef's Tip: To get the most consistent shapes, freeze your cutouts for 5 minutes before putting them in the oven. This prevents them from expanding too much and keeps the edges sharp.
Troubleshooting Cookie Issues
Even with a great recipe, things can go sideways if the room is too hot or your flour is packed too tight. Here is how to handle the most common mishaps when making Easy Crunchy Sugar Cookies.
Why Your Cookies Spread
If your cookies look like pancakes, your butter was likely too soft (almost melted) or your oven wasn't fully preheated. When the butter melts too quickly, the structure collapses before the flour can set.
Avoiding a Cakey Texture
Too much flour or too much baking powder creates a bread like crumb. Ensure you are spooning the flour into the measuring cup rather than scooping it, which packs the flour down and adds too much bulk.
Solving Burnt Edges
If the edges are black but the middle is raw, your oven might be running hot. Try moving the rack up one level or checking your oven temperature with a separate thermometer.
| Problem | Root Cause | Solution |
|---|---|---|
| Too Soft | Underbaked | Bake 1-2 mins longer until edges are mahogany |
| Cracking | Over mixing | Mix flour until just combined; don't overwork |
| Dull Look | No sugar roll | Ensure every cookie is rolled in sugar before baking |
Common Mistakes Checklist
- ✓ Butter is softened but still cool (not oily)
- ✓ Flour was measured by spooning and leveling
- ✓ Dough rolled to exactly 1/4 inch thickness
- ✓ Cookies cooled on the pan for 5 minutes
- ✓ Oven preheated to exactly 350°F
Creative Ingredient Swaps
Depending on what you have in the pantry, you can tweak these without ruining the crunch. Just keep in mind that changing the fat or the flour will change the "shatter" factor.
- Butter: You can use vegan butter sticks. Note: Ensure they are "sticks" and not "tub margarine," as the water content in tubs makes cookies cakey.
- Sugar: Coconut sugar can work for a deeper, caramel like flavor. Note: The color will be darker and the snap slightly less intense.
- Flour: Almond flour can be used for a gluten-free version. Note: This will create a denser, nuttier cookie that is less "snappy."
- Vanilla: Almond extract is a brilliant swap for a more wedding cake flavor profile.
If you're in the mood for something a bit healthier, you could try my Applesauce Oatmeal Cookies, but for these, stick to the butter for that classic taste.
Decision Shortcut
- If you want a harder snap, bake for 11 minutes.
- If you want a softer center, bake for 8 minutes.
- If you want a larger cookie, roll to 3/8 inch thickness.
Storage and Freshness
To keep that "just baked" crunch, you need to fight humidity. Moisture is the enemy of the Easy Crunchy Sugar Cookies.
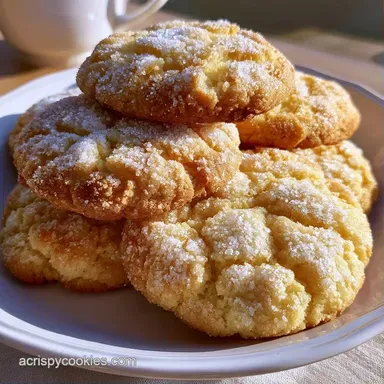
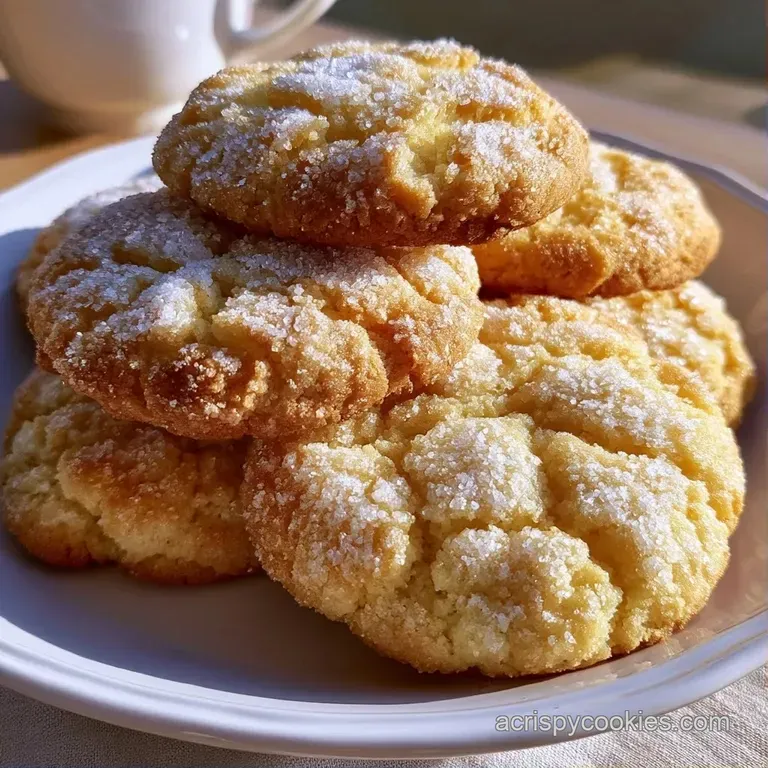
Store these in an airtight container once they are completely cool. I recommend placing a piece of parchment paper between layers so they don't stick or rub off their sugar coating. They'll stay crisp at room temperature for up to 7 days.
If you're in a humid environment, you can keep them in the fridge, but let them come to room temperature before eating for the best flavor.
For long term storage, these freeze beautifully. Freeze them in a heavy duty freezer bag for up to 3 months. To revive them, just pop them in a 300°F (150°C) oven for 3 minutes to bring back that shatter crisp texture.
As for zero waste, don't throw away the scraps of dough left over from the cutters. Just roll them into small balls, flatten them with your palm, roll in sugar, and bake them as "rustic" cookies. They taste exactly the same!
Serving and Presentation
Since these cookies are so visually clean, they're perfect for decorating. You can leave them plain for a rustic look or dip half of the cooled cookie into melted dark chocolate and sprinkle with sea salt.
For a real party "wow" factor, stack them in a pyramid on a white platter. The contrast of the mahogany edges against the white plate looks stunning. These are also incredible when served alongside a warm drink. I usually pair them with my Homemade Hot Chocolate Mix for the ultimate winter treat.
If you're gifting these, use a clear cellophane bag tied with a ribbon. Because they're so sturdy, they won't break in transit, making them the ideal "thank you" gift or holiday gesture. Just remember to let them cool completely before bagging, or the steam will make them soft.
Recipe FAQs
What makes a sugar cookie crunchy?
The combination of granulated sugar and a thin roll. Rolling the dough to 1/4 inch and coating the exterior in sugar creates a crisp snap and golden finish.
How to make the middle of the cookie crisp?
Bake until the edges reach a light mahogany color. Allow them to set on the pan for 5 minutes before transferring to a wire rack to finish crisping.
Is it true that adding extra flour is the secret to a crunchy cookie?
No, this is a common misconception. Excess flour makes cookies cakey; the real crunch comes from the 1/4 inch thickness and proper cooling.
How to make sugar cookies soft and chewy instead of crunchy?
Adjust the baking time and dough hydration. If you prefer a velvety texture over a snap, try our soft and chewy version.
How to keep cookies from getting soft in storage?
Store in an airtight container only after they are completely cool. Place parchment paper between layers to protect the sugar coating from humidity.
Why did my cookies stay soft in the center?
They were likely removed from the oven too early. Ensure they bake for the full 8 10 minutes at 350°F until the edges are mahogany.
How to get a professional, uniform texture?
Roll the dough to exactly 1/4 inch thickness. This ensures every cookie bakes evenly and achieves the same level of crunch across the whole batch.
Easy Crunchy Sugar Cookies