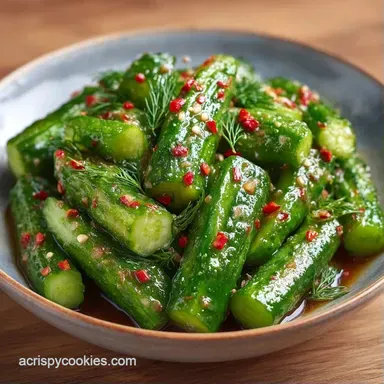
Crisp and Zesty Red Pepper Pickles

- Time: 10 min active + 5 min cook + 30 min room-temperature rest + 24 hours chilling
- Flavor & Texture: Tangy, spicy, and crisp
- Perfect for: Charcuterie boards, sandwiches, or meal prep
Red Pepper Pickles
Ever wonder why some pickled peppers taste like vinegar-soaked cardboard while others have a sharp, bright snap? It usually comes down to how the heat is handled during the brine process. If you boil the vegetables, you lose the cell structure, and everything turns limp.
The trick is to keep the peppers raw and let the boiling liquid do the work. This creates a condiment that tastes like something from a high-end deli but takes almost no effort.
You can expect a vibrant, zesty result that cuts through rich foods. These red pepper pickles stay firm in the fridge, providing a punchy contrast to creamy cheeses or grilled meats.
How They Stay Crisp
- Thermal Shock: Pouring boiling brine over raw peppers and then chilling them quickly helps preserve the crunch.
- Pectin Protection: The salt and sugar in the brine may help slow pectin breakdown in the pepper walls.
The fast-track fridge method is different from traditional canning. While canning is for the pantry, this version focuses on immediate freshness and texture.
| Method | Time | Texture | Best For |
|---|---|---|---|
| Fridge Quick Pickle | 24 hours | Extra Crisp | Fresh eating, short-term storage |
| Water Bath Canning | Weeks | Softer | Long-term pantry storage |
The Pantry List
Ensure you use distilled white vinegar before beginning; other varieties will noticeably alter the color and taste.
| Ingredient | What It Does | Best Swap |
|---|---|---|
| White Distilled Vinegar | Adds acidity and ensures preservation | Apple Cider Vinegar. Note: Creates a milder, sweeter profile |
| Pickling Salt | Ensures the brine remains clear | Kosher Salt. Note: May result in slight cloudiness |
| Granulated Sugar | Offsets the sharp vinegar taste | Honey. Note: Use 1:1, though it changes the aroma |
- 1 lb mini sweet peppers, halved and seeded Why this? They offer a uniform size and gentle heat
- 4 garlic cloves, crushed Why this? Crushing extracts more aromatic oils than slicing
- 1 cup white distilled vinegar
- 1/2 cup water
- 1/4 cup granulated sugar
- 1 tbsp pickling salt
- 1 tsp mustard seeds
- 1/2 tsp black peppercorns
- 1/2 tsp red pepper flakes
The Essential Gear
While professional gear isn't necessary, a few specific tools are helpful. Stick with a stainless steel pan for the brine, as aluminum or non-stick coatings can react to the high acidity of the vinegar.
Use two 16 oz wide-mouth mason jars for this recipe. The wide openings make it far simpler to pack the peppers tightly without bruising the skins.
The Process
Phase 1: Prep and Pack
Start by cleaning two 16 oz wide-mouth mason jars. Cut 1 lb of mini sweet peppers into consistent slices. Divide the pepper pieces and 4 smashed garlic cloves equally between the jars. Press them down firmly, ensuring there is a half-inch gap of headspace at the top.

Phase 2: Simmering the Brine
In a small stainless steel saucepan, combine 1 cup white distilled vinegar, 1/2 cup water, 1/4 cup granulated sugar, 1 tbsp pickling salt, 1 tsp mustard seeds, 1/2 tsp black peppercorns, and 1/2 tsp red pepper flakes.
Bring the mixture to a light boil over medium heat, stirring every so often to dissolve the salt and sugar. The liquid is ready when it looks clear and glossy and gives off a sharp scent of vinegar and toasted mustard seeds.
Phase 3: The Pour and Set
Fill the jars with the hot brine until the peppers are completely covered. You will notice a faint sizzle as the liquid hits the cold peppers. Shake or nudge the jars to dislodge any trapped air bubbles.
Tighten the lids and let them rest at room temperature for 30 minutes. To achieve the best results for this red pepper pickles recipe, move the jars to the refrigerator to cure for at least 24 hours before serving.

When It Does Not Turn Out
Soft Pepper Texture
This happens when the brine stays too hot for too long or the vinegar balance is off. To ensure your refrigerator red pepper pickles stay crunchy, avoid boiling the peppers themselves. Stick to the 2:1 vinegar-to-water ratio to maintain the acidity needed for a good snap.
Cloudy Brine
If the liquid appears murky, the salt is usually the culprit. Table salt often contains anti-caking agents that cloud the brine. Pure pickling salt or clean kosher salt prevents this. As long as you like the taste, cloudiness is just a visual issue and doesn't affect safety.
Bland Flavor
A lack of zest usually means they haven't cured long enough. While edible after a few hours, the brine needs a full day to penetrate the pepper skins. If they still taste plain, let them sit for an additional 48 hours.
For another use of a quick brine, my Cucumber Fridge Pickles use a similar approach for a different kind of crunch.
While you're in the kitchen, consider how switching pepper types changes the result.
| Original Pepper | Substitute | Impact on Outcome |
|---|---|---|
| Mini Sweet Peppers | Red Bell Pepper | Larger chunks, milder flavor |
| Mini Sweet Peppers | Fresno Peppers | Significantly higher heat level |
Keeping It Fresh
Since these red pepper pickles are not water-bath canned, they must remain refrigerated. Keep them in airtight jars in the fridge for up to 3 months.
The flavor typically reaches its peak after one week of curing. Avoid using your fingers to remove them; introducing bacteria can cloud the brine and reduce the total shelf life.
Serving Ideas

These are a flavor detective's dream for adding acidity to a plate. I like them piled high on a burger or sliced thin over a bowl of hummus.
For a restaurant-style presentation, drain the peppers and quickly sauté them in a pan with a bit of butter for 2 minutes. It mellows the vinegar and creates a warm, tangy topping for grilled fish.
Flavor Swaps
Sweet Heat
If you want more kick, double the red pepper flakes to 1 tsp. You can also add a sliced habanero to the jar for a serious burn.
Garlic Infusion
For a more aggressive garlic taste, slice the cloves thinly instead of smashing them. This increases the surface area, allowing the garlic aroma to permeate the red pepper pickles more deeply.
Low Sugar
You can cut the sugar to 2 tbsp without ruining the texture. The result will be more acidic and sharp, which works better if you're serving these alongside a very rich cheese like brie.
Recipe FAQs
How do you make hot pepper pickles?
Pack mini sweet peppers and smashed garlic into mason jars. Pour boiling brine over them and refrigerate for 24 hours after a 30-minute room temperature rest.
Do homemade vinegar pickles need to be refrigerated?
Yes, keep them chilled. This fridge-cure method is not for pantry storage and requires refrigeration to maintain safety and texture.
How to make spicy pickles without canning?
Pour boiling brine over raw vegetables and chill them quickly. If you enjoyed this quick-pickling technique, the same acid-based approach is used in our refrigerator pickles.
Why did my peppers turn out mushy?
The peppers were likely boiled. Keeping the peppers raw and using the boiling liquid for thermal shock preserves the cell structure and crunch.
Is it true that any salt can be used for the brine?
This one's false: pickling salt is essential for a clear brine. Table salts often contain iodine or anti-caking agents that can make the liquid cloudy.
Red Pepper Pickles with Garlic