Sugar Free Peanut Butter Heaven: No Bake Keto Dessert
- Time:10 minutes active + 2 hours chilling = Total 2 hours 10 mins
- Flavor/Texture Hook: Velvety, cloud like mousse with a salty sweet chocolate snap
- Perfect for: High protein keto treats, diabetic friendly desserts, or a quick prep luxury snack
- Easy Sugar Free Peanut Butter Heaven No Bake Keto Dessert
- The Secret to Velvety Texture
- Breaking Down the Components
- Ingredients and Smart Swaps
- Essential Kitchen Gear
- Step-by-Step Assembly Guide
- Solving Common Mousse Problems
- Creative Flavor Twists
- Adjusting the Batch Size
- Debunking Low Carb Myths
- Storage and Zero Waste
- Plating for Maximum Impact
- Recipe FAQs
- 📝 Recipe Card
Easy sugar free Peanut Butter Heaven No Bake Keto Dessert
That deep, nutty aroma of roasted peanuts hitting the air the second you open the jar is enough to make anyone crave something sweet. I remember the first time I tried making a low carb mousse, and I completely ignored the "chilled bowl" rule.
I ended up with a lukewarm, runny peanut butter soup that looked more like a dip than a dessert. It was a disaster, but it taught me that temperature is everything when you're working with fats and air.
You'll love this easy sugar free Peanut Butter Heaven No Bake Keto Dessert recipe. It's the kind of treat that feels like you've spent hours in the kitchen, but it actually only takes about 10 minutes of active work. Once you get the folding technique down, it's virtually impossible to mess up.
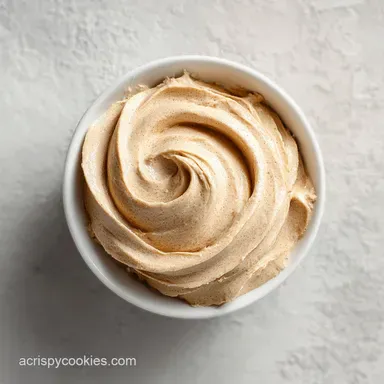
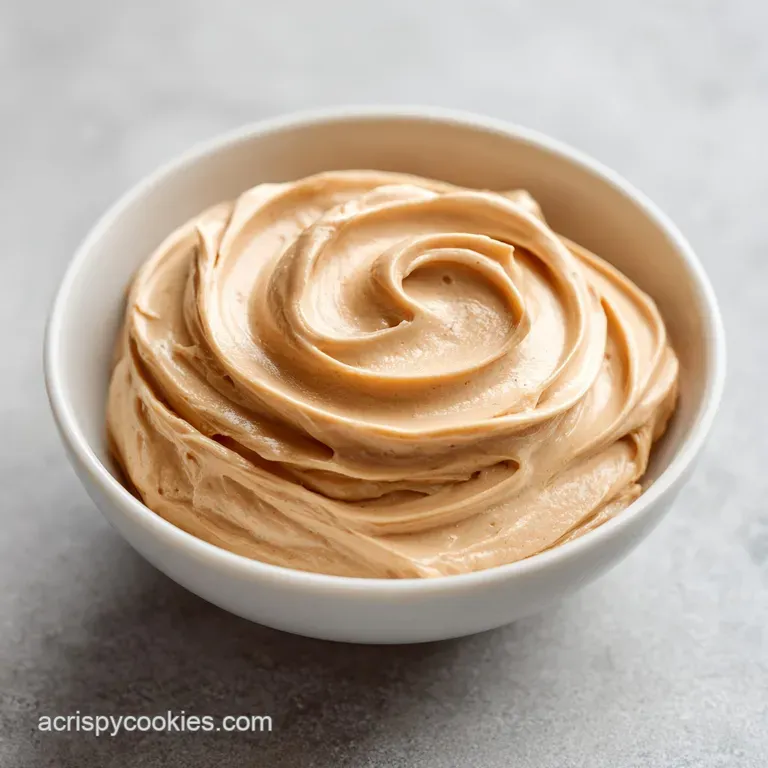
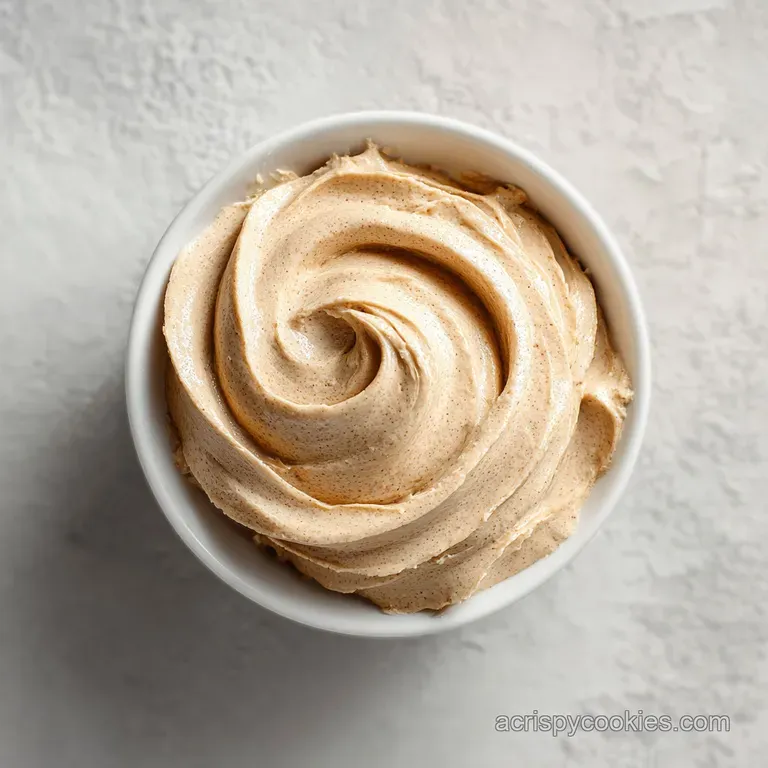
We're going for a texture that's halfway between a cheesecake and a cloud. It's rich, salty, and hit with a hit of dark chocolate that cuts right through the creaminess. Trust me on this, don't skip the flaky salt on top, it's what makes the whole thing taste professional rather than just "homemade."
The Secret to Velvety Texture
When you're making a no bake dessert, you don't have the oven to help bind things together. Instead, we rely on the structural properties of fat and air. Here is what's actually happening in your bowl:
- Fat Stabilization: The cream cheese acts as a stabilizer, giving the mousse a thicker body that prevents the heavy cream from collapsing.
- Air Incorporation: Whipping the cream creates tiny air bubbles that get trapped in the fat globules, which is what gives the dessert its "heavenly" lift.
- sugar-free Crystallization: Powdered erythritol is used instead of granulated because it dissolves instantly, preventing that gritty "sand" feeling common in keto sweets.
- Temperature Control: Keeping the cream cold ensures the fat stays firm enough to hold the air, keeping the mousse fluffy rather than flat.
Right then, before you dive into the ingredients, it's helpful to know how this version differs from other peanut butter treats. Most people either go for a heavy, frozen peanut butter fudge or a light, airy mousse. This recipe hits the sweet spot right in the middle.
| Style | Texture | Setting Time | Best For |
|---|---|---|---|
| Mousse (This Recipe) | Velvety & Airy | 2 hours | Elegant dinner parties |
| Frozen Bars | Dense & Fudgy | 4 hours | On the-go snacking |
| PB Fluff | Light & Sticky | 30 mins | Quick cravings |
Breaking Down the Components
To get this right, you need to understand how each ingredient plays its part. It's not just about flavor, it's about the architecture of the dessert.
| Ingredient | Science Role | Pro Secret |
|---|---|---|
| Cream Cheese | Structure | Use full fat; low-fat versions release too much water |
| Heavy Cream | Aeration | Must be chilled to 40°F for maximum volume |
| Peanut Butter | Emulsifier | Natural, no stir brands provide a cleaner flavor |
| Coconut Oil | Texture | Prevents sugar-free chocolate from becoming chalky |
The balance here is critical. If you add too much peanut butter, the mousse becomes too heavy and loses that airy quality. If you under whip the cream, you'll get a dense pudding. It's all about that ratio of stable fats to whipped air.
Ingredients and Smart Swaps
I've listed everything you need below. I highly recommend using a kitchen scale for the solids, but imperial measurements work just fine too.
- 1/2 cup (120g) cream cheese, softened Why this? Provides the necessary structure and tang.
- 1/2 cup (128g) natural creamy peanut butter Why this? The primary flavor and fat source.
- 1 cup (240ml) heavy whipping cream, chilled Why this? Creates the airy, mousse volume.
- 1/2 cup (60g) powdered erythritol or monk fruit sweetener Why this? Sweetens without the glycemic spike.
- 1 tsp (5ml) pure vanilla extract Why this? Rounds out the nuttiness with warmth.
- 1/4 tsp (1.5g) fine sea salt Why this? Enhances the peanut flavor.
- 2 oz (56g) sugar-free dark chocolate chips Why this? Adds a rich, bitter contrast.
- 1 tbsp (15ml) coconut oil, melted Why this? Makes the chocolate drizzle silky.
- pinch of flaky sea salt Why this? Provides a sensory pop on the tongue.
If you don't have something on hand, don't panic. Most of these can be swapped without ruining the vibe.
| Original Ingredient | Substitute | Why It Works |
|---|---|---|
| Peanut Butter | Almond Butter | Similar fat profile. Note: Milder flavor, less "classic" PB taste |
| Heavy Cream | Coconut Cream | High fat content. Note: Adds tropical notes and is vegan friendly |
| Erythritol | Allulose | Better melt/mouthfeel. Note: Slightly less sweet than erythritol |
| Cream Cheese | Mascarpone | Even richer texture. Note: Less tangy than standard cream cheese |
Essential Kitchen Gear
You don't need a professional lab for this, but a few specific tools make the process much smoother. I'm all about minimal cleanup, so I've kept the gear list short.
- Electric Hand Mixer or Stand Mixer: Essential for getting those stiff peaks in the cream.
- Medium Mixing Bowl: For the peanut butter base.
- Chilled Metal Bowl: For whipping the cream. I keep mine in the freezer for 10 minutes before starting.
- Rubber Spatula: The only tool you should use for folding. A whisk will deflate all your hard work.
- Microwave Safe Bowl: For melting the chocolate.
- 4 Dessert Glasses: Small jars or wine glasses work brilliantly for presentation.
Step-by-step Assembly Guide
Let's crack on. Follow these steps in order, and pay close attention to the sensory cues.
- Beat the base. In a medium bowl, beat the softened cream cheese and powdered sweetener. Mix until the texture is completely smooth and you can't see any lumps. Note: Softened cheese is key here to avoid "cheese pebbles" in your mousse.
- Incorporate flavor. Gradually add the peanut butter, vanilla extract, and salt. Mix on medium speed until the base is a uniform, mahogany colored cream.
- Whip the cream. In your separate chilled bowl, whip the heavy cream on high speed. Keep going until stiff peaks form (this means when you lift the beaters, the cream stands straight up without drooping).
- Fold gently. Using your rubber spatula, gently fold the whipped cream into the peanut butter mixture. Use a "cut and fold" motion, scraping the bottom and folding over the top, until no white streaks remain. Note: Do not stir or beat at this stage, or you'll lose the air.
- Portion. Spoon the mousse evenly into four glasses. Smooth the tops with the back of a spoon.
- Melt chocolate. Combine sugar-free chocolate chips and melted coconut oil in a bowl. Microwave in 20 second bursts, stirring in between, until the mixture is glossy and fluid.
- Garnish. Drizzle the chocolate over the top of each mousse and sprinkle with a pinch of flaky sea salt.
- Set. Place in the refrigerator for at least 2 hours to set. The mousse should feel firm but springy to the touch.
Solving Common Mousse Problems
Even with a simple recipe, things can go sideways. Usually, it's a temperature or technique issue.
Why Your Mousse is Grainy
This usually happens if the cream cheese wasn't soft enough or if you used granulated sweetener instead of powdered. The fat doesn't emulsify properly, leaving little bits of solids behind.
| Problem | Root Cause | Solution |
|---|---|---|
| Grainy Texture | Cold cream cheese | Microwave cheese for 10 seconds before beating |
| Gritty Taste | Granulated sweetener | Pulse sweetener in a blender until it's a fine powder |
| Lumpy Base | Over mixing | Beat the cream cheese alone before adding PB |
Why Your Mousse is Runny
If your mousse doesn't set, it's almost always because the heavy cream wasn't whipped to stiff peaks or the refrigerator wasn't cold enough. If it's too soft, you can pop it in the freezer for 20 minutes to firm it up quickly.
| Problem | Root Cause | Solution |
|---|---|---|
| Runny Mousse | Under whipped cream | Whip cream longer until peaks are firm |
| Chocolate Seized | Overheated chocolate | Stir in a teaspoon of coconut oil and reheat gently |
| Deflated Air | Over folding | Use a wider spatula and fewer strokes |
Mistakes to avoid:
- ✓ Pat your mixing bowl dry before adding cream (water prevents whipping)
- ✓ Use a room temperature peanut butter to avoid clumps
- ✓ Fold the cream in three separate additions rather than all at once
- ✓ Chill the glasses before filling to help the mousse set faster
- ✓ Avoid using "light" or "low fat" versions of any dairy ingredient
Creative Flavor Twists
Once you've mastered the base, you can start playing with the flavors. This is where it gets fun. If you're in the mood for something different, try adding a teaspoon of cinnamon to the peanut butter base for a "snickerdoodle" vibe.
For those who love a bit of crunch, you can add crushed sugar free nuts or a layer of crumbled sugar free No Bake Cookies at the bottom of the glass. This adds a fantastic contrast to the velvety mousse.
If you want to pivot away from peanut butter entirely, almond butter or cashew butter work great. Just keep in mind that cashew butter is a bit sweeter, so you might want to reduce the erythritol by a tablespoon. For a more substantial dessert, you can serve this mousse as a topping for a slice of Keto Pound Cake Recipe.
Decision Shortcut: If you want a "Cheesecake" feel, add a squeeze of fresh lemon juice to the cream cheese. If you want a "Reese's" feel, double the chocolate drizzle and add mini sugar-free chips. If you want a "Nutella" feel, swap peanut butter for hazelnut butter.
Adjusting the Batch Size
Scaling this recipe is straightforward, but you can't always just double everything blindly, especially when it comes to the aeration.
Scaling Down (Half Batch): If you're only making 2 servings, use 1/4 cup of cream cheese and peanut butter. For the egg free nature of this, you don't have to worry about splitting eggs, but be careful with the vanilla and salt. Use 1/2 tsp vanilla and a pinch of salt.
Reduce the chilling time by about 30 minutes since the volume is smaller.
Scaling Up (Double or Triple Batch): When doubling the recipe, do not double the mixing time. Over beating the cream can turn it into butter. I recommend working in batches for the whipping stage. Increase the salt and vanilla to 1.5x instead of 2x to avoid over seasoning.
If you're using a larger container instead of individual glasses, extend the setting time to 3 or 4 hours to ensure the center is firm.
Debunking Low Carb Myths
There are a lot of misconceptions about no bake keto treats. Let's clear a few things up.
First, some people think that "no bake" means "no structure." In reality, the combination of saturated fats from the cream cheese and coconut oil creates a very stable matrix. You don't need heat to get a dessert that holds its shape.
Second, there's a myth that sugar-free sweeteners always leave a bitter aftertaste. This is usually because people use too much or use the wrong type. Powdered monk fruit and erythritol blends are designed to mimic the flavor profile of sucrose without the bitterness, provided you stick to the measurements.
Storage and Zero Waste
Since this dessert is primarily fat based, it keeps remarkably well in the fridge. Store the glasses covered with plastic wrap or lids for up to 4 days.
If you want to freeze them, you can, but the texture changes. It becomes more like a frozen peanut butter parfait. If you freeze them, let them thaw in the fridge for 30 minutes before eating to regain that velvety mouthfeel.
- Leftover Cream Cheese
- If you only used half a block, mix the rest with a bit of honey or stevia and some cinnamon for a quick breakfast spread.
- Remaining Heavy Cream
- Use any leftover whipped cream as a topper for your morning coffee or a bowl of berries.
- Chocolate Scraps
- If you have leftover melted chocolate, drizzle it over some sliced strawberries or freeze it into tiny "bark" pieces.
Plating for Maximum Impact
We eat with our eyes first, and this dessert is a prime candidate for some fancy plating. Instead of standard bowls, use clear martini glasses or small mason jars. This lets you see the beautiful mahogany color of the mousse against the dark chocolate.
For a professional touch, pipe the mousse in using a pastry bag with a large round tip. This creates a clean, domed top that looks much more polished than spooning it in.
Finally, add a few fresh raspberries or a single mint leaf on top of the chocolate drizzle. The bright red or green against the brown chocolate and tan mousse creates a striking visual contrast. A final sprinkle of that flaky sea salt not only helps the taste but adds a crystalline sparkle that catches the light.
Recipe FAQs
Can I use chunky peanut butter instead of creamy?
Yes, but the texture changes. You will have crunchy bits throughout the mousse instead of a velvety smooth finish.
Why is my peanut butter mixture lumpy?
The cream cheese wasn't soft enough. Beating fully softened cheese with the sweetener is essential to avoid "cheese pebbles" in the base.
How to store these desserts to keep them fresh?
Cover the glasses with plastic wrap or lids. Keep them in the refrigerator for up to 4 days.
Is it true that freezing ruins the texture of the mousse?
No, this is a common misconception. It simply becomes more like a frozen parfait; just thaw in the fridge for 30 minutes to regain the original mouthfeel.
How to get the mousse to set properly?
Refrigerate for at least 2 hours. This allows the fat-based ingredients to stabilize and firm up for a cleaner scoop.
How to melt the sugar-free chocolate without burning it?
Microwave in 20-second bursts. Stir between each interval and mix with coconut oil for a smooth, pourable drizzle.
Can I use a different sugar-free sweetener?
Yes, either powdered erythritol or monk fruit work perfectly. If you enjoyed balancing sweeteners in this keto treat, see how we manage flavor profiles in our cinnamon sugar sourdough.
sugar free Peanut Butter Heaven