Quick Crunchy Dill Pickles: Shatter Crisp
- Time: 15 min active + 24 hours chilling
- Flavor/Texture Hook: Shatter crisp, tangy, and garlic forward
- Perfect for: Burger toppers, charcuterie boards, or late night snacking
- Why Most Recipes Fail
- The Basic Recipe Specs
- Core Ingredient Breakdown
- Must Have Kitchen Gear
- Step-by-Step Brining Process
- Fixing Common Pickle Problems
- Troubleshooting Common Issues
- Custom Twists and Swaps
- Freshness and Storage Tips
- The Best Serving Ideas
- Critical Sodium Level
- Recipe FAQs
- 📝 Recipe Card
The sound of a truly great pickle isn't a soft crunch, it's a snap that you can actually hear across the room. Most people think you need to spend weeks fermenting in a dark cellar or use heavy duty canning equipment to get that result, but that's just not true.
Forget the idea that "real" pickles have to be fermented for a month. You can get a professional grade result in your own fridge with a few simple tweaks to how you handle the cucumbers.
I used to think the secret was in the vinegar brand or some fancy salt, but I was wrong. The real trick is in the prep. If you just throw cucumbers in brine, you get something that's okay, but not something that makes you want to eat the whole jar in one sitting.
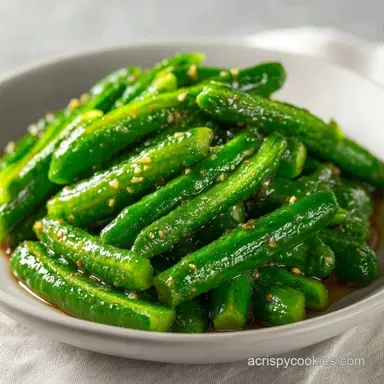
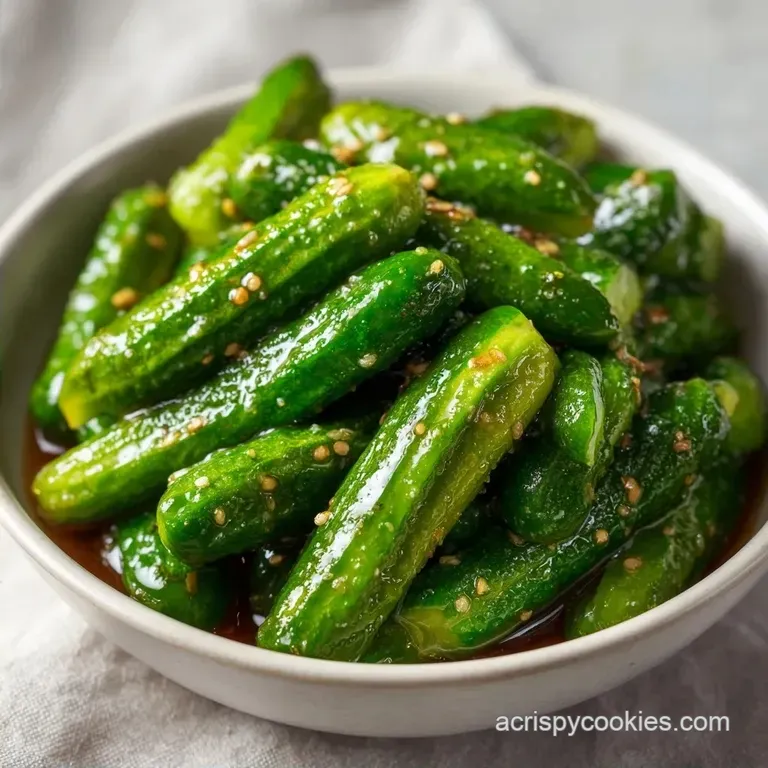
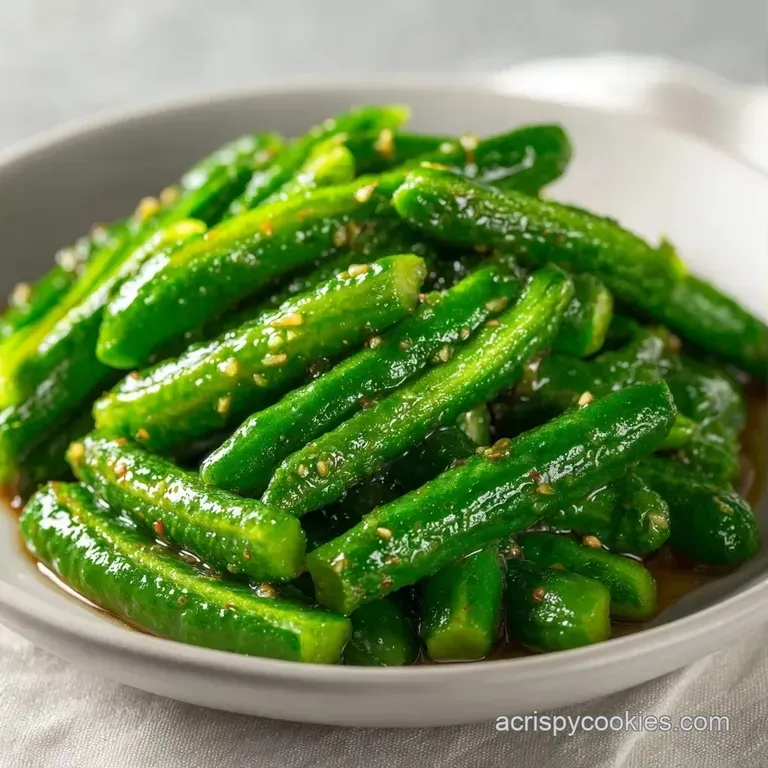
These Dill Pickles are built on the contrast between the cold, fresh snap of the veggie and the hot, acidic punch of the brine.
We're going for a flavor profile that's bright and sharp, but not so acidic that it burns your throat. It's a balance of salt, acid, and the earthy punch of fresh dill. Trust me on this, once you taste the difference between a store-bought jar and these, you'll never go back.
Why Most Recipes Fail
The biggest mistake people make is ignoring the water content inside the cucumber. Cucumbers are mostly water, and if that water stays inside when the brine hits, it dilutes the flavor and softens the cell walls. This is why so many homemade versions end up tasting like salty water and have the texture of a wet sponge.
By sweating the cucumbers first, we pull out the excess moisture, making room for the brine to penetrate deep into the core.
Another common slip up is the temperature of the brine. Some people boil the life out of their cucumbers, which essentially cooks them. We want the brine hot enough to dissolve the sugar and salt, but we aren't trying to make a soup.
The contrast of the warm liquid hitting the cold, salted cucumbers creates a specific tension in the skin that helps maintain that shatter crisp bite.
Finally,, a lot of recipes skimp on the garlic or use dried dill. Dried dill tastes like dust; fresh dill tastes like a garden. To get that "copycat" restaurant quality, you need the pungent, raw hit of smashed garlic and the bright, grassy notes of fresh herbs.
It's these small, concrete details that separate a mediocre pickle from a great one.
Flavor Map
- Top Note: Sharp, clean acidity from the distilled vinegar.
- Heart Note: Grassy, citrusy brightness from the fresh dill.
- Base Note: Pungent, savory depth from the smashed garlic.
- Finish: A clean, salty snap that cleanses the palate.
| Feature | Fridge Method (This Recipe) | Traditional Ferment |
|---|---|---|
| Time to Eat | 24 hours | 2-4 weeks |
| Texture | Shatter crisp | Softer, more complex |
| Flavor | Bright and tangy | Funky and sour |
The Basic Recipe Specs
When you're making Dill Pickles, precision is your best friend. You don't need a lab, but you do need to stick to the timing. If you let the cucumbers sweat for an hour instead of 15 minutes, they'll lose too much structure and become limp.
If you don't wait the full 24 hours in the fridge, the brine won't have fully penetrated the center of the spear, leaving you with a bland middle.
- 1. Sweating Time
- Exactly 15 minutes. No more, no less.
- 2. Brine Temp
- Remove from heat the second it reaches a light simmer.
- 3. Cold Cure
- A minimum of 24 hours in the refrigerator.
According to guidelines from Serious Eats, using the right type of salt is vital because table salt often contains anti caking agents that can make your brine cloudy. That's why we use kosher salt for sweating and pickling salt for the brine, ensuring the liquid stays clear and the flavor remains pure.
Core Ingredient Breakdown
The magic happens when the chemistry of the salt and vinegar interacts with the plant fibers of the cucumber. It's a simple process of osmosis and acidification.
- Osmosis
- Salt draws water out of the cucumber cells, which prevents the brine from becoming diluted.
- Acidification
- Vinegar lowers the pH level, which preserves the cucumber and gives it that signature tang.
- Pectin Support
- The combination of cold temperatures and salt helps the pectin in the cucumber walls stay rigid.
- Aromatic Infusion
- Warm brine opens up the pores of the garlic and peppercorns, allowing their oils to bleed into the liquid.
| Ingredient | Science Role | Pro Secret |
|---|---|---|
| Kirby Cucumber | Structural Base | Thicker skins hold the crunch better than English cucumbers. |
| Distilled Vinegar | Acid Preservative | Use 5% acidity for the most consistent tang. |
| Kosher Salt | Moisture Extractor | The larger grain prevents over salting during the sweat. |
| Fresh Dill | Primary Aromatic | Roughly chop it to release more oils without bruising. |
Must Have Kitchen Gear
You don't need a fancy setup for these Dill Pickles, but a few specific tools make the process a lot smoother. First, get some wide mouth pint jars. Trying to cram cucumber spears into narrow mouth jars is a recipe for frustration and bruised vegetables.
Wide mouths let you pack the cucumbers tightly, which is key to keeping them submerged.
A stainless steel saucepan is best for the brine because it doesn't react with the vinegar. If you use an aluminum pot, you might notice a metallic taste in your finished product. Also, a colander is non negotiable for the sweating step.
You need the cucumbers to drain freely so they aren't sitting in a pool of their own brine, which can make them soggy.
Finally, make sure your jars are scrubbed clean. Since we aren't doing a full boiling water canning process, we're relying on the refrigerator and the acidity of the vinegar to keep things fresh. A clean environment ensures your Dill Pickles stay crisp and safe for weeks.
Step-by-step Brining Process
Right then, let's get into the actual making of these. Follow these steps closely, and you'll get that perfect snap every time.
- Prep the cucumbers. Slice 1 lb of Kirby or Persian cucumbers into spears or rounds. Note: Spears provide more surface area for the crunch.
- Sweat the produce. Toss cucumbers in a colander with 1 tbsp kosher salt and let sit for 15 minutes. until they look slightly glossy and release water.
- Rinse quickly. Run cold water over the cucumbers to remove excess surface salt. Note: Do this fast so you don't wash away the internal seasoning.
- Simmer the brine. Combine 1 cup white distilled vinegar, 1 cup filtered water, 1 tbsp cane sugar, and 1 tbsp pickling salt in a saucepan. Bring to a light simmer over medium heat, stirring until the sugar and salt disappear, then remove from heat immediately.
- Prep the jars. Divide 4 smashed garlic cloves, 1 tsp black peppercorns, 1 tsp mustard seeds, and 1/2 cup chopped fresh dill evenly between two wide mouth pint jars.
- Pack the jars. Pack the cucumbers tightly into the jars, leaving 1/2 inch of headspace. Note: Tight packing prevents them from floating.
- Fill with liquid. Pour the warm brine over the cucumbers until they are fully submerged.
- Remove air. Tap the jars gently on the counter to release air bubbles, seal tightly, and cool to room temperature.
- The cold cure. Place the jars in the fridge for 24 hours. until the flavors have fully melded.
Fixing Common Pickle Problems
Even the best of us hit a snag now and then. Usually, if something goes wrong with your Dill Pickles, it comes down to the ingredients or the temperature.
Troubleshooting Common Issues
| Issue | Solution |
|---|---|
| Why Your Pickles Are Mushy | This is the most common complaint. It usually happens because the cucumbers were too warm when the brine was added, or you used a cucumber variety with too many seeds, like a slicing cucumber. |
| Why The Brine Is Cloudy | Cloudy brine is usually caused by using tap water with high mineral content or using salt with additives. Filtered water is the way to go here. |
| Why The Flavor Is Bland | If your pickles taste like vinegar but have no "soul," you probably didn't smash your garlic enough or your dill wasn't fresh. |
Custom Twists and Swaps
Once you've nailed the basic Dill Pickles, you can start playing with the flavor profile. If you want a bit more heat, add 1/2 tsp of red pepper flakes to each jar. It doesn't make them "spicy" in a painful way, but it adds a warm back note that cuts through the acidity.
For those who prefer a slightly sweeter vibe, you can increase the cane sugar to 2 tbsp. This creates a "bread and butter" hybrid that's still savory but has a softer edge. If you're out of white vinegar, apple cider vinegar works, but it will change the color to a slightly more golden hue and add a fruity sweetness.
If you're looking for something faster, you might want to try Pickles in 20 Minutes recipe, which is great for a quick craving. But for the absolute best texture, the 24 hour soak is the gold standard.
Decision Shortcut
- Want more heat? Add red pepper flakes.
- Want a softer tang? Use apple cider vinegar.
- Want a sweeter finish? Add an extra tablespoon of sugar.
Freshness and Storage Tips
Because these are refrigerator pickles and not canned, they don't last forever, but they'll stay great for a while. Keep your Dill Pickles in the coldest part of your fridge, usually the back of the middle shelf. They will stay shatter crisp for about 3 to 4 weeks.
Always use a clean fork to pull pickles out of the jar. If you use your fingers, you introduce bacteria that can make the brine cloudy and soften the cucumbers faster. If you notice the brine getting cloudy after a few weeks, it's time to toss them.
Don't waste the leftover brine! It's liquid gold. Use it as a marinade for grilled chicken or whisk it into some mayo and sour cream for a zesty tartar sauce. If you're into quick snacks, you can use the leftover liquid to make Quick Garlic Fridge Pickles by adding a few fresh cucumber slices to the remaining brine.
The Best Serving Ideas
The beauty of these Dill Pickles is their versatility. Obviously, they are the king of the burger world. A thick, cold spear next to a juicy cheeseburger creates a perfect contrast of hot and cold, fatty and acidic.
For a more sophisticated spread, slice them into thin coins and add them to a charcuterie board with sharp cheddar, salty salami, and some grainy mustard. The acidity of the pickle cleanses the palate between the rich meats and cheeses.
If you're feeling adventurous, chop them up finely and fold them into a potato salad or a tuna melt. The punchy flavor of the garlic and dill cuts through the creaminess of the mayo, making the whole dish feel brighter and fresher.
Trust me, a handful of these chopped up in a turkey sandwich is a total game changer for your lunch game.
Critical Sodium Level
3200 mg 3,200 mg of sodium per serving (139% 139% of daily value)
The American Heart Association recommends a limit of 2,300 mg of sodium per day for most adults to reduce the risk of cardiovascular disease.
Tips to Reduce Sodium in Your Pickles
-
Reduce Pickling Salt-30%
Cut the pickling salt amount by half or use a potassium based salt substitute to drastically lower the sodium content of the brine.
-
Limit Kosher Salt-30%
Significantly reduce the kosher salt used for curing; try using only a small pinch to maintain the crunch without the excess sodium.
-
Increase Vinegar Ratio-15%
Increase the amount of white distilled vinegar to enhance the acidity and 'tang,' which helps compensate for the reduction in salt.
-
Boost Fresh Aromatics
Double the amount of fresh dill and smashed garlic to provide a punchier flavor profile that masks the lower salt levels.
Recipe FAQs
How to make my dill pickles crunchy?
Toss them in kosher salt and let them sweat for 15 minutes. This process draws out excess moisture, which ensures the brine doesn't dilute and the texture remains firm.
Do homemade dill pickles in vinegar need to be refrigerated?
Yes, always keep them chilled. Since these are refrigerator pickles and not processed in a water bath canner, they must stay refrigerated to remain safe and crisp.
Are pickles okay for diabetics?
Yes, in moderation. This recipe uses a minimal amount of cane sugar, which can be omitted entirely without affecting the preservation process.
How to make simple dill pickles?
Slice cucumbers, sweat them with salt, and submerge them in a warm brine of vinegar, water, sugar, and salt. Pack them tightly into jars with garlic and dill for the best flavor.
What is the secret to crispy pickles?
Use Kirby or Persian cucumbers. These varieties have firmer walls and fewer seeds than standard slicing cucumbers, which prevents them from becoming mushy.
How to make sweet pickles without canning?
Increase the cane sugar in the brine and store the jars in the refrigerator. This creates a sweet tart profile similar to the one used in our pickled veggie mix.
Is it true that any water works for the brine without affecting clarity?
No, this is a common misconception. Tap water often contains minerals that can make the brine look cloudy, so filtered water is the best choice for a crystal clear result.
Crunchy Dill Pickles